Refer to the video to know about Data Mapping.
Fields and Descriptions
Client Maintenance / Client Data Mappings / Mapping List View
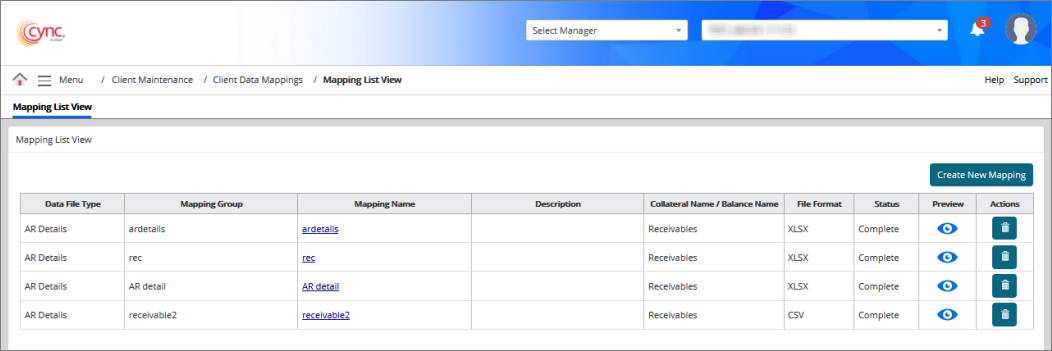
Mapping List View
The client mapping feature allows you to map the data of the file to the application. These data are mapped to help you process the BBCs and Factoring invoices.
|
Table of Contents |
Navigation: Client Maintenance → Client Data Mappings → Mapping List View
Refer to the screenshot:
Refer to the video to know about Data Mapping.
Fields and Descriptions
|
Fields |
Descriptions |
|
Data File Type |
Specifies the data file type of the mapped file. |
|
Mapping Group |
Specifies the name of the mapping group. You can create a mapping group and map the multiple files with the same data file type, format, and collateral name. For more information refer to Grouping and Mapping multiple files. |
|
Mapping Name |
Specifies the mapping name. |
|
Collateral Name/ Balance Name |
Specifies the collateral name. |
|
File Format |
Specifies the format of the file. |
|
Status |
Specifies the status of the mapping. |
|
Preview |
Click the preview icon to view or download the data file. You can review the details of each mapped file available in the list. |
|
Actions |
The option allows to deleted the mapped data file. |
The file types for ABL are as follows:
The file types for Factoring are as follows:
Mapping can be done in two ways:
The mapping process includes the following steps:
 User can click the Step Navigation Icons to access the respective pages. If user clicks on any step while working on another steps, the changes which are already done will be saved and user will get navigated to the respective page.
![]() The Mapping Name and the Mapping Group Name defined or updated by the user in Step 1 will be displayed in each step of the Mapping as a non-editable field.
The Mapping Name and the Mapping Group Name defined or updated by the user in Step 1 will be displayed in each step of the Mapping as a non-editable field.
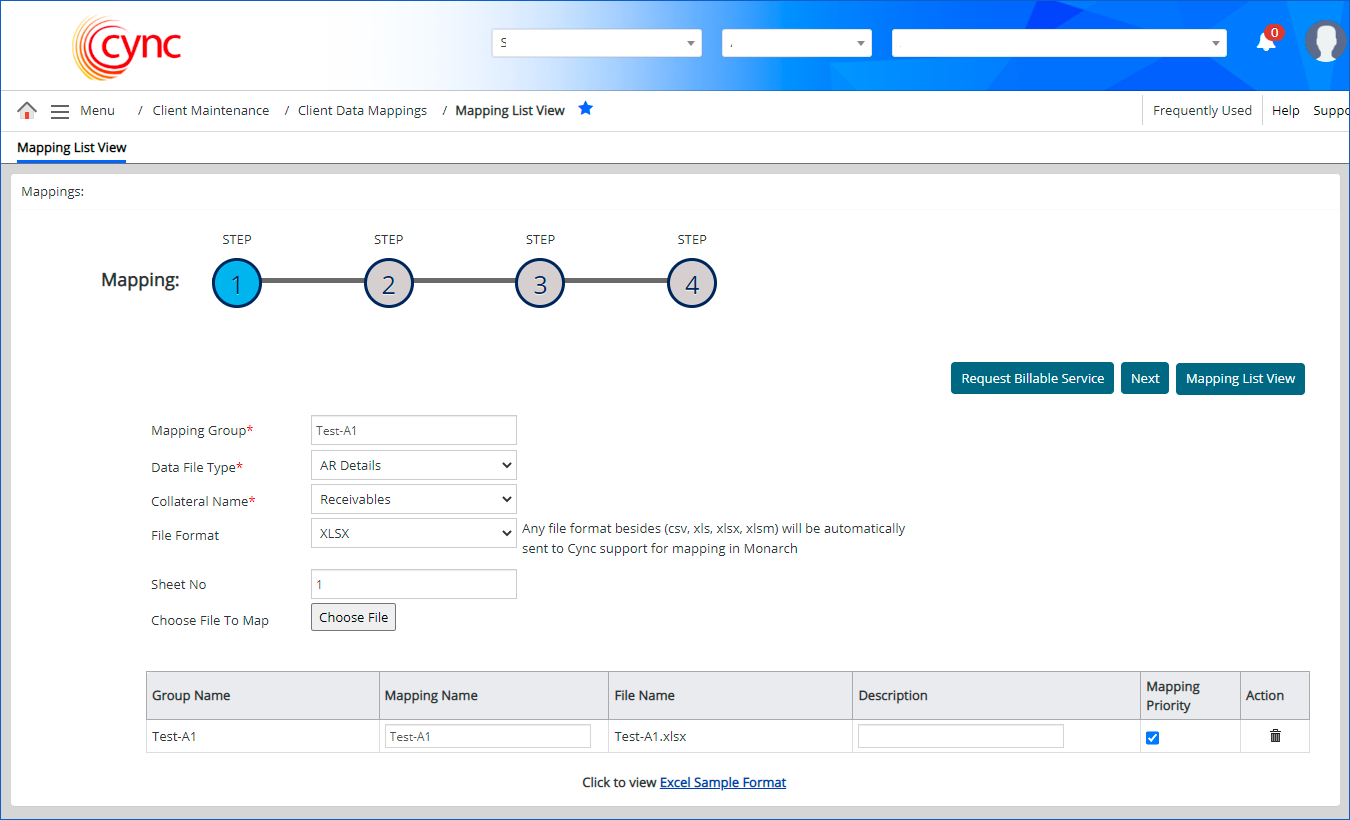
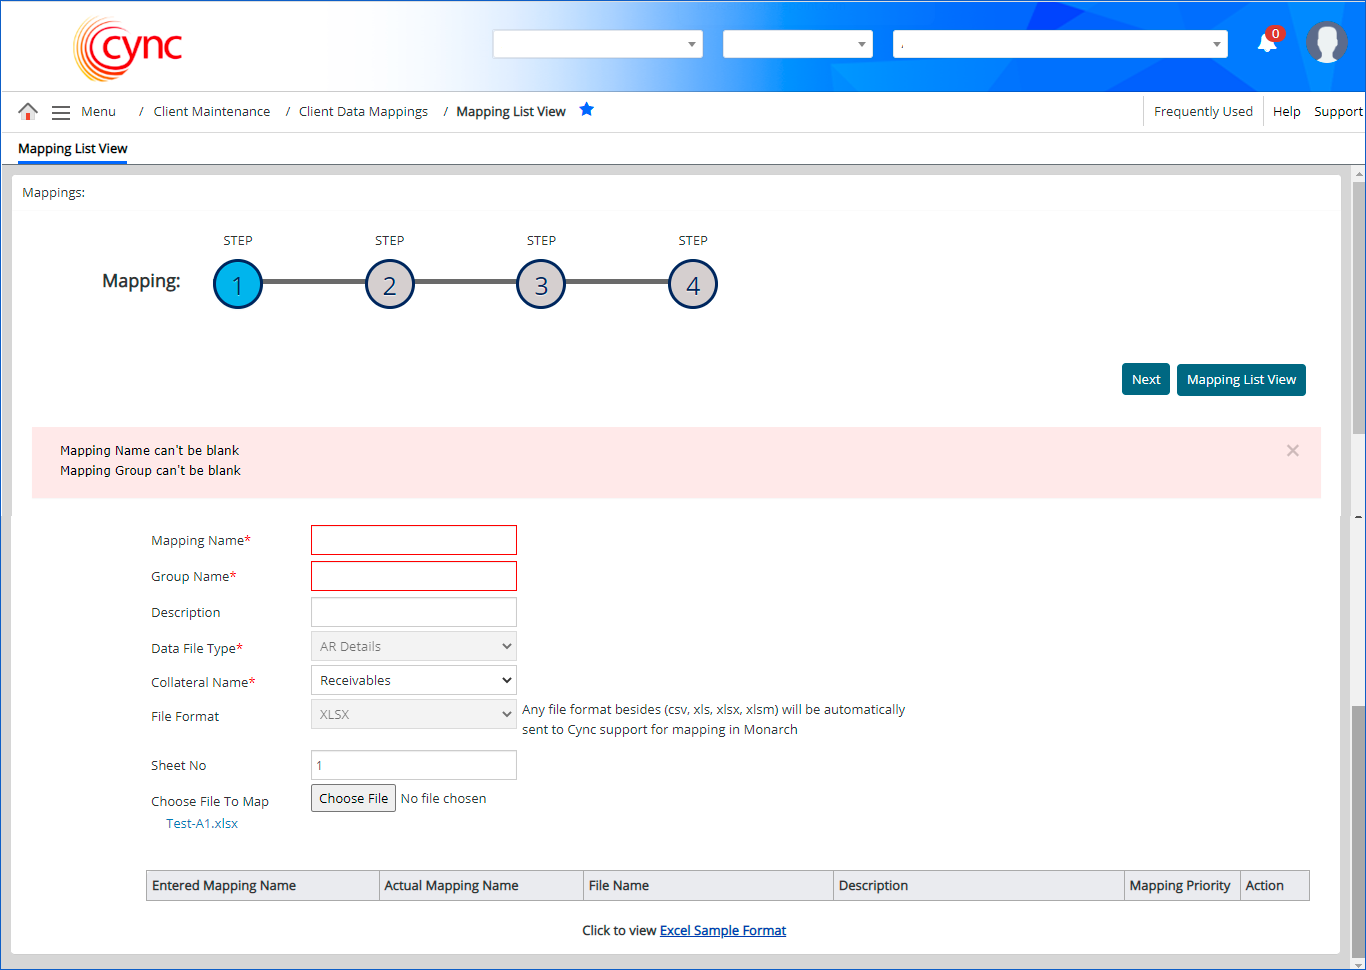
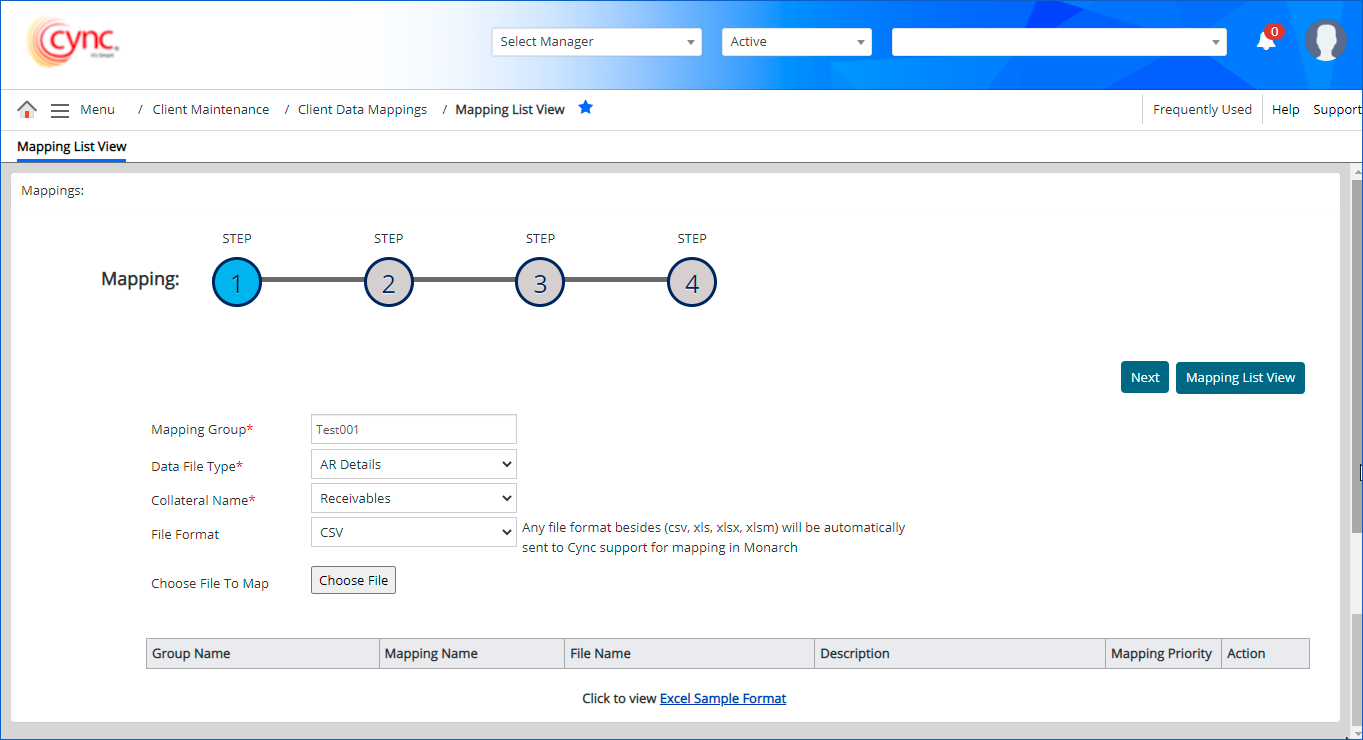
Step 1: File selection
Mapping of data is performed by uploading files. You will choose and upload the file to map. You can map file types to a particular selected client.
This is further classified as
To create a new mapping click the ![]() button.
button.
1. In the Group/ Mapping Name field, enter the group name or the mapping name of the file that you want to map. You can create a group and map multiple files with the same data file type, collateral name, and file format.
2. In the Data File Type field, select the type of data file you are mapping from the dropdown list.
3. In the Collateral Name field, select the type of collateral from the dropdown list.
4. In the File Format field, select the format of the file from the dropdown list.
5. In the Sheet No field, enter the sheet number. For .xls and .xlsx file formats, enter the number for the sheet being exported.
6.In the Choose File to Map field, attach the file you are mapping from your local drive.
The file can have the text or numeric value with embedded URL/hyperlinks in multiple columns. Upon completion of data mapping process, the system displays only the text or numeric value (including decimal point) from the uploaded file without displaying any hyperlinks/embedded URL in Step 4 of Mapping page.
1. Upon choosing the file to map, the system shows the details of the mapped file. You can add the description, mapping priority for the mapped file or delete the same.
2. Click ![]() . You are redirected to step 2 or the mapping process.
. You are redirected to step 2 or the mapping process.
Refer to the screenshot:
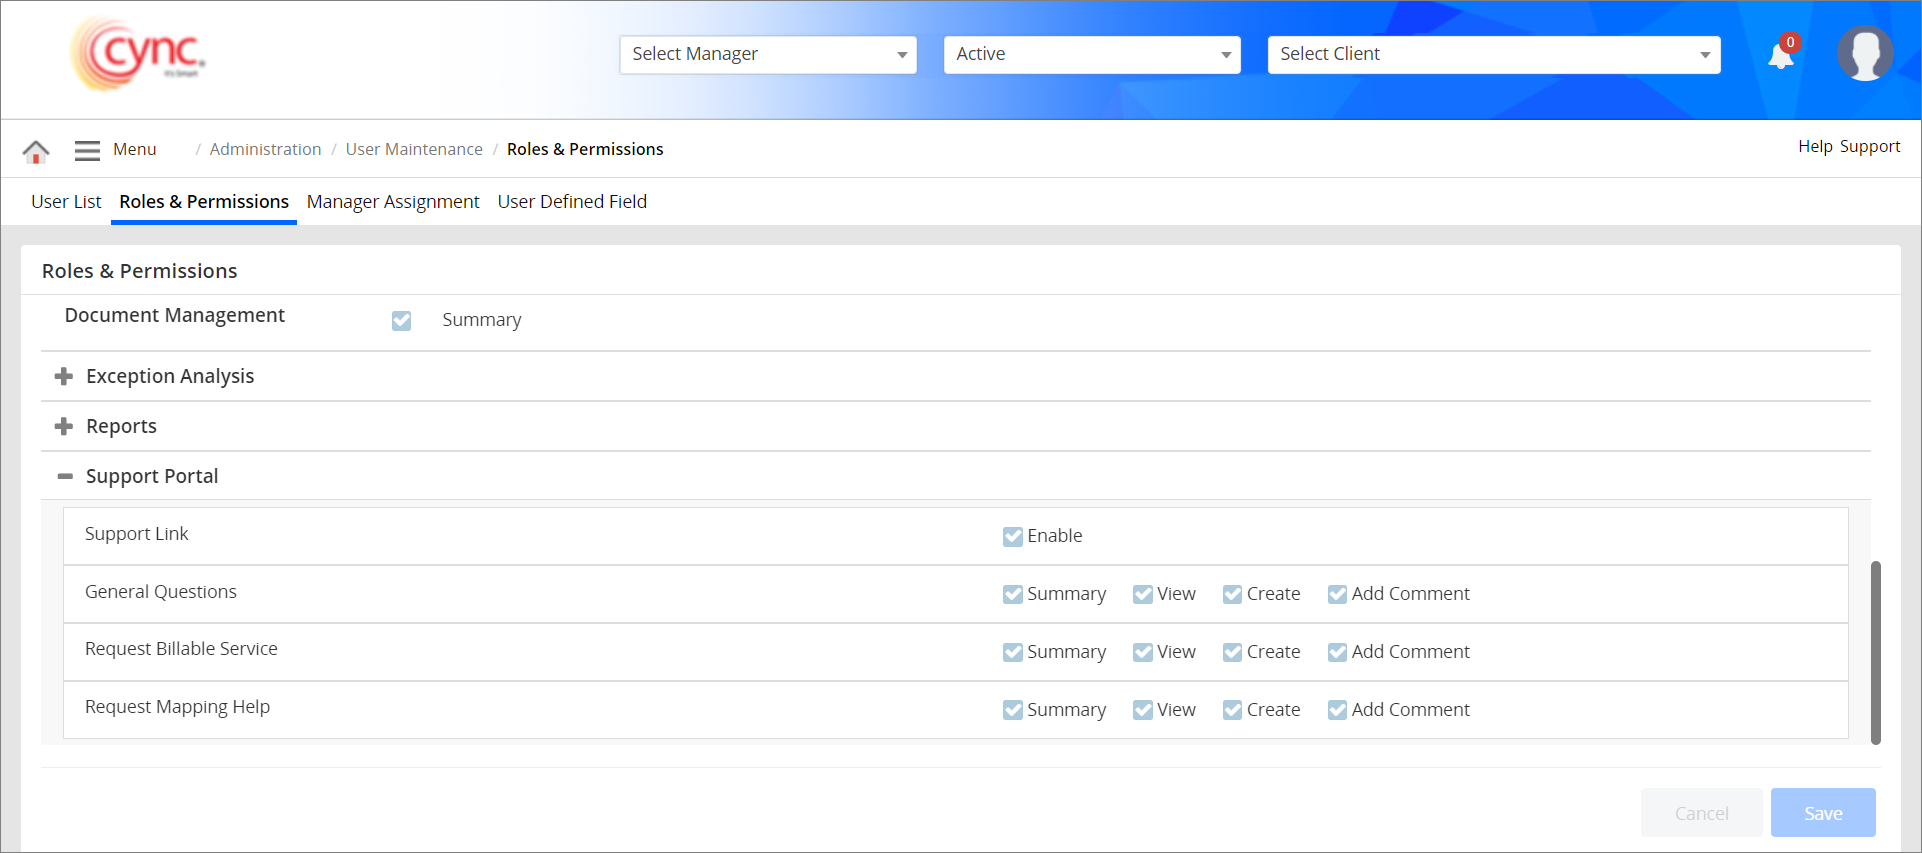
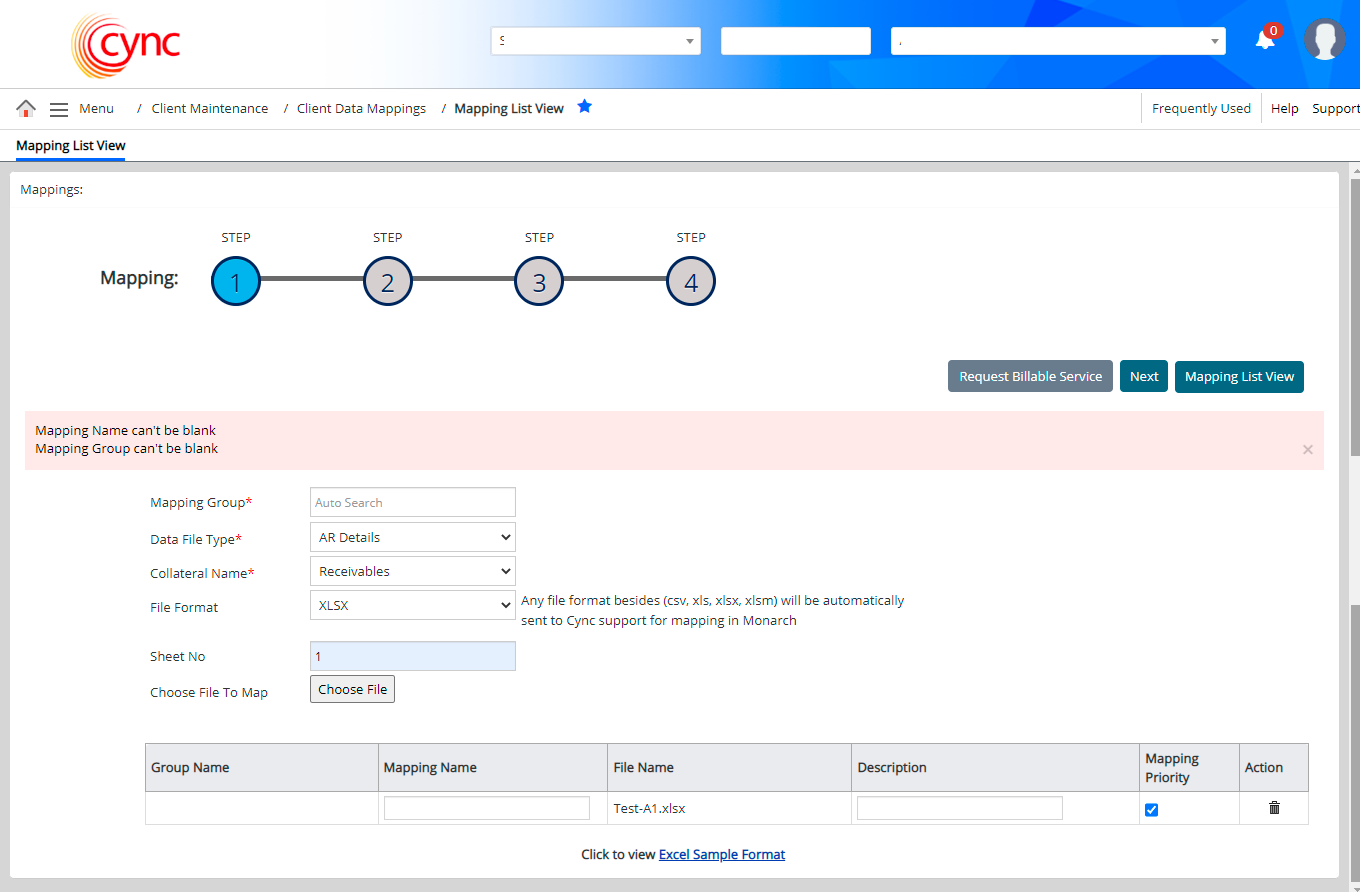
The system displays the  button based on the permissions provided to the corresponding role under Roles & PermissionsRoles & Permissions page. By default, the Request Billable Service option would be checked ON for the Administrator Role.
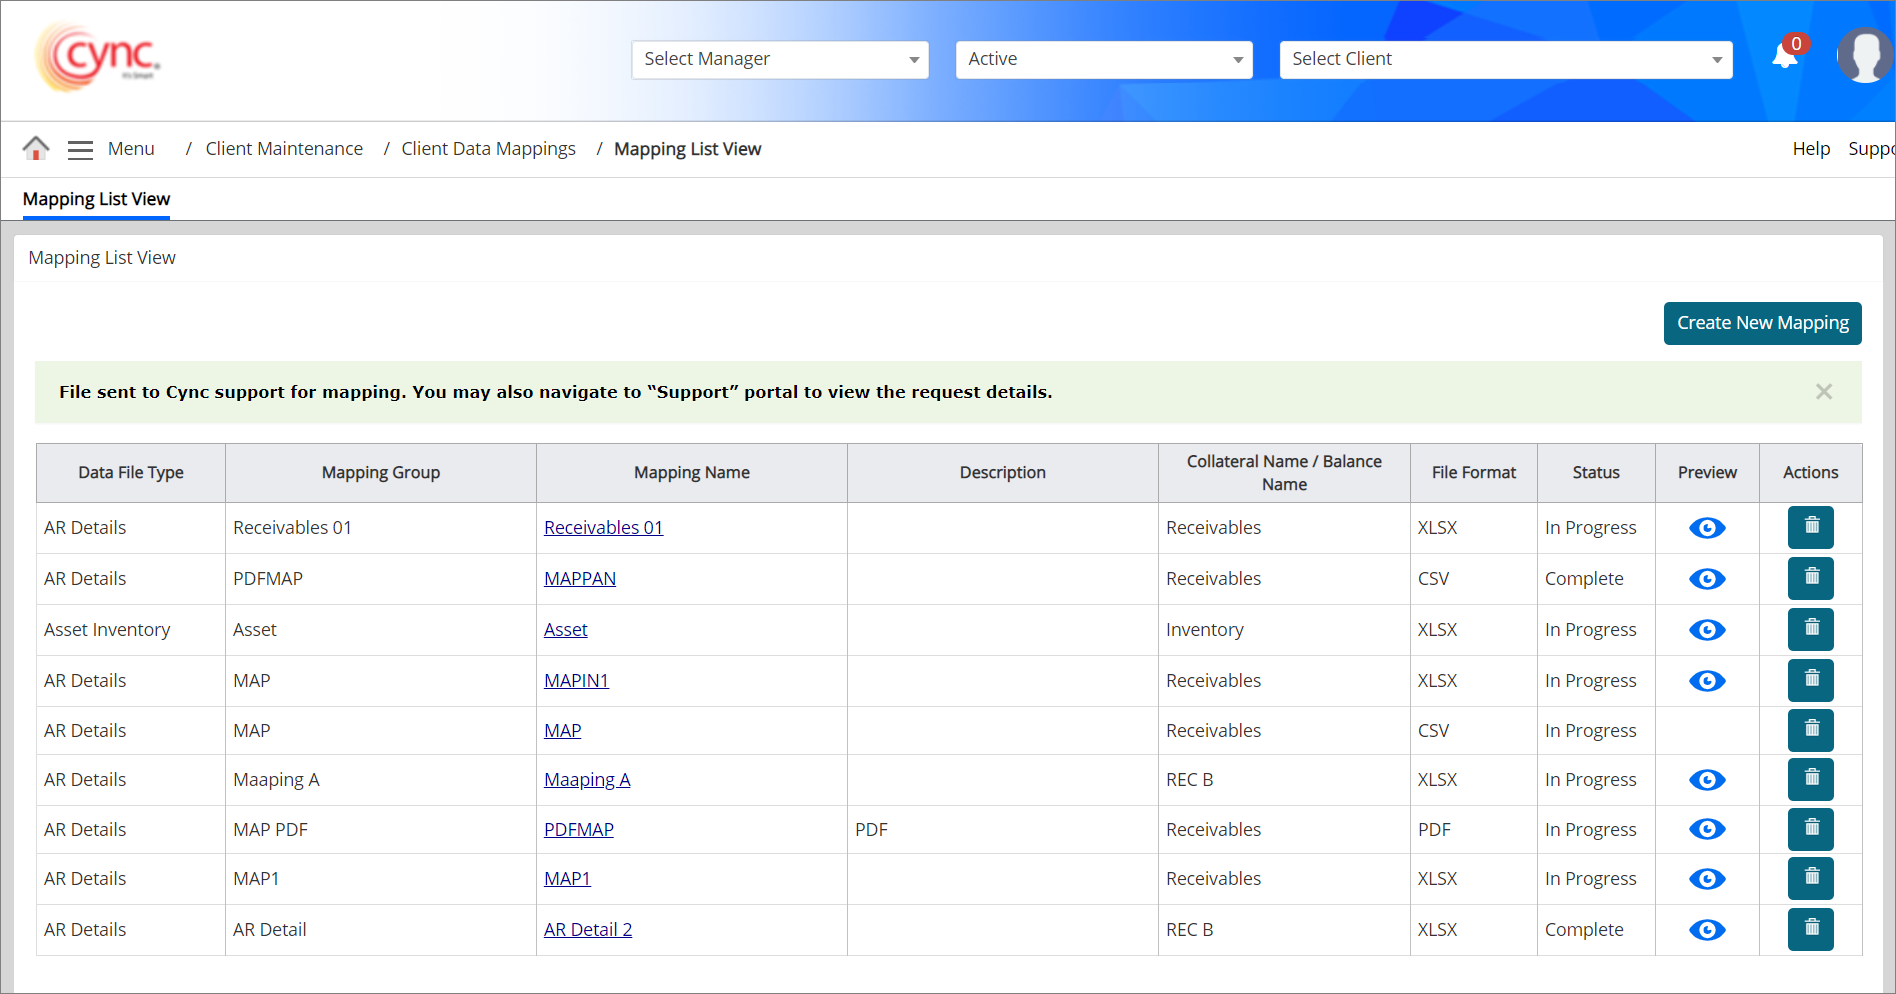
On clicking the ![]() button, the system redirects the user to Mapping List View page and a message “File sent to Cync support for mapping. You may also navigate to “Support” portal to view the request details.” appears. The status will be shown as In Progress for the respective mapping data. The ticket will be created in JIRA in the CSSP for Production proje ct. The reference of the created Jira ticket will be displayed in Support Portal page.
button, the system redirects the user to Mapping List View page and a message “File sent to Cync support for mapping. You may also navigate to “Support” portal to view the request details.” appears. The status will be shown as In Progress for the respective mapping data. The ticket will be created in JIRA in the CSSP for Production proje ct. The reference of the created Jira ticket will be displayed in Support Portal page.
The option is available once the user uploads a file having any of the following formats such as csv, xls, xlsx, xlsm.
Refer to the screenshot:
If the user clicks on Mapping Name to edit the mapping details, the system redirects the user to Step 1 of mapping with “Request Billable Service” link in disabled state and hovering on the disabled link displays the text viz “A request is already raised for the mapping. Please navigate to support portal to view details of the request ” as a tool tip.
Request Billable Service button will be hidden If the mapping status is Complete.
The Country code and Term code are User defined fields. It is available only when the user maps the relevant data under User Defined Field page. You can upload the file with country code and term codes.
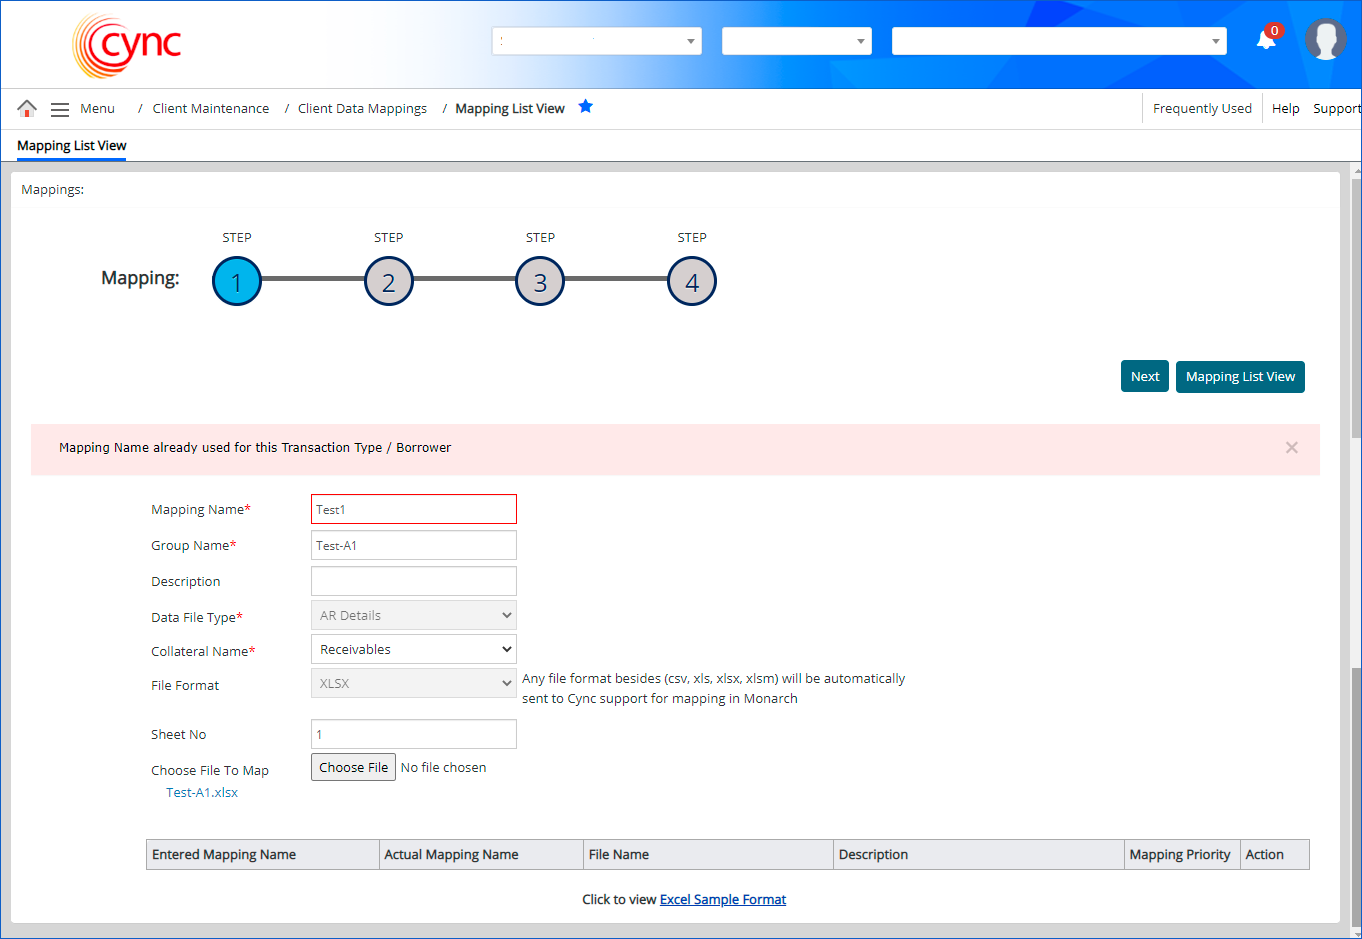
If user enters a duplicate Mapping Name for same file formats or different file formats, then the system shows an error notification.
Refer to the screenshot:
If the Mapping Group field is not filled out while creating a new mapping, then the system shows an error notification.
Refer to the screenshot:
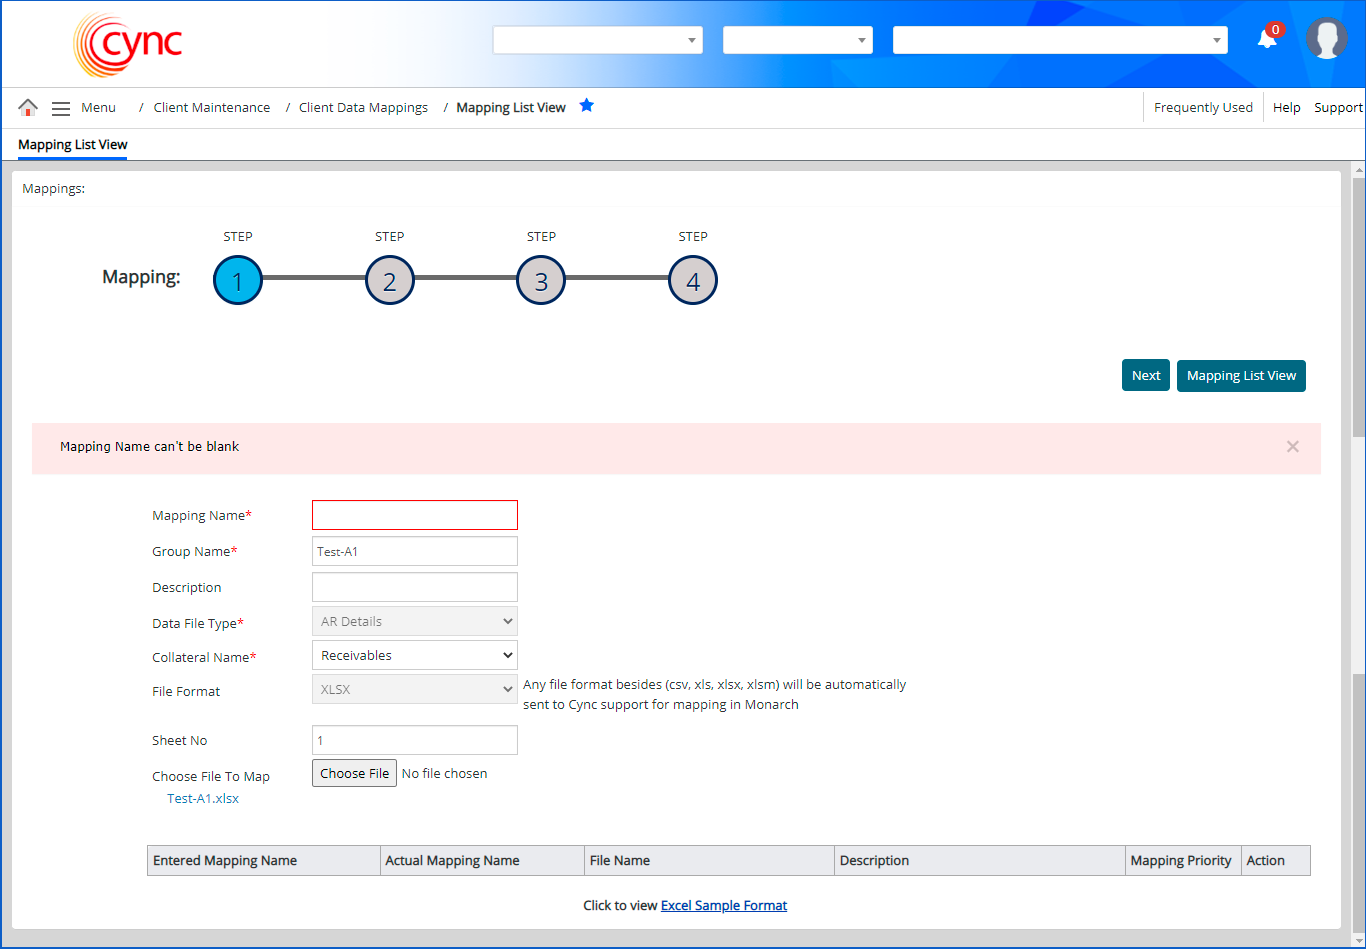
If Mapping Name is not filled out while editing the existing data mapping, then the system shows an error notification.
Refer to the screenshot:
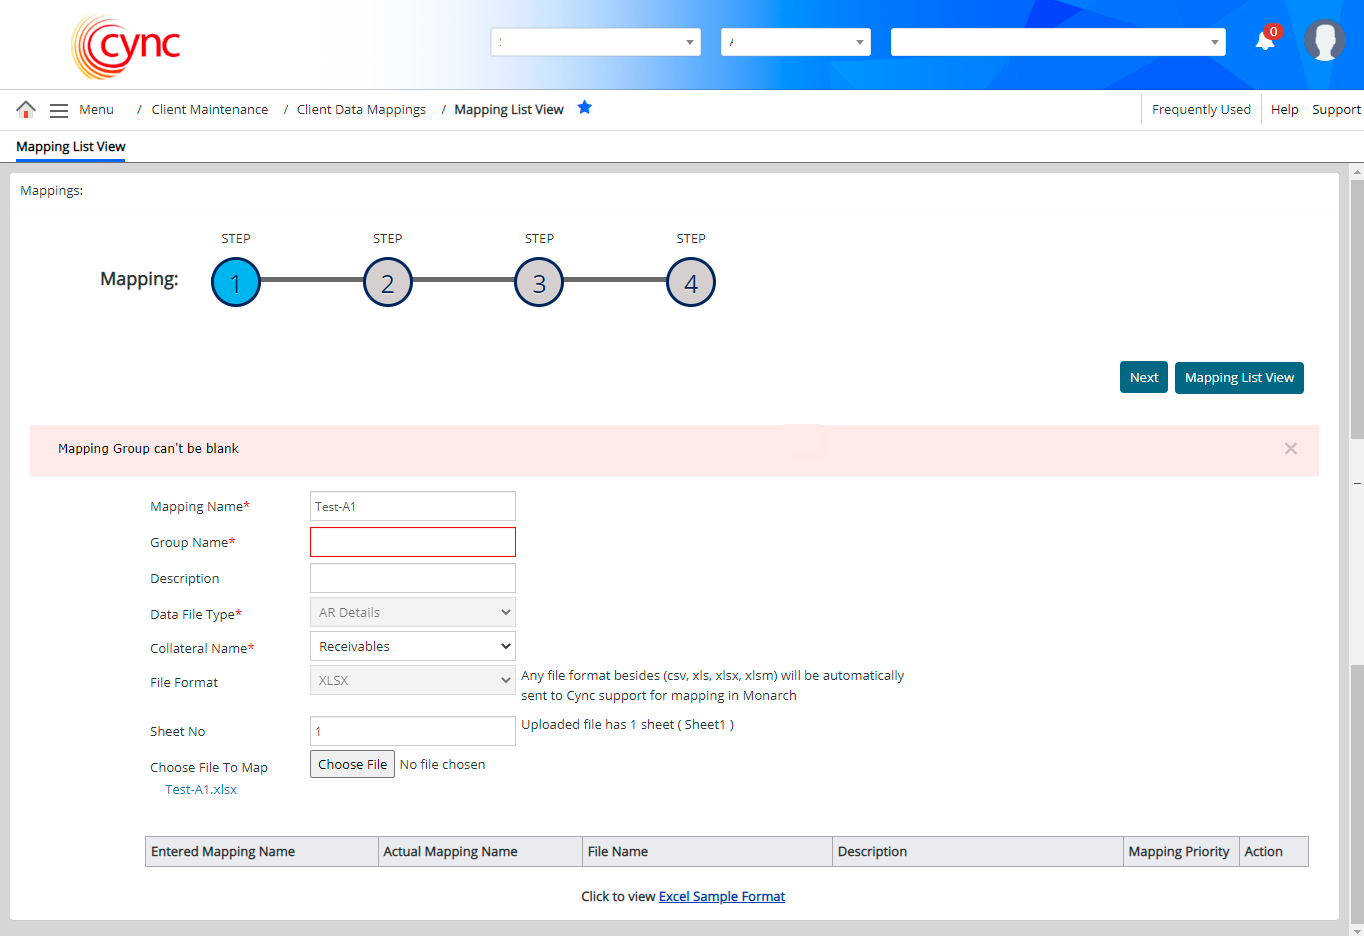
If the Group Name is not filled out while editing the existing data mapping, then the system shows an error notification.
Refer to the screenshot:
If the Mapping Name and Group Name are not filled out while editing the existing data mapping, then the system shows an error notification.
Refer to the screenshot:
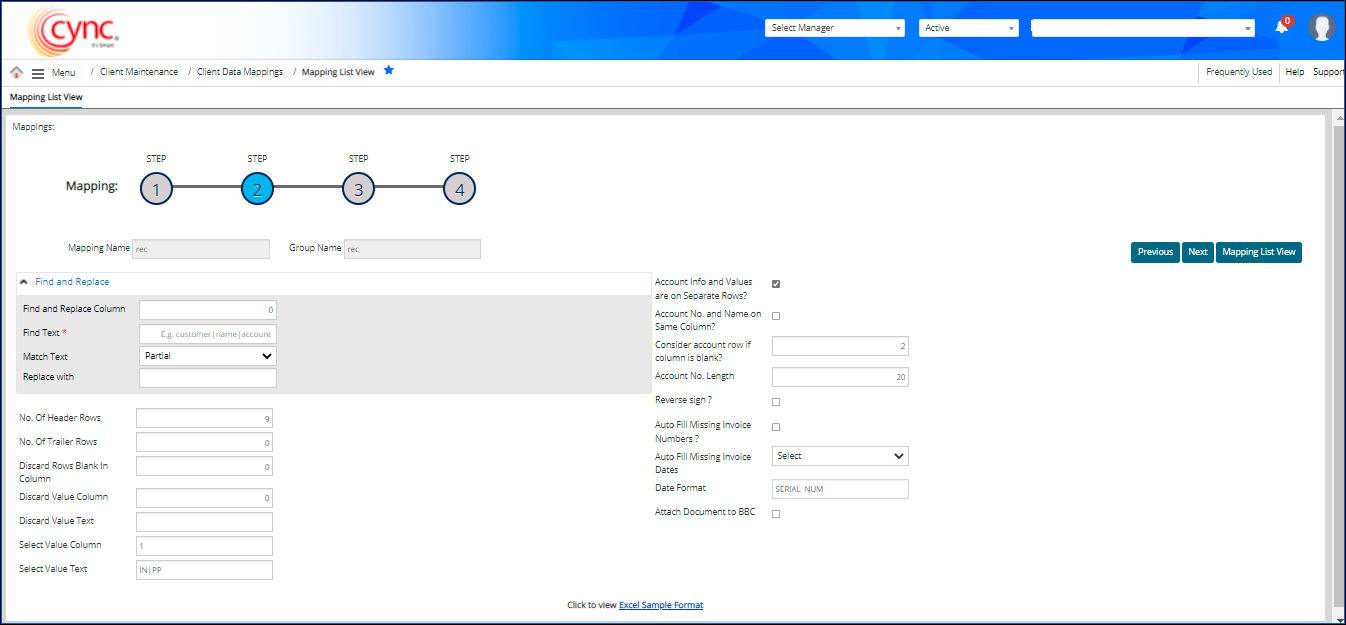
Step 2: Mapping
The actual mapping screen specifies which rows on the Borrower’s reports Cync should use to determine collateral values going forward. What you see on this screen will vary by the type of collateral you selected in Step 1.
Example: in the screenshot below, the collateral type that was selected was ‘AR Details’. In order for you to complete the mapping, these fields must be defined so that you enter the correct response.
Note, the mapping will not be successful if these fields are not filled out correctly.
Refer to the screenshot:
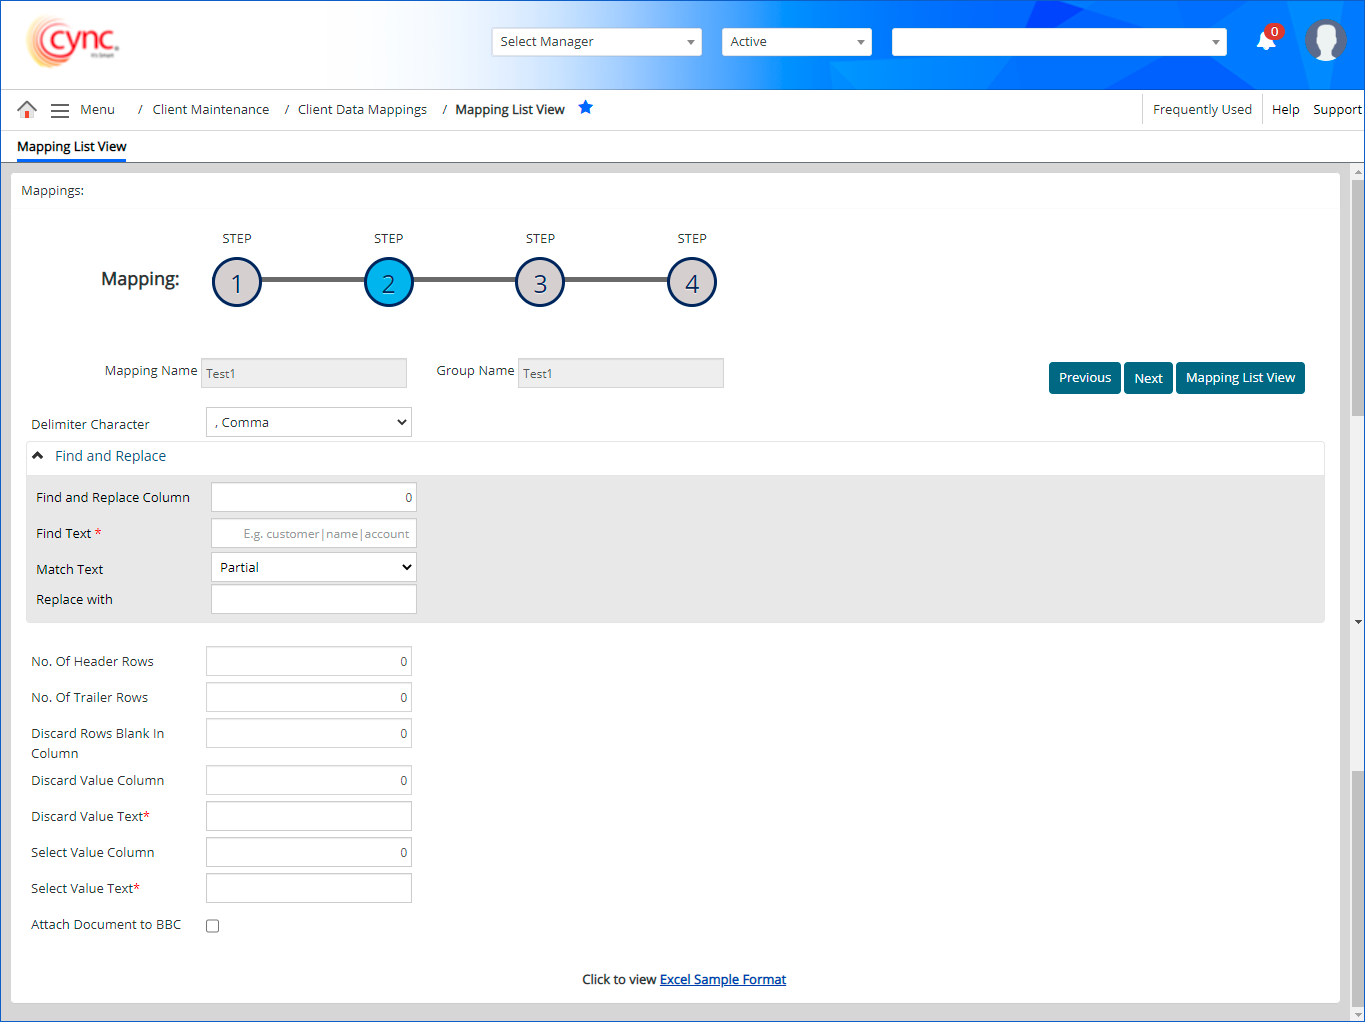
Steps to map the rows and columns
This step allows you to identify the data that you need to map. You need to map the data as per their occurrence in the rows and columns in the spreadsheet.
1. In the Delimiter Character field, select the type of delimiter character from the dropdown list (for example, comma, hyphen, semicolon).
2. Find and replace drop-down : If the data file includes specific characters or unwanted text. You may find and then replace the same before uploading the file. To replace unwanted characters follow these steps:
![]() You can find and replace multiple characters with new characters using pipeline separation (|). You can review the replaced text under Data Review.
You can find and replace multiple characters with new characters using pipeline separation (|). You can review the replaced text under Data Review.
3. In the No. of Header Rows field, count all rows at the beginning of the spreadsheet that do not contain real invoice data and enter the total in this field.
4. In the No. of Trailer Rows field, count all rows at the end of the spreadsheet do not contain real invoice data and enter the total in this field.
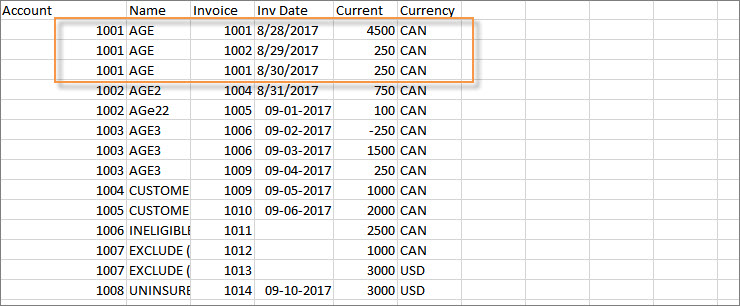
5. In the Discard Row Blank in Column, enter the data that contain data that is not required. For example, the total sum of invoice amount which is automatically calculated by Cync. Hence, we can avoid this data. Notice that this row contains some blank spaces so identify one of the columns with a blank space, e.g., column ‘E’ or ‘5’ (because E is the 5th column).
6. In the Discard Value Column field, if the rows needed to be excluded that contains column headers, identify the column number with the header to be excluded and enter the number on this line.
7. In the Discard Value Text field, if you entered a value in the Discard Value Column then enter partial text that identifies the data found in that field.
8. In the Select Value Column field, instead of excluding something from the mapping, you can identify what should be included by filling in this field and the select value text field. So if you want to include column headers, enter the column number where the header information is found.
9. In the Select Value Text field, if you entered a value in the select column value field then enter partial text that identifies the data found in that field.
10. In the Account Info and Values are on Separate Rows? field, select the checkbox to map the account information and values on separate rows. This is applicable for all the mapping types such as AR Details, AP Details, AR Summary, AP Summary and Cash Receipts.
11. In the Account No and Name on Same Column? field, select the checkbox to map the account number and account name in the same column.
12. In the Consider account row if column is blank field, enter the order of the account number and account name row, select a column that is blank in that row but not empty in the invoice or aging detail row. Example column 2(B) or 3(C) could work for the example below.
13. In the Account No. Length field, enter the number of characters you would like Cync to use when auto generating an account number for you or use the default.
14. In the Reverse sign field, select the checkbox if you want to reverse the sign of amount or bucket column values in spreadsheet.
15. In the Auto Fill Missing Invoice Numbers field, select the checkbox if the spreadsheet does not include the invoice numbers and you want Cync to auto-generate the invoice number.
16. In the Auto Fill Missing Invoice Dates dropdown, select the Current or Unreleased BBC Date. If the spreadsheet does not include the invoice dates, then the system automatically fills the missing invoice dates with the current or unreleased BBC Date. You can review the same under Data Review. .
17. In the Date Format field, select the date format as per the mapping file. The default date format is M/D/Y. The supported date formats are MMDDYY, MMMDDYYYY, MMM-DD-YYYY, MMM/DD/YYYY, MMM.DD.YYYY, YYYYMMDD and YY/MM/DD.
18. In the Attach Document to BBC option allows you to attach the file uploaded to BBC Documents page. Select the checkbox to attach the file to BBC Documents page after the file uploads for the respective mapping.
19. Click the ![]() button.
button.
Any file format besides csv, xls, xlsx, xlsm are mapped through a software, named as Monarch. Monarch supports file formats, such as pdf, doc, docx, txt, and supports file up to 30 MB. Click  to send the file to Cync support for mapping in monarch.
Refer to the screenshot:
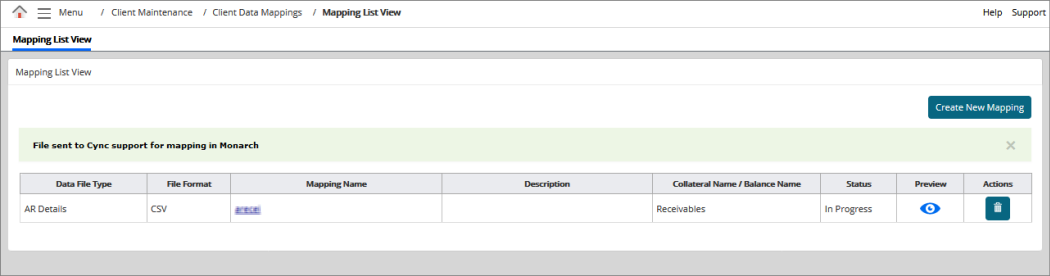
Once the file is mapped by monarch team, you can upload the file in ABL File uploads. The uploaded file data will be displayed in Detail Receivables page or Summary Receivables page or Detail Payables page or Summary Payables page.
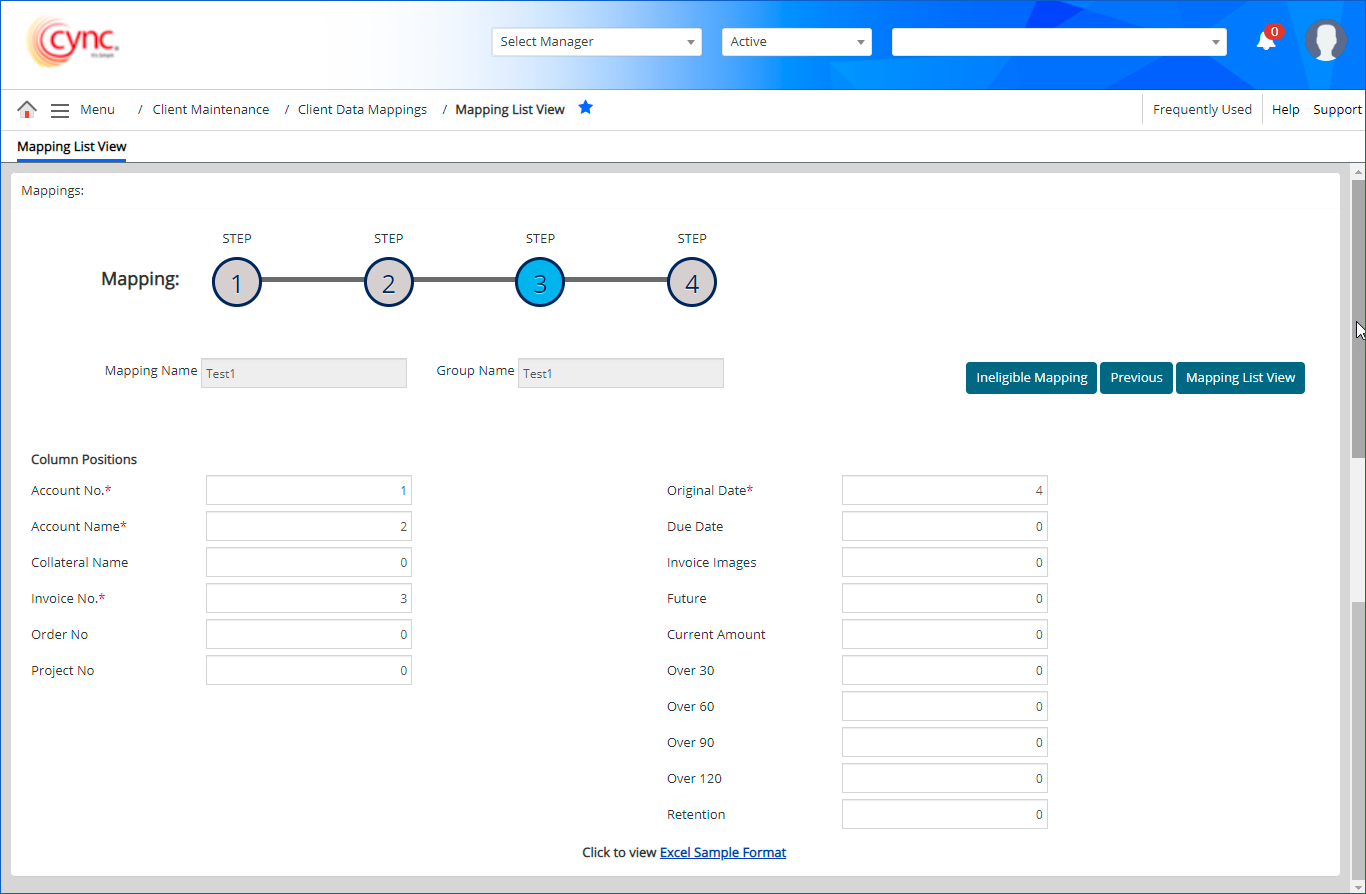
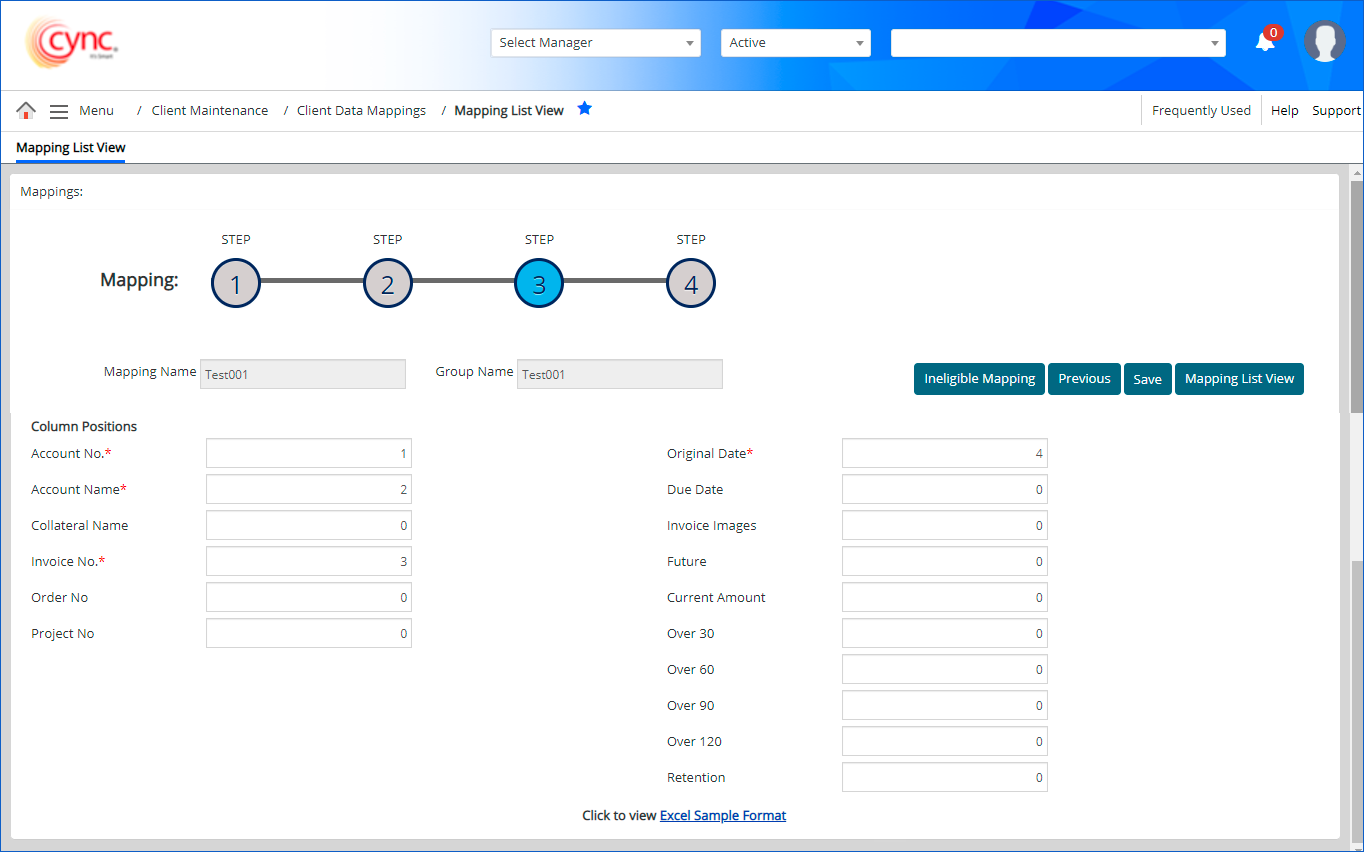
Step 3: Mapping Assignment
This step allows you to label and assign the data. The fields appear on this page based on the collateral type you select. This page shows the column headings that you need to map.
Refer to the screenshot:
Steps to map the columns headers:
1. In the Account No and Account Name field, select the account name. This appears only when Account No and Name on Same Column? checkbox is enabled.
2. In Collateral Name field, select the collateral name from drop-down list.
3. In Invoice No. field, select the invoice number from drop-down list if it is available in the mapped document else leave it blank.
4. In Order No field, select the order number from drop-down list.
5. In the Original Date field, select the original date from the dropdown list, if it is available in the mapped document.
6. In the Due Date field, select the due date from the dropdown list, if it is available in the mapped document or the application auto-fills the Invoice Date with the Due Date.
7. In the Invoice image field, select the invoice image that requires to be mapped from dropdown list, if image is not available leave it blank.
8. In the Future field, select the future amount in the document that requires to be mapped under current amount from dropdown list if it’s not available leave it blank.
9. In the Current Amount field, select the current amount in the document that requires to be mapped under current amount from dropdown list if it’s not available leave it blank.
10. In the Over 30, Over 60, Over 90 and Over 120 fields, select the bucket values such has over30, over60, over90 and over120 which requires to be mapped in the document. If bucket values are not required to be mapped leave it blank.
11. In the Retention Amount field, select the retention bucket. If the retention values are not required to be mapped leave it blank.
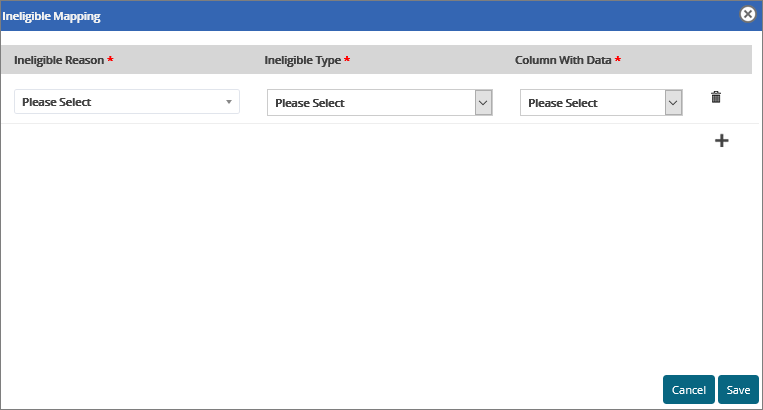
Steps to map ineligibles using Ineligible Mapping:
User can map ineligibles using Ineligible Mapping option in Step 3 only for the mappings created with data file types such as “AR Detail” and “AR Summary” in Step 1 of mapping (once the user uploads the AR Detail or AR Summary data file, the Ineligible Mapping button is available in step 3).
1.Click ![]() .The Ineligible Mapping pop-up box appears.
.The Ineligible Mapping pop-up box appears.
Refer to the screenshot:
2. Click the  button to create more ineligibles.
3. Select the Ineligible Reason from the drop-down list.
The Ineligible Reason drop down lists all the system defined and non-system ineligibles as available in the Description column in the Ineligibility Reasons page under Other General Codes. ((Go to ABL → Other General Codes → Ineligible Reasons)
4. Select the Ineligible Type from the drop-down list.
Refer to the screenshot:
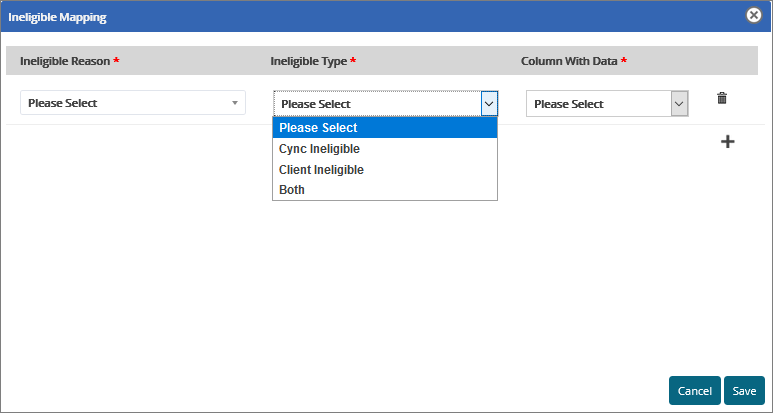
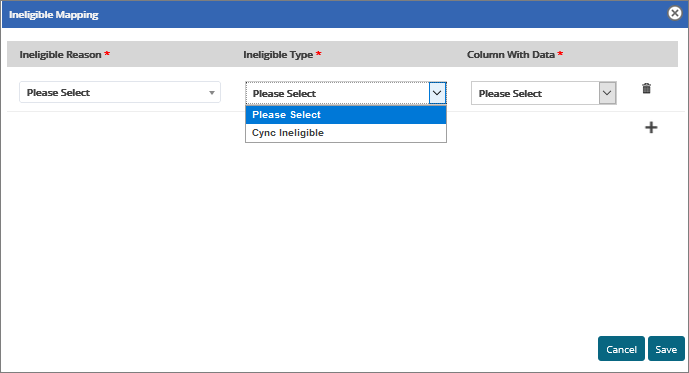
The Ineligible Type drop-down will list the following options (as shown in the following screenshot) whenever Manually Entered Client Ineligible check box is OFF under Basic Parameters page.
Refer to the screenshot:
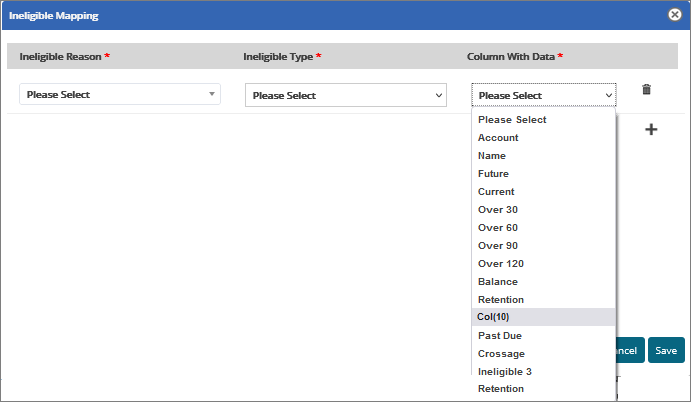
5. Select the Column with Data from the drop-down list.
![]() If a specific column (for example, column 10 in the uploaded excel file) is blank then that particular column number (column number which is blank) is listed as one of the options in Column with Data field in the Ineligible Mapping pop-up.
If a specific column (for example, column 10 in the uploaded excel file) is blank then that particular column number (column number which is blank) is listed as one of the options in Column with Data field in the Ineligible Mapping pop-up.
Refer to the screenshot:
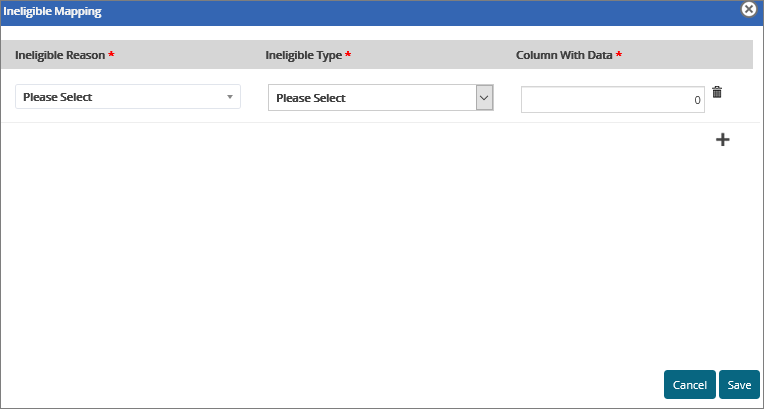
The Column with Data field displays the value ‘0’ by default if no file is mapped under Step 1.
Refer to the screenshot:
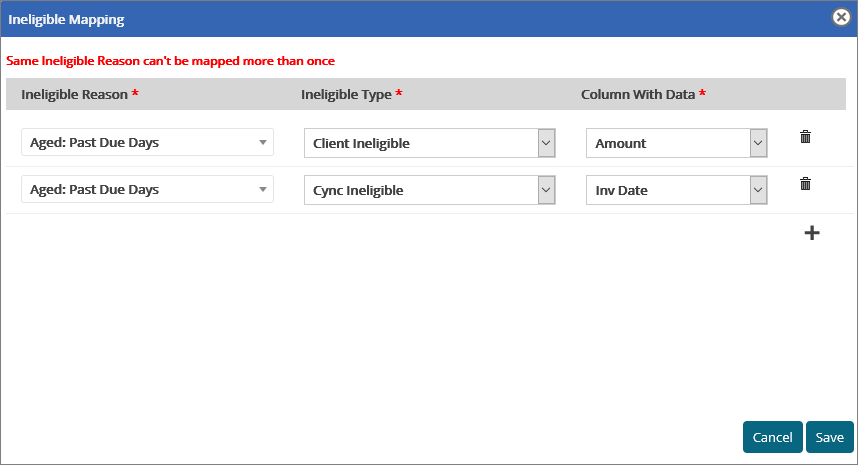
If the user selects the same ineligible reason multiple times and clicks on save, then the system displays the error message “Same Ineligible Reason can’t be mapped more than once”.
Refer to the screenshot:
The user can add multiple ineligibles by clicking on the button.
6. Click the ![]() button if you want to delete the mapped/added ineligible record.
button if you want to delete the mapped/added ineligible record.
7. Click the  button.
Once the Ineligibles are mapped and saved in the Ineligible Mapping pop-up, the text will get changed to Ineligible Mapping View with mouse over stating: “Contains Ineligibles Mapped”.
8. Click  to cancel the mapping created.
In the Ineligible Mapping pop-up, if all the 3 fields are not selected and if the user clicks on the save button, then the system displays the error message. For example, in a particular row, the Ineligible Reason, Ineligible Type is selected from the list but Column with Data is not selected then the system displays the message "Please select Column with Data"
Refer ti the screenshot:

Once you upload the AR Details file and map the system to the file, the system checks for the availability of the order number. In case, the order number is available, the date for the negative AR is replaced by the date of the new file that you have uploaded.
The following fields appear in Step 3 of mapping If the Data File Type is selected as Asset Inventory in Step 1 of mapping.
Refer to the screenshot:
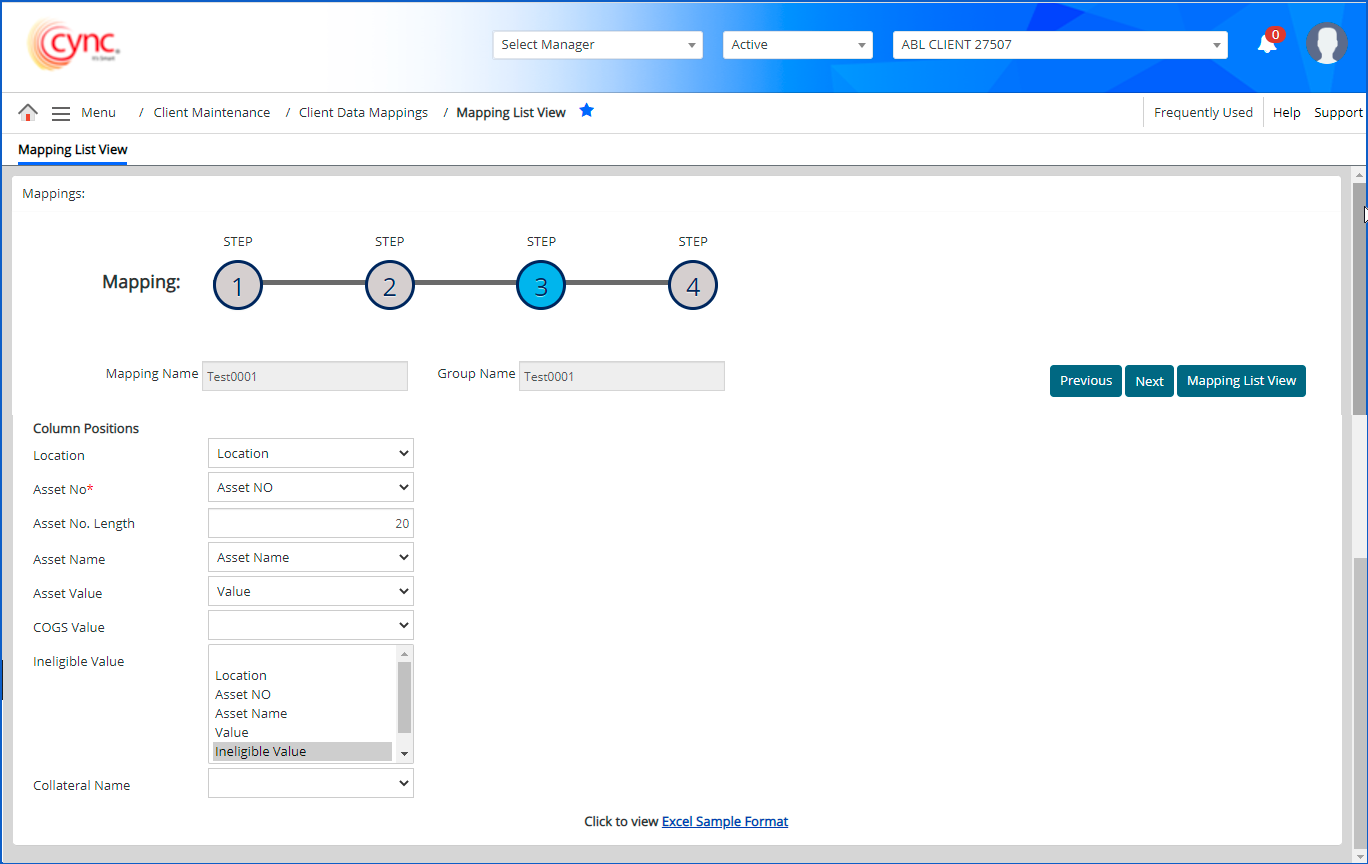
Steps to map the columns headers:
1. In the Location field, select the location from the drop-down list.
2. In the Asset No field, select the asset number from the drop-down list.
3. In the Asset No. Length field, enter the numeric value to define the length of asset number.
The default asset no. length value is 20. The maximum value is 50. Decimal value, Blank and Special Characters are not allowed. The number of digits including space will be truncated in Step 4 based on the value entered in Asset No. Length field for the mapped column.
4. In the Asset Name field, select the asset name from drop-down list.
5. In the Asset Value field, select the asset value from drop-down list.
6. In the COGS Value field, select the COGS value from drop-down list.
7. In the Ineligible Value field, select the ineligible value from drop-down list.
8. In the Collateral Name field, select the collateral name from drop-down list.
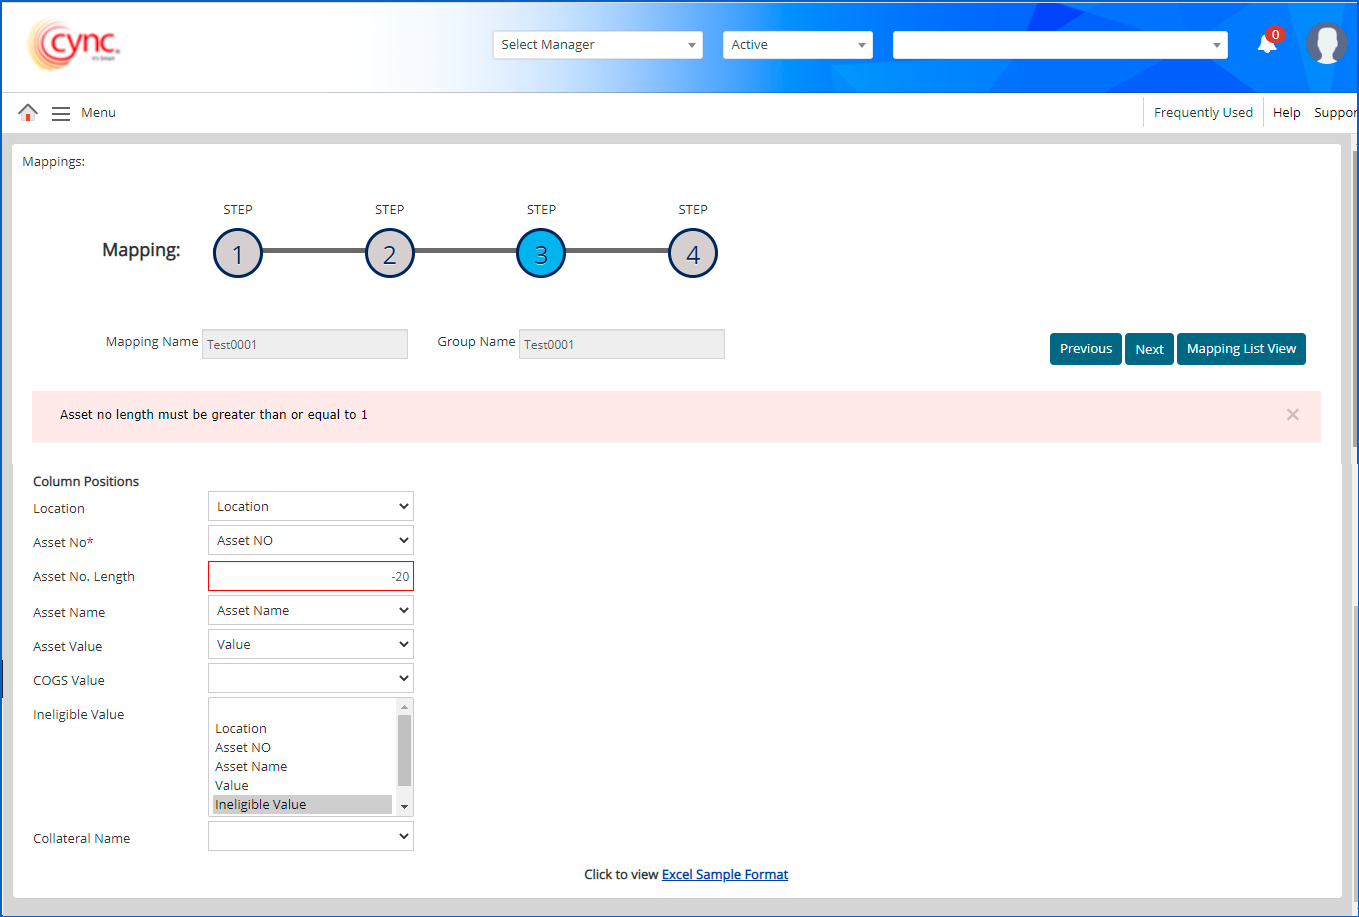
If user enters any negative value in Asset No. Length field, then the system shows an error notification.
Refer to the screenshot:
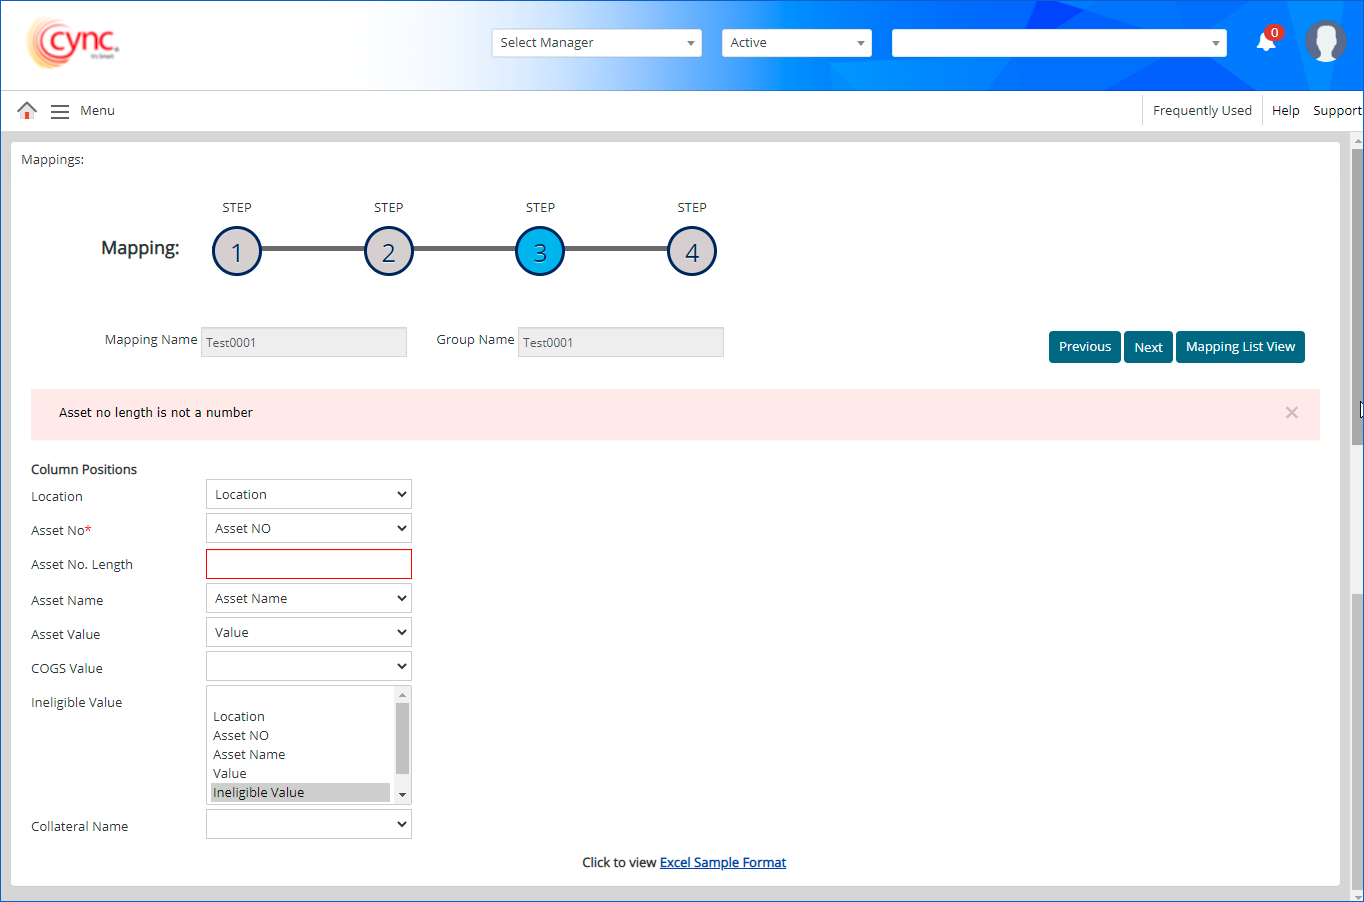
If user enters any blank/special characters in Asset No. Length field, then the system shows an error notification.
Refer to the screenshot:
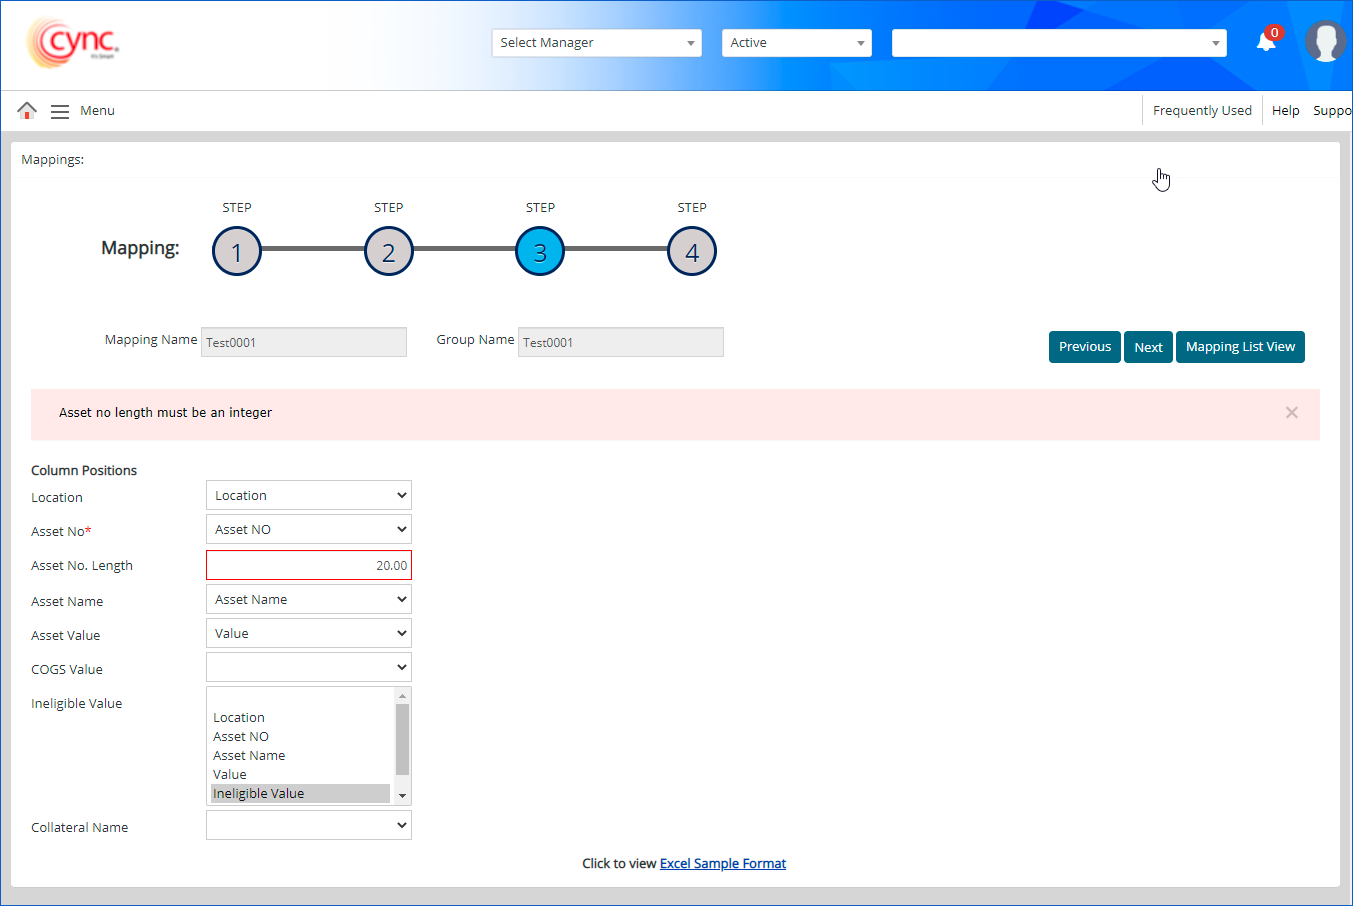
If user enters any decimal value in Asset No. Length field, then the system shows an error notification.
Refer to the screenshot:
If the asset no. is blank in the uploaded file, a notification message shows as “Asset no can’t be blank” from Notification icon.
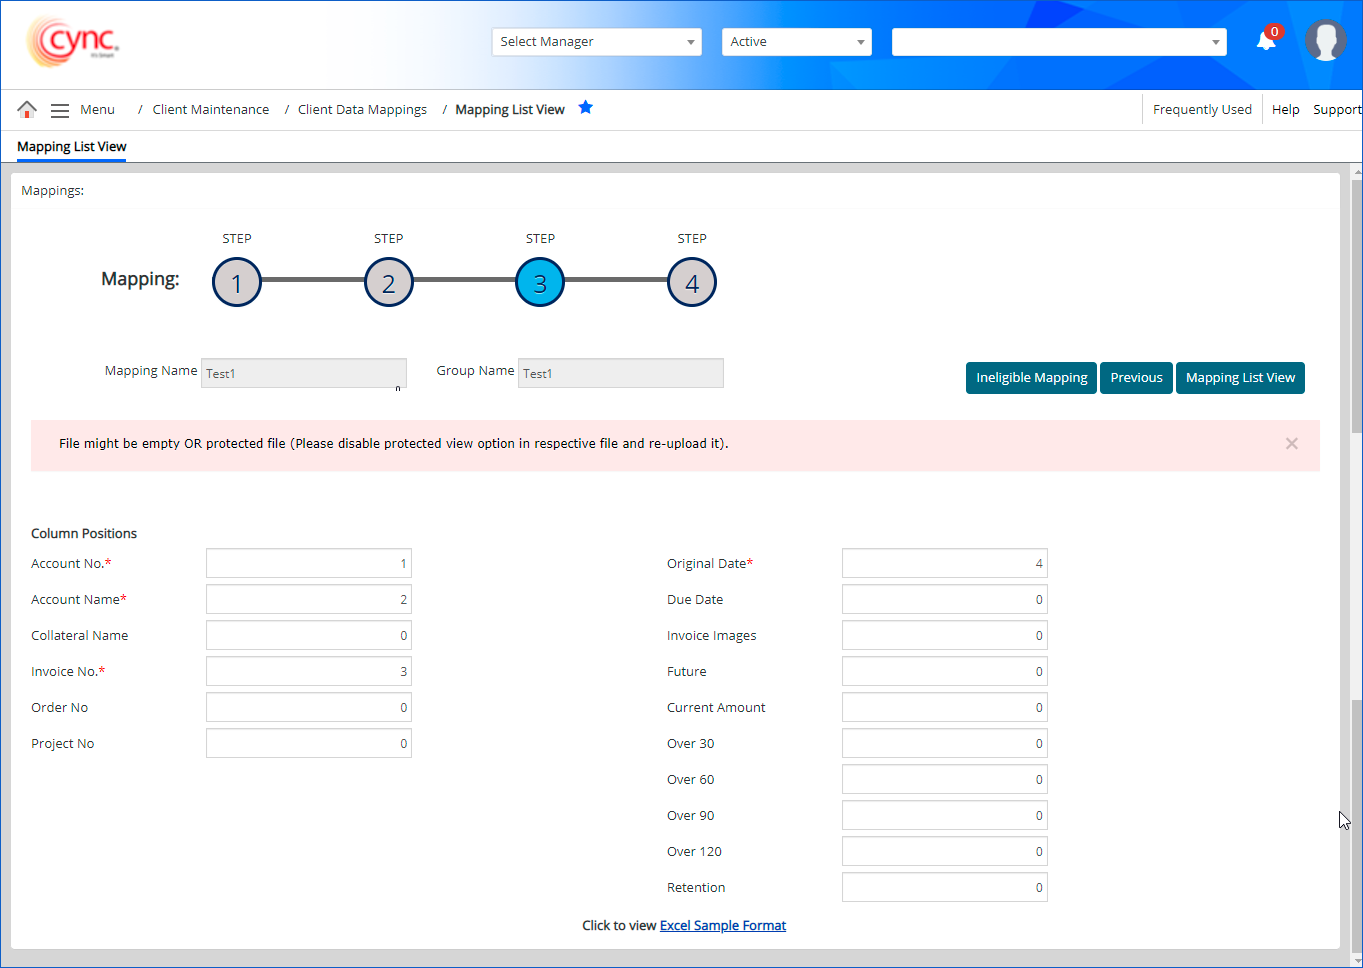
If any password protected/corrupted file was uploaded in Step 1 of mapping, then the system shows an error notification in Step 3 of mapping.
Refer to the screenshot:
Step 4: Data Review
This step allows you to review data extracted by Cync. The first 50 rows of data appears for your review. Click Save button to complete the mapping process. In case the data is incorrect, you can click on Previous button to change the mapping.
Steps to view the ineligibles mapped:
1. Click the  button to view all the ineligibles mapped. The user can click on the
 ![]() button for further mapping.
button for further mapping.
2. Click the  button.The user can view the ineligibles mapped.
Refer to the screenshot:

If the user tries to either delete the ineligibles available in the ineligible summary or ineligibles that are mapped, the system displays “The Ineligible Reason can’t be deleted as it is associated with Abl: Ineligible Summary/Mapping”.
Refer to the screenshot:
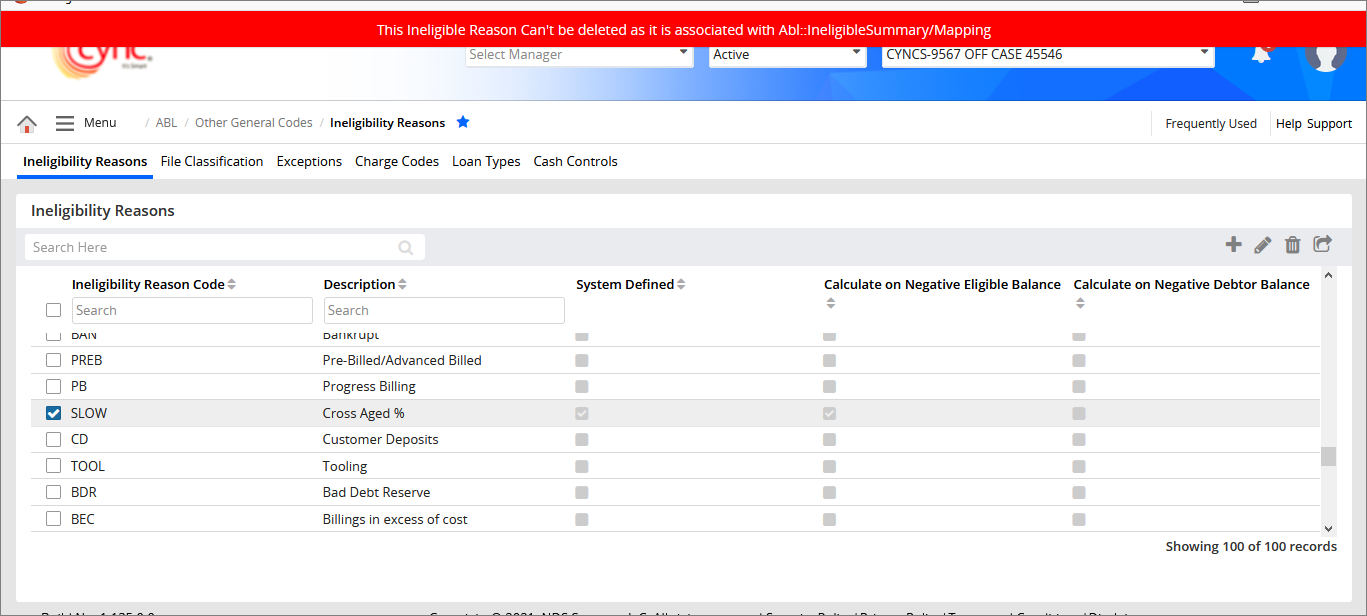
Refer to the screenshot:
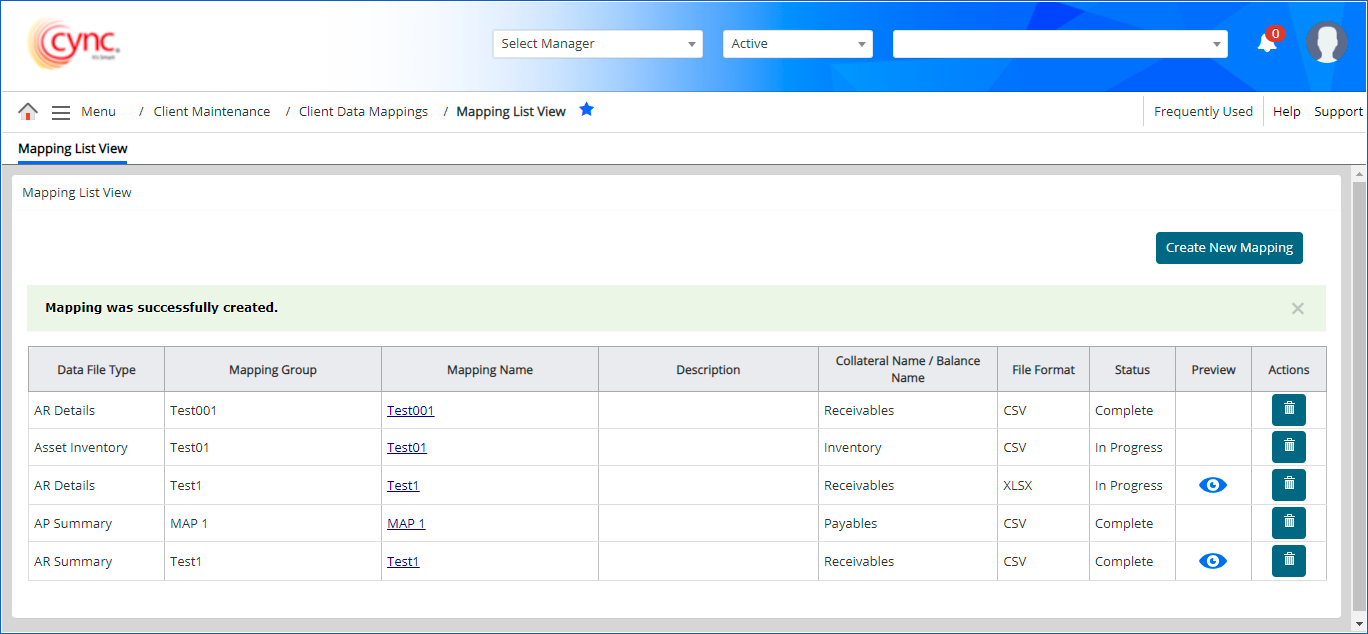
Once mapping process is complete, the system redirects you to Mapping List View page and displays a success message as “Mapping was successfully created”. Then, you can process your BBC files and invoices.
Refer to the screenshot:
The system displays the  button based on the permissions provided to the corresponding role under Roles & PermissionsRoles & Permissions page. By default, the Request Mapping Help option would be checked ON for the Administrator Role.
On clicking the button, the system redirects the user to Mapping List View page and a message “File sent to Cync support for mapping. You may also navigate to “Support” portal to view the request details.” appears. The status will be shown as In Progress for the respective mapping data. The ticket will be created in JIRA in the CSSP for Production project. The reference of the created Jira ticket will be displayed in Support Portal page.
Refer to the screenshot:
If the user clicks on Mapping Name to edit the mapping details, the system redirects the user to Step 1 of mapping with “Request Billable Service” link in disabled state and hovering on the disabled link displays the text viz “A request is already raised for the mapping. Please navigate to support portal to view details of the request” as a tool tip.
Request Mapping Help button will be hidden if the mapping status is Complete.
Mapping of data is performed without file uploads. You will choose the file to map and will not upload the file. Instead of uploading a file, you can enter the data manually to the application. Initially, you have to map the data present in the file before you process it.
Step1: Mapping the file without upload
To create new mapping, perform these steps:
1. Go to Client Maintenance → Client Parameters → Mapping List View and click the ![]() button.
button.
2.In the Mapping Group field, enter the mapping group name or the mapping name of the file that you want to map.
3. In the Data File Type field, select the type of data file you are mapping from the dropdown list.
4. In the Collateral Name field, select the type of collateral from the dropdown list.
5. In the File Format field, select the format of the file from the dropdown list.
6. In the Sheet No field, enter the sheet number. For .xls and .xlsx file formats, enter the number for the sheet being exported.
7. In the Choose File to Map field, do not attach the file (Leave Choose File to Map dialog box blank)
8. Click the ![]() button. You are redirected to step 2 or the mapping process.
button. You are redirected to step 2 or the mapping process.
Refer to the screenshot:
Step 2: Mapping
Map the data of the file to be uploaded with the rows available. Select the date format, header and, trailer according to the file and click Next button.
1. In the Delimiter Character field, select the type of delimiter character from the dropdown list (for example, comma, hyphen, semicolon).
2. Find and replace drop-down : If the data file includes specific characters or unwanted text. You may find and then replace the same before uploading the file. To replace unwanted characters follow these steps:
![]() You can find and replace multiple characters with new characters using pipeline separation (|). You can review the replaced text under Data Review.
You can find and replace multiple characters with new characters using pipeline separation (|). You can review the replaced text under Data Review.
3. In the No. of Header Rows field, count all rows at the beginning of the spreadsheet that do not contain real invoice data and enter the total in this field.
4.In the No. of Trailer Rows field, count all rows at the end of the spreadsheet do not contain real invoice data and enter the total in this field.
5. In the Discard Row Blank in Column, enter the data that contain data that is not required. For example, the total sum of invoice amount which is automatically calculated by Cync. Hence, we can avoid this data. Notice that this row contains some blank spaces so identify one of the columns with a blank space, e.g., column ‘E’ or ‘5’ (because E is the 5th column).
6. In the Discard Value Column field, if the rows needed to be excluded that contains column headers, identify the column number with the header to be excluded and enter the number on this line.
7. In the Discard Value Text field, if you entered a value in the Discard Value Column then enter partial text that identifies the data found in that field.
8. In the Select Value Column field, instead of excluding something from the mapping, you can identify what should be included by filling in this field and the select value text field. So if you want to include column headers, enter the column number where the header information is found.
9. In the Select Value Text field, if you entered a value in the select column value field then enter partial text that identifies the data found in that field.
10. In the Account Info and Values are on Separate Rows? field, select the checkbox to map the account information and values on separate rows. This is applicable for all the mapping types such as AR Details, AP Details, AR Summary, AP Summary and Cash Receipts.
11. In the Account No and Name on Same Column? field, select the checkbox to map the account number and account name in the same column.
12. In the Consider account row if column is blank field, enter the order of the account number and account name row, select a column that is blank in that row but not empty in the invoice or aging detail row. Example column 2(B) or 3(C) could work for the example below.
13. In the Account No. Length field, enter the number of characters you would like Cync to use when auto generating an account number for you or use the default.
14. In the Reverse sign field, select the checkbox if you want to reverse the sign of amount or bucket column values in spreadsheet.
15. In the Auto Fill Missing Invoice Numbers field, select the checkbox if the spreadsheet does not include the invoice numbers and you want Cync to auto-generate the invoice number.
16. In the Auto Fill Missing Invoice Dates dropdown, select the Current or Unreleased BBC Date. If the spreadsheet does not include the invoice dates, then the system automatically fills the missing invoice dates with the current or unreleased BBC Date. You can review the same under Data Review. .
17. In the Date Format field, select the date format as per the mapping file. The default date format is SERIAL_NUM. The supported date formats are MMDDYY, MMMDDYYYY, MMM-DD-YYYY, MMM/DD/YYYY, MMM.DD.YYYY, YYYYMMDD and YY/MM/DD.
18. In the Attach Document to BBC option allows you to attach the file uploaded to BBC Documents page. Select the checkbox to attach the file to BBC Documents page after the file uploads for the respective mapping.
19. Click the  button.
Refer to the screenshot:
Step 3: Mapping Assignment
This step allows you to label and assign the data. The fields appear on this page based on the collateral type you select. This page shows the column headings that you need to map.
Refer to the screenshot:
Steps to map the columns headers:
You can also create a mapping group and map multiple files with the same data file type, format, and collateral name. For more information refer to Grouping and Mapping multiple files.
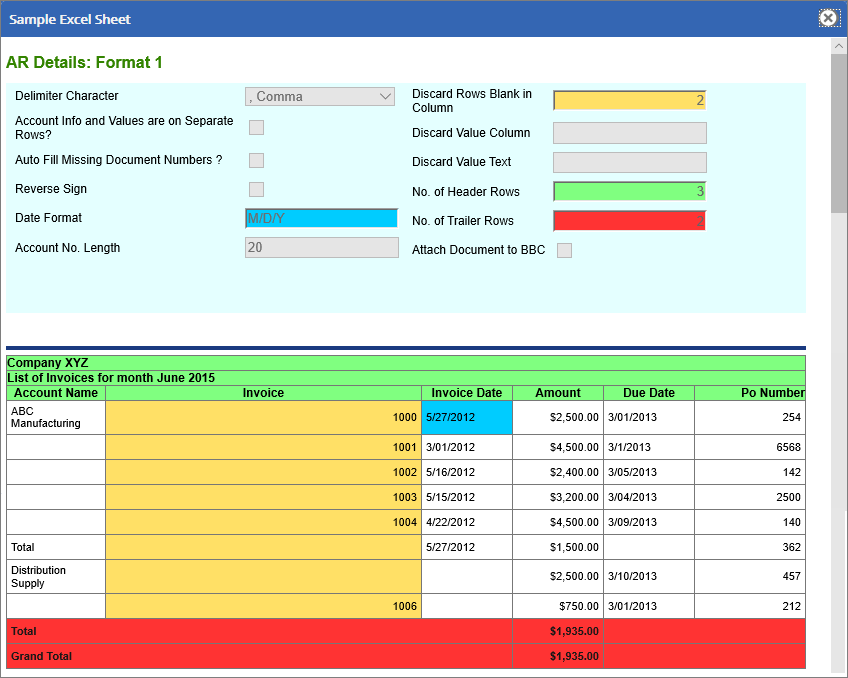
You can click on the Excel Sample Format hyperlink located at the bottom of each step of mapping (1-4) page to view the sample format of uploaded file. The system displays the sample excel sheet of the uploaded data file.
Refer to the screenshot:
To edit the step 1 of existing mapping details, perform these steps:
1. In Mapping List View page, click on the Mapping Name hyperlink under Mapping Name column. The system redirects you to steps 1 of mapping page.
2. Edit the Mapping Name field as required.
The Mapping Name field would be enabled to edit only if the uploaded file formats are CSV, XLS, XLSX and XLSM.
3. Edit the Group Name field as required.
The Group Name field would be enabled for all the file formats such as CSV, XLS, XLSX, XLSM, PDF, HTML, TXT and RPT.
4. Select the collateral name from the drop-down list.
The collateral name can be modified only for single mapping. The Collateral Name field would be enabled to edit only if the uploaded file formats are CSV, XLS, XLSX and XLSM.
5. Edit the Sheet No field as required.
6. In Choose File To Map field, click Browse option to upload new file if required.
7. Click ![]() button. The mapping/group name, collateral name, sheet no and mapped file details are updated.
button. The mapping/group name, collateral name, sheet no and mapped file details are updated.
8. Click ![]() to view the updated mapping/group name, collateral name, sheet no and mapped file details.
to view the updated mapping/group name, collateral name, sheet no and mapped file details.
In Mapping List View page, the system displays the updated Mapping Name, Group Name and collateral name under Mapping Name, Mapping Group and Collateral Name/Balance Name columns, respectively. The system displays the updated Mapping Name, Mapping Group and Collateral Name automatically in BBC Files Required page, Upload BBC Data Files page and Action PendingAction Pending page.
Refer to the screenshot: