Loan Maintenance / Collateral Loan Upload / Task & Upload History
Task & Upload History
The Task & Upload History page consists of Tasks section and Upload History section. By default, the system displays the Tasks section.
Navigation: Loan Maintenance→ Collateral Loan Upload → Task & Upload History
Refer to the screenshot:
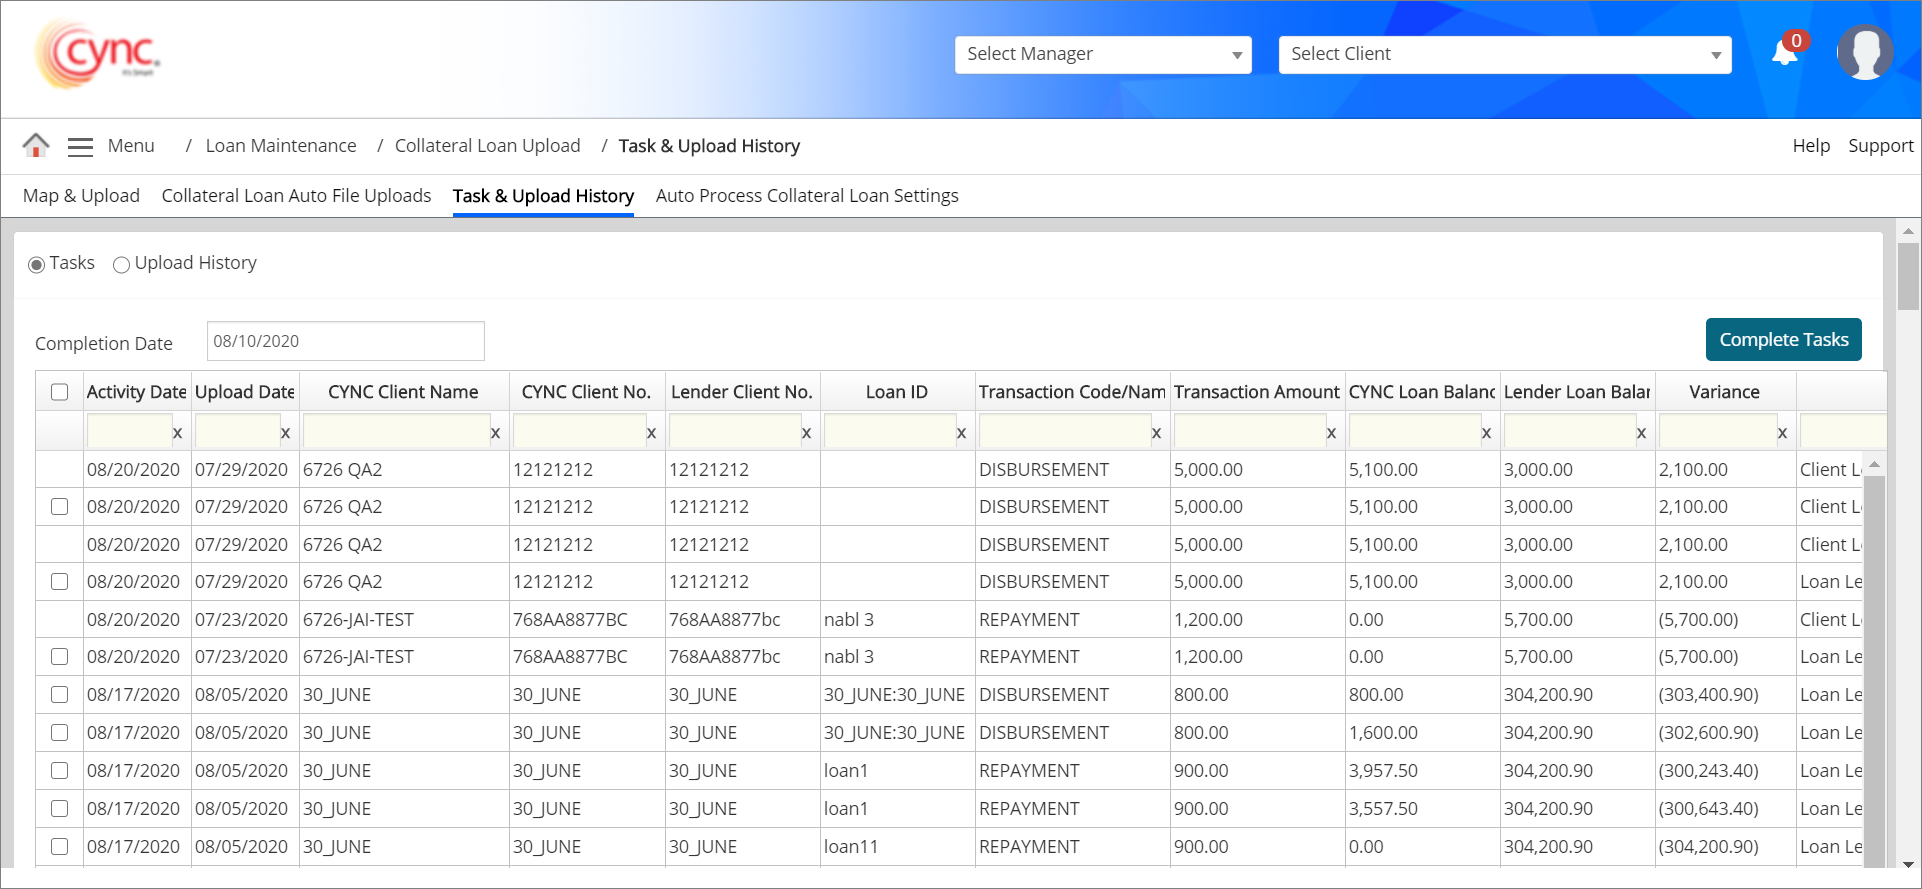
Tasks
The Tasks section displays the failed/exception tasks.
Refer to the screenshot:
Fields and Descriptions
|
Fields |
Descriptions |
| Activity Date | Specifies the activity date from Collateral Loans page. |
| Upload Date | Specifies the date of loan activity upload that triggered tasks. |
| CYNC Client Name | Specifies the client name of cync. |
| CYNC Client No. | Specifies the client ID number of cync. |
| Lender Client No. | Specifies the lender client ID number. |
| Loan ID | Specifies the Loan ID number. |
| Transaction Code/Name | Specifies the transaction code or name. |
| Transaction Amount | Specifies the transaction amount. |
| CYNC Loan Balance | Specifies the actual latest principal/closing balance as of that uploaded date from Collateral Loans page of Loan ID of each client that is present in the uploaded file for both ABL and MCL loans. The same value will be updated in encrypted pdf file. |
| Lender Loan Balance | Specifies the current lender loan balance. |
| Variance | Specifies the difference value between CYNC Loan Balance and Lender Loan Balance. |
| Message | Specifies the validation message triggered while uploading the file. |
| Completion Date | Specifies the date entered in Completion Date field while performing complete tasks. |
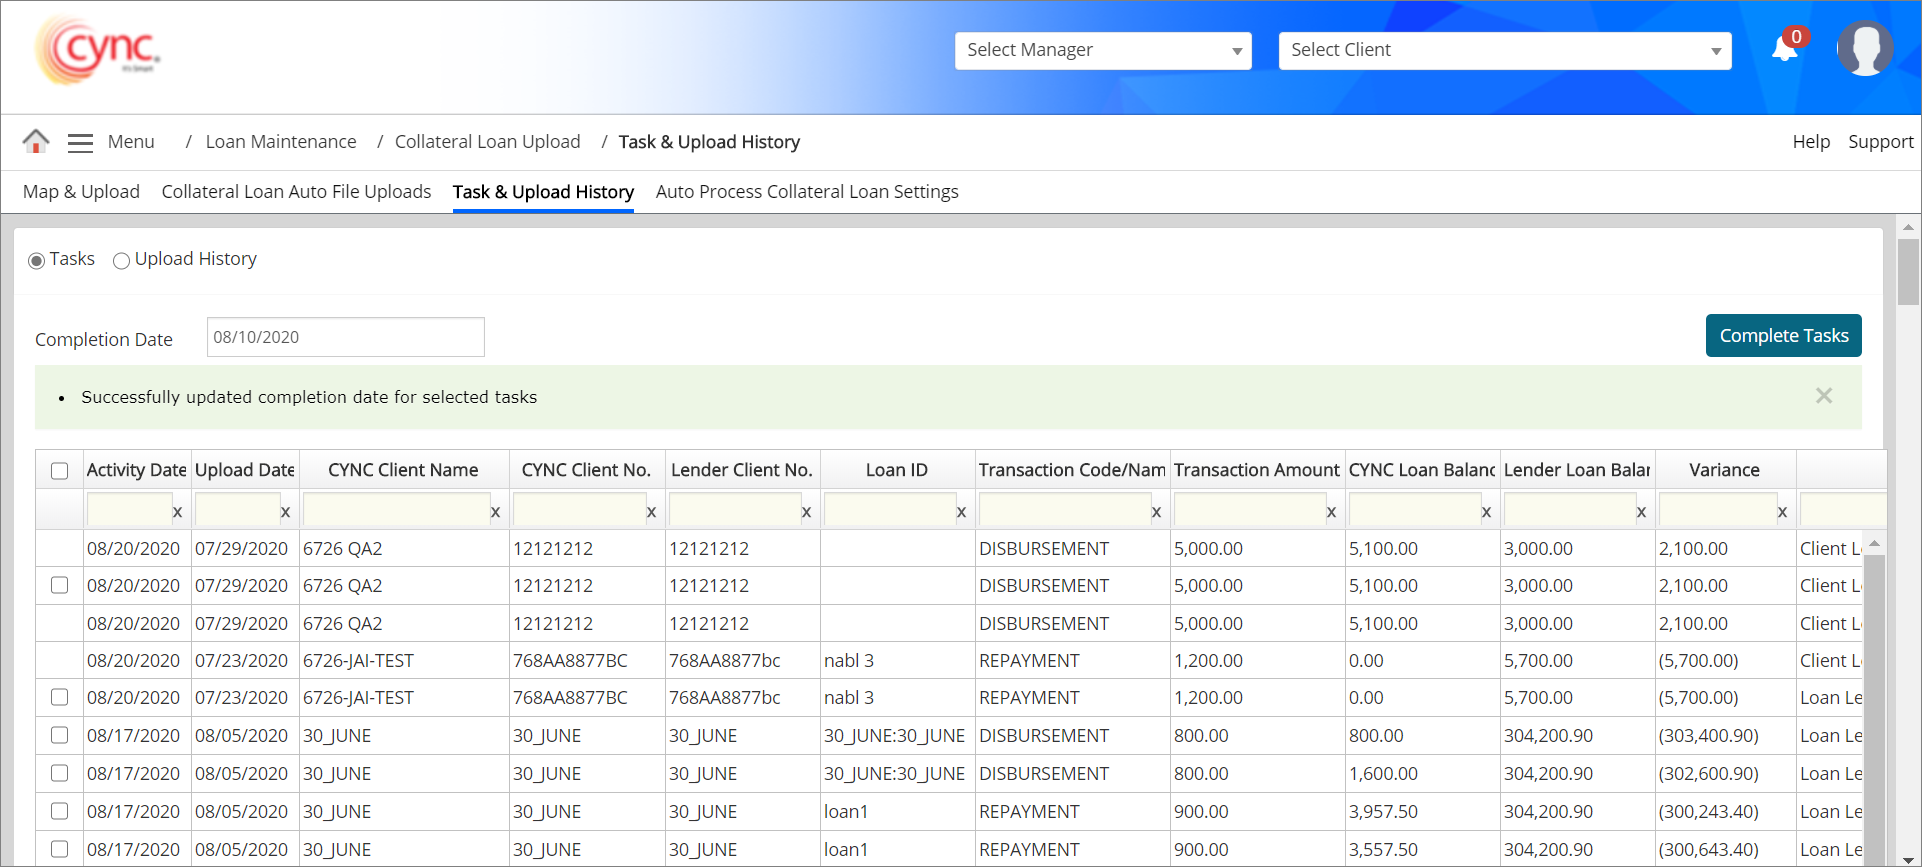
To do complete tasks under Tasks section, perform the following steps:
1. Select the Tasks radio button.
2. In Completion Date field, select the completion date.
3. Select the checkbox on the respective task that you wish to complete.
4. Click the ![]() button. The task is completed and a message “Successfully updated completion date for selected tasks” appears.
button. The task is completed and a message “Successfully updated completion date for selected tasks” appears.
Refer to the screenshot:
Once the file is uploaded, the Lender Loan Balance will be matched with the Cync DB Loan Balance per Loan ID of each client. If there is no match, the Current Balance from the furthest Down row of that particular Loan ID of each Client will be considered as File Loan Balance or Lender Loan Balance in the uploaded file.
If there is any mis-match between CYNC Loan Balance and Lender Loan Balance, then the Exception task will be generated with the Activity date as "Uploaded Date" and also email will be triggered for that Mis-match with Transaction date as "Uploaded date" of that particular file.
If the furthest row of Loan ID has Activity date “Blank” in the uploaded file and mapped as “Consider Rows Blank In Column” with any column (For example: Activity date), then the exception will be generated with the transaction date as Uploaded date. And, it’s exception task will have the Uploaded date of that file as "Activity Date" (If mapped same lender balance considered from that row for mismatch).
The system will not generate any exception task on mis-match on loan balance and will not trigger any e-mail for mis-match exception if the Lender Loan Balance matches with the CYNC Loan Balance.
If the uploaded file has “More than One Activity Date” per Loan ID and has “Multiple Transactions with the same Activity Date”, then the Cync DB Loan Balance will be the latest Current Balance as of Uploaded date and File Loan Balance will be the same value as it is matching with the Cync DB Loan Balance with the Activity date in the uploaded file. In this case, the comparison between Cync DB Loan Balance and File Loan Balance will happen always once per Loan ID of each client per uploaded file. Hence, the exception task will also be generated per Loan ID wise of each client per upload. If Loan ID is not mapped (ABL Mapping), then the comparison between Cync DB Loan Balance and File Loan Balance will happen per Client wise per Upload not on each Activity date wise.
The following are the validation message triggered from file upload for both ABL and MCL loans:
1. If the uploaded file sheet has charge(transaction) codes or charge names which are not available in Charge Codes and Charge Templates page, then the system would display the message in Message column in the following cases:
![]() Once user discards any particular transaction code or transaction name available in the uploaded file using Discard Value Column and Discard Value Text fields from Map & Upload page and reprocesses the same uploaded file from Upload History section, the system automatically removes the earlier created above excelption tasks from Tasks section. The exception tasks will be removed even if it was created on any past date and/or in the current date once user has discarded the transaction code or transaction name and reprocessed the same uploaded file. The removed exception task will also not be available in the exported page of Task & Upload History page.
Once user discards any particular transaction code or transaction name available in the uploaded file using Discard Value Column and Discard Value Text fields from Map & Upload page and reprocesses the same uploaded file from Upload History section, the system automatically removes the earlier created above excelption tasks from Tasks section. The exception tasks will be removed even if it was created on any past date and/or in the current date once user has discarded the transaction code or transaction name and reprocessed the same uploaded file. The removed exception task will also not be available in the exported page of Task & Upload History page.
2. If any loan ID (loan number) is wrong in the uploaded file in loan level, then the system would display the message in Message column as Loan Level: Missing Loan No.
3. If any client number is found in the uploaded file but not found in CYNC, then the system would display the message in Message column as Client Level: Missing Client No.
4. If activity date is blank in the uploaded file, the system would display the message in Message column as File Issue: Activity date column is empty.
5. If any expiry date is blank or having past date in the uploaded file, then the system would display the message in Message column as Client Level: Expiry Date either blank or past date in the file.
6. If any mismatch in CYNC loan balance & lender loan balance (current balance) in the uploaded file, then the system would display the message in Message column as Loan Level: Mismatch Balance.
7. If any Risk rating code is blank in the uploaded file, then the system would display the message in Message column as Client Level: Risk Rating Code either blank or 0 in the file.
8. If the Inactivate Loan text provided in the Inactive Loan Text field does not match with Inactive text provided in the file for each loan under Map & Upload page, then the system would display the message in Message column as Loan level: Unable to change the Loan Status.
9. If expiry date is past date or blank in the uploaded file, then the system would display the message in Message column as Loan level: Expiry date either Blank or Past Date in the file.
10. If the credit line amount is blank or having any past date in the uploaded file, then the system would display the message in Message column as Loan level: Credit Line amount is either blank data or 0 in the file.
11. If the cash control data on database is not matched with uploaded file, then the system would display the message in Message column as Client Level: Cash Control Not Found in File in the following scenarios:
The exception task will be created for UDF based on the conditions prioritized as follows for both ABL and MCL Loans by checking:
The following are the validation message triggered based on UDF field for both ABL and MCL loans:
1. If user modifies the UDF condition to any other UDF condition apart from Updatable field or both Updatable and Mandatory field conditions for any specific UDF after mapping the specific UDF to Collateral Upload Program under User Definition page, then the system would display the message in Message column as Client level: UDF Field <UDF Field Name> Conflict found in UDF Condition.
2. Following are the conditions that trigger exception message (Client level: UDF Field <UDF Field Name> Conflict found in UDF Condition) when user edits and updates the UDF condition to any other UDF condition apart from Updatable field or both Updatable and Mandatory field conditions after mapping the specific UDF to the Collateral Loan Upload Program.
3.If user inputs lesser or greater than the value (which is defined in Fixed Length field under UDF Definition page) in the uploaded file, then the system would display the message in Message column as Client Level: UDF Field value is not equal to the configured length.
4.If user inputs lesser than the value defined in Min Length field and greater than the value defined in the Max Length field under UDF Definition page in the uploaded file, then the system would display the message in Message column as Client Level: UDF Field value not within length.
5. If the user enters in value to a field (UDF) in the file that is uploaded, but the UDF is not mapped to the client, then the system would display the message in Message column as Client Level: UDF not mapped to client.
6. If the user enters more than one value to a UDF via different transactions, for the same client in the file that is uploaded, then the system would display the message in the Message column as Client Level: Multiple UDF values found.
7. If the user does not enter value for a UDF that is configured as Mandatory, then the system would display the message in the Message column as Client Level: UDF is mandatory, No value input in file.
8. If the user enters characters other than numbers in the UDF for which the field type is configured as Numeric, then the system would display the message in the Message column as Client Level: UDF is not numeric.
9. If the value input is not within the range configured, then the system would display the message in the Message column as Client Level: UDF value is not within range.
10. If the value input does not match with any value that is pre-configured in the LOV, then the system would display the message in the Message column as Client Level: UDF value is not in LOV.
The following are the scenarios in which validation message are not to be created:
1. If the UDF is entered with the same value for multiple transactions for the same client, then exception should not be created, instead, the value should be updated for the UDF.
2. If a unique updatable transaction is found in the file uploaded.
3. If the uploaded file has no loan transactions details, but the UDF value will get successfully updated in Basic Client Details if the transaction has either the Client ID and/or the Loan ID.
The email notification will be triggered for both ABL and MCL loans once the exception task is generated in Task section under Task & Upload History page. User will get the email notification for each exception task to the email ID mentioned in Auto Process Collateral Loan Settings page.
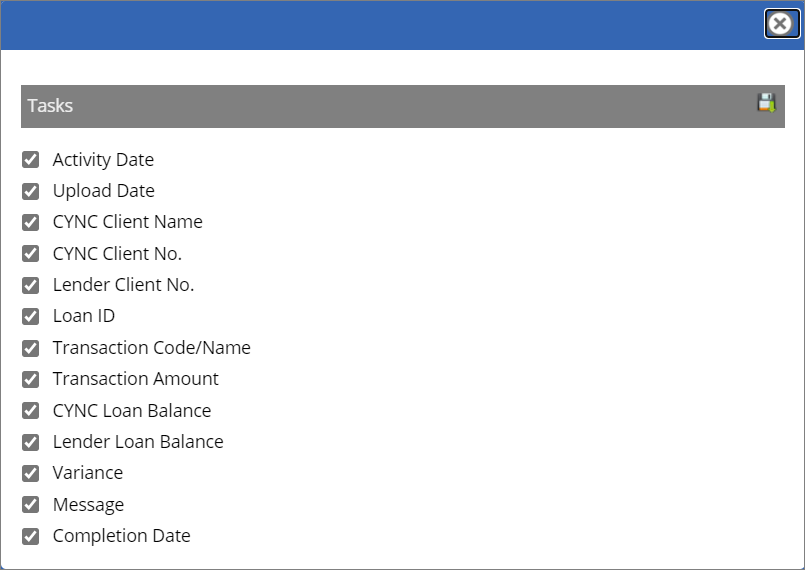
To export the tasks, perform these steps:
1. Select the Tasks radio button.
2. Click the ![]() button. A Tasks popup window appears.
button. A Tasks popup window appears.
Refer to the screenshot:
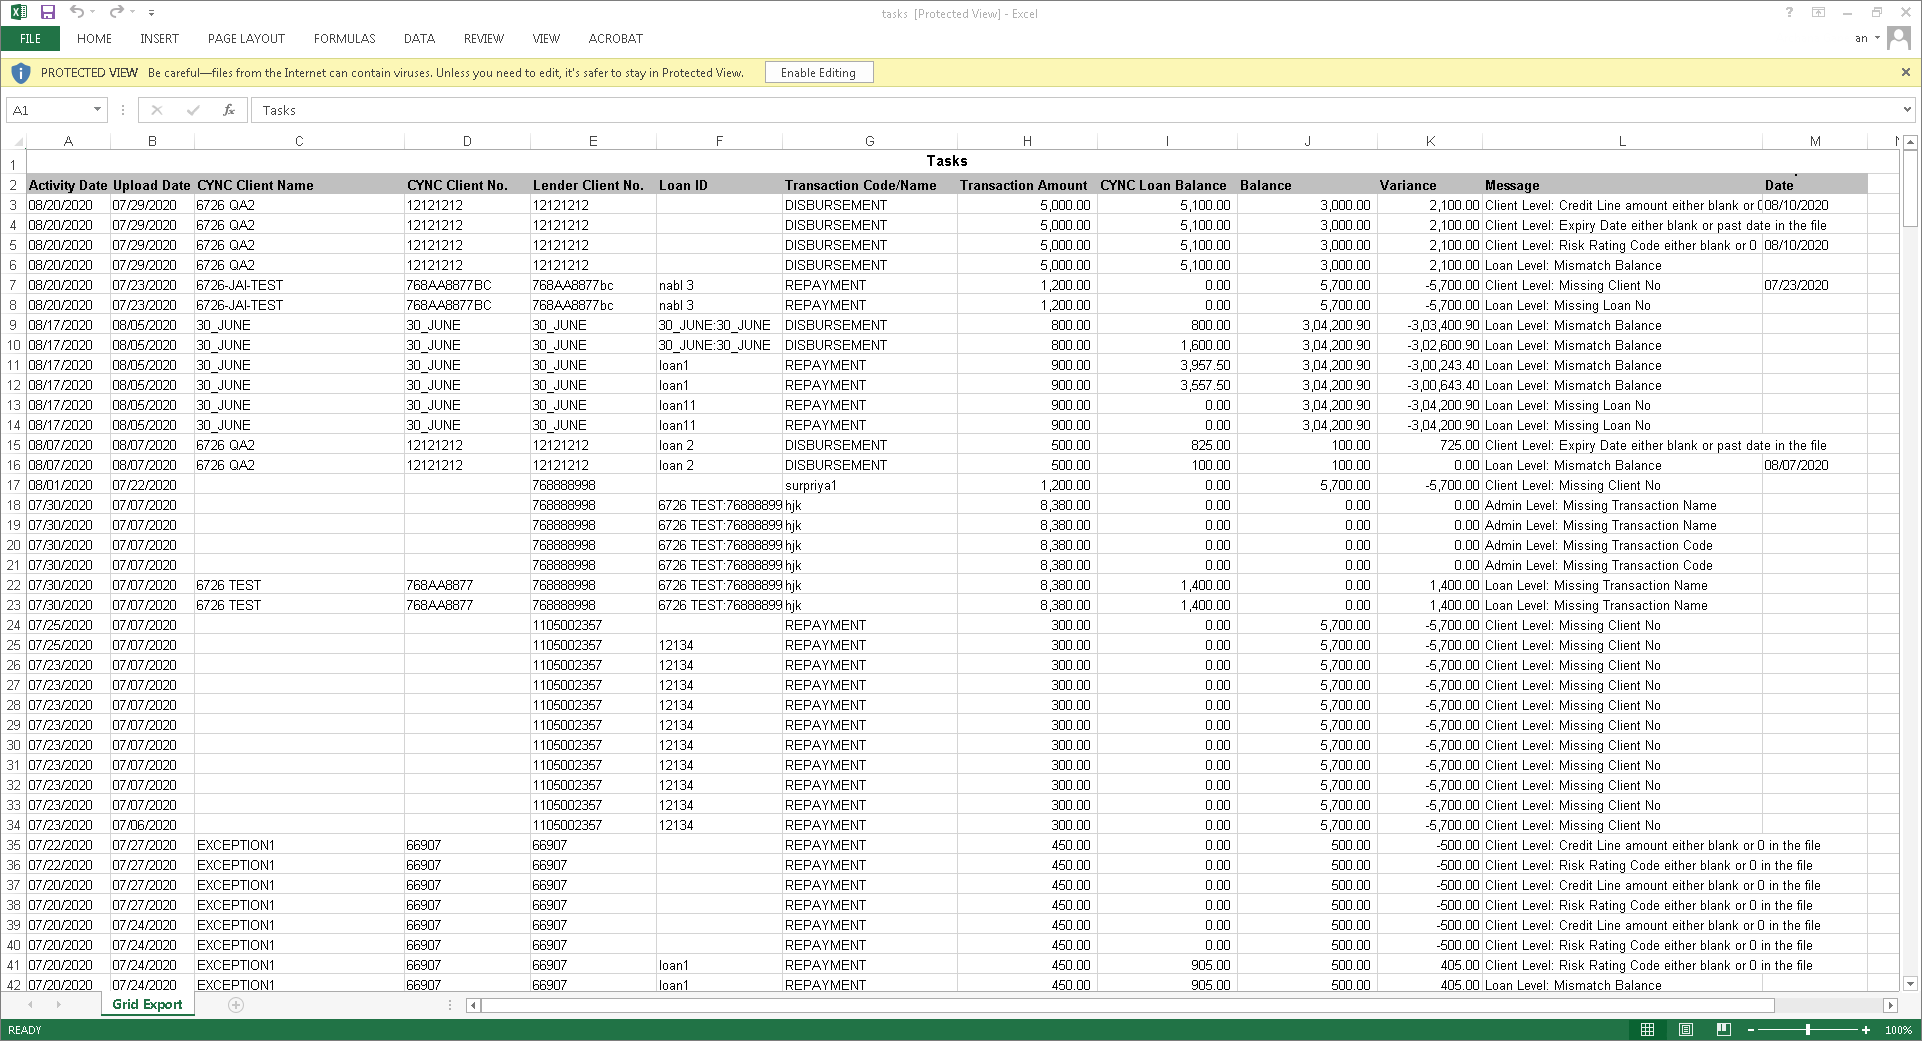
3. Click the  button. A pop-up message “Do you want to open or save tasks.xls from cyncsoftware.com?” appears.
4. Click Save if you want to save the extracted data. (or)
5. Click Open. The tasks data is exported.
Refer to the screenshot:
Upload History
The Upload History section displays a list of all collateral loan data that has been uploaded. To view the Upload History section, select the Upload History radio button.
Refer to the screenshot:
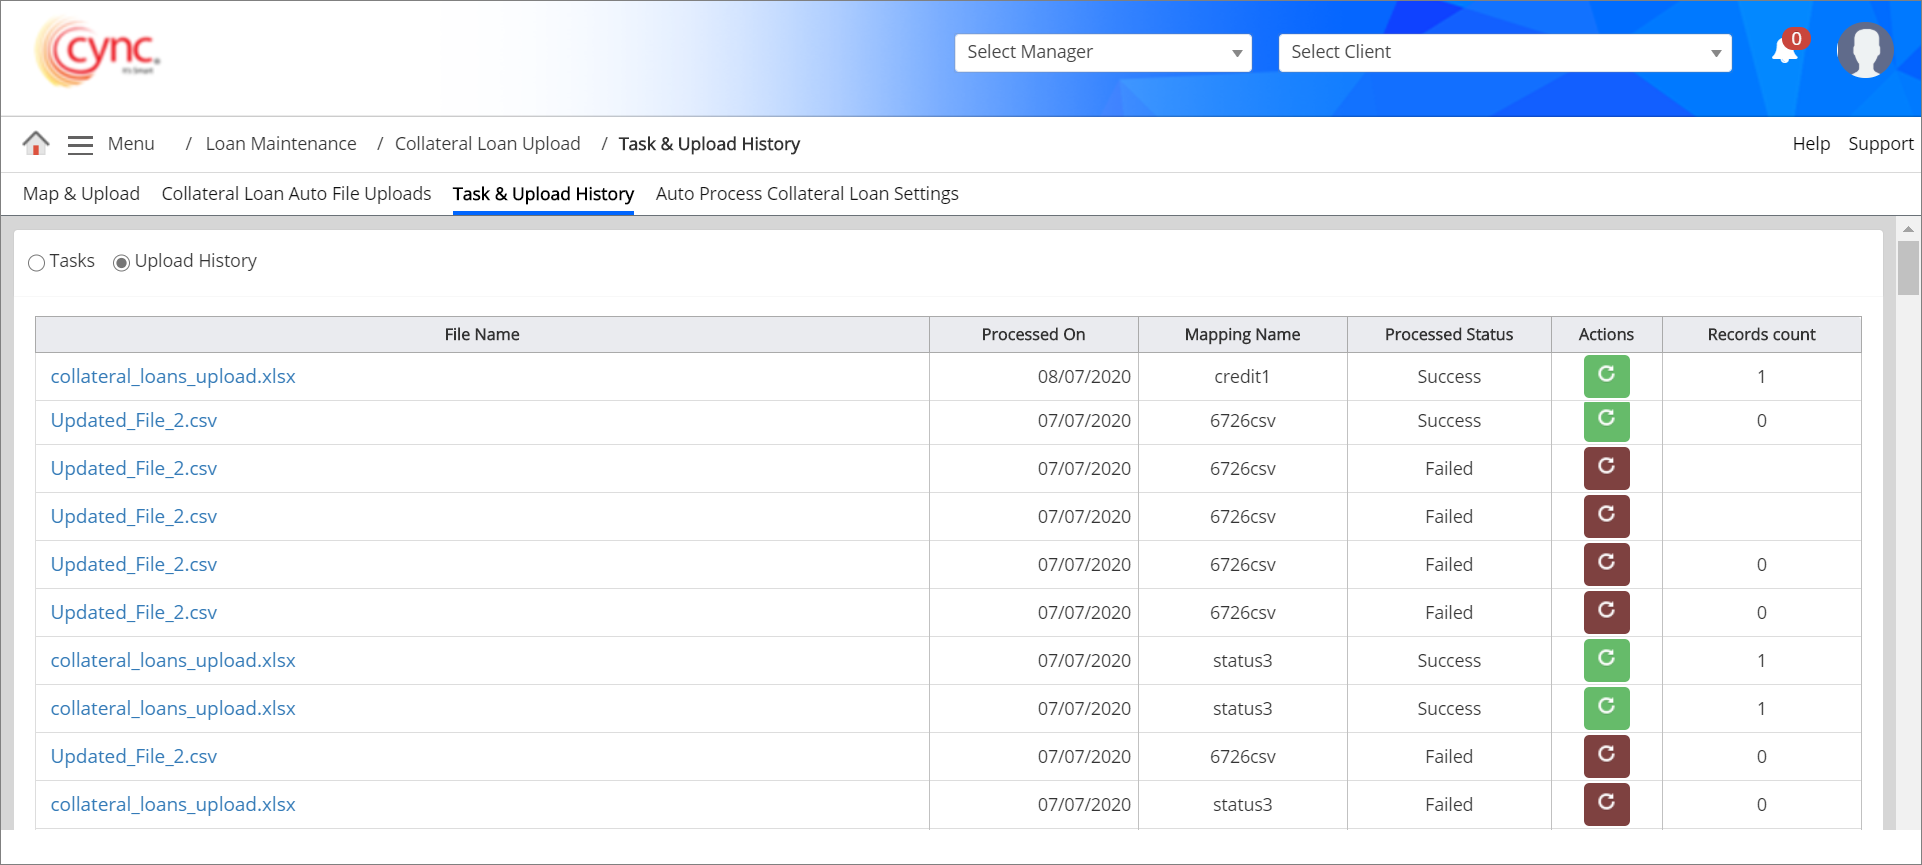
Fields and Descriptions
|
Fields |
Descriptions |
| File Name | Specifies the uploaded file name. |
| Processed On | Specifies the processed date. |
| Mapping Name | Specifies the mapping name of the uploaded file. |
| Process Status | Displays the process statuses such as Success or Failed. |
| Actions | Allows to delete or reprocess the uploaded file. |
| Records Count | Displays the number of records. |
You can undo a mapping by clicking the  icon. A pop-up message “Undoing file is initiated successfully!” appears.
Refer to the screenshot:
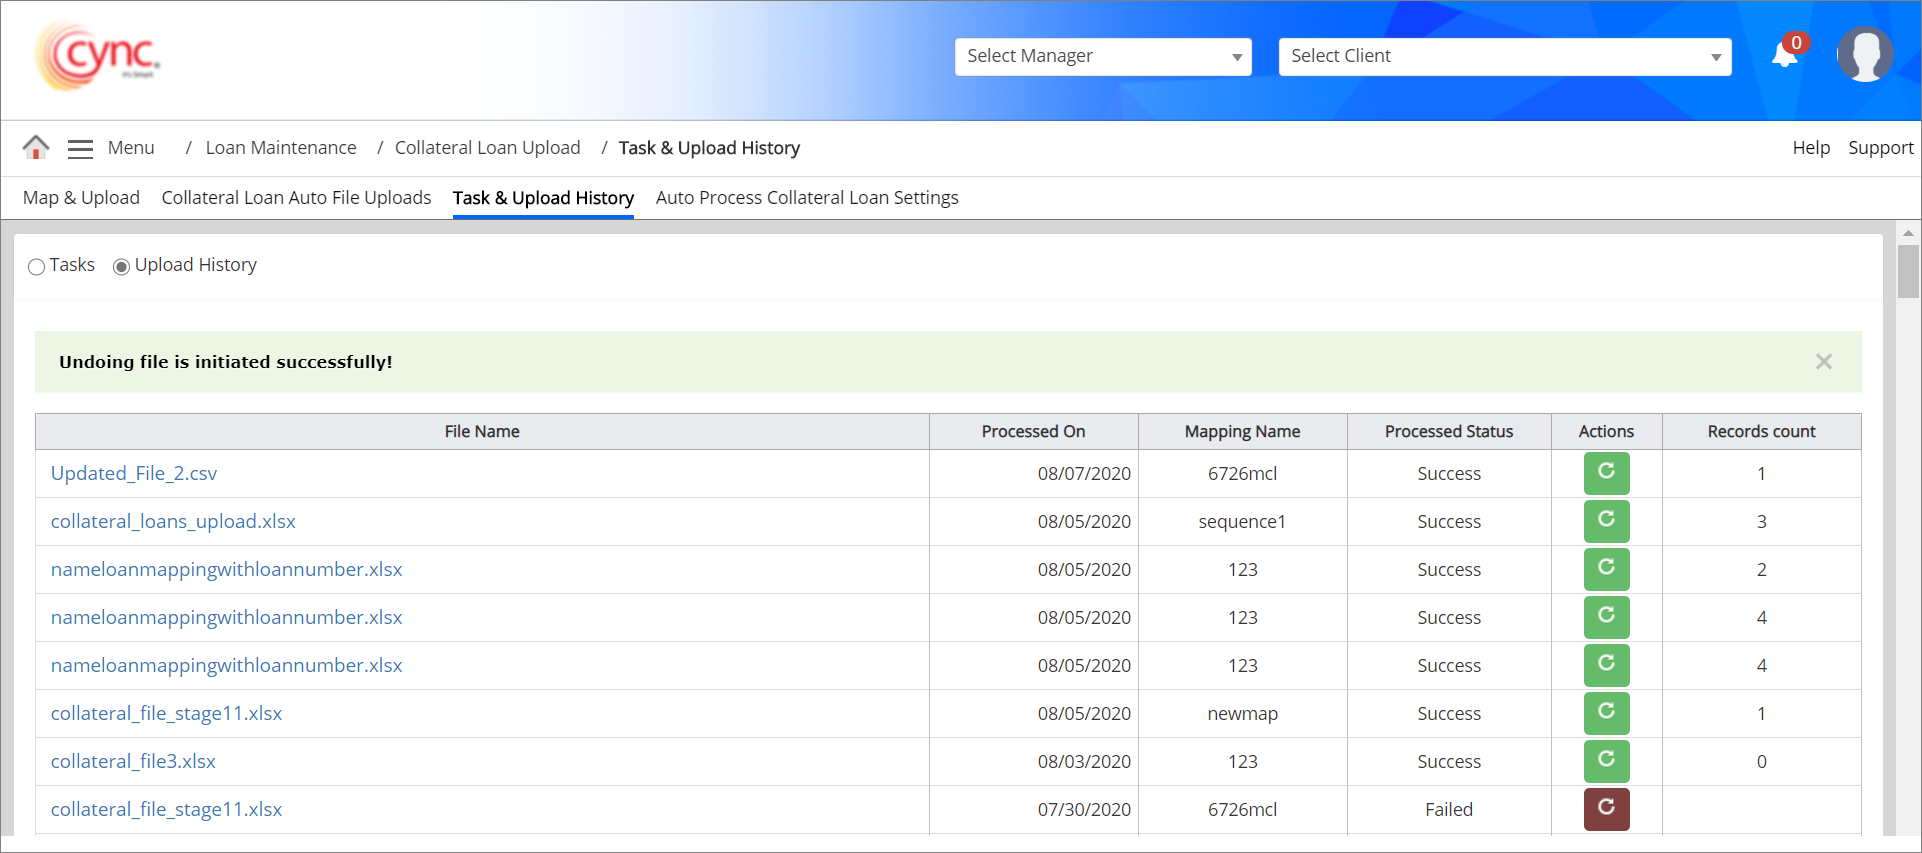
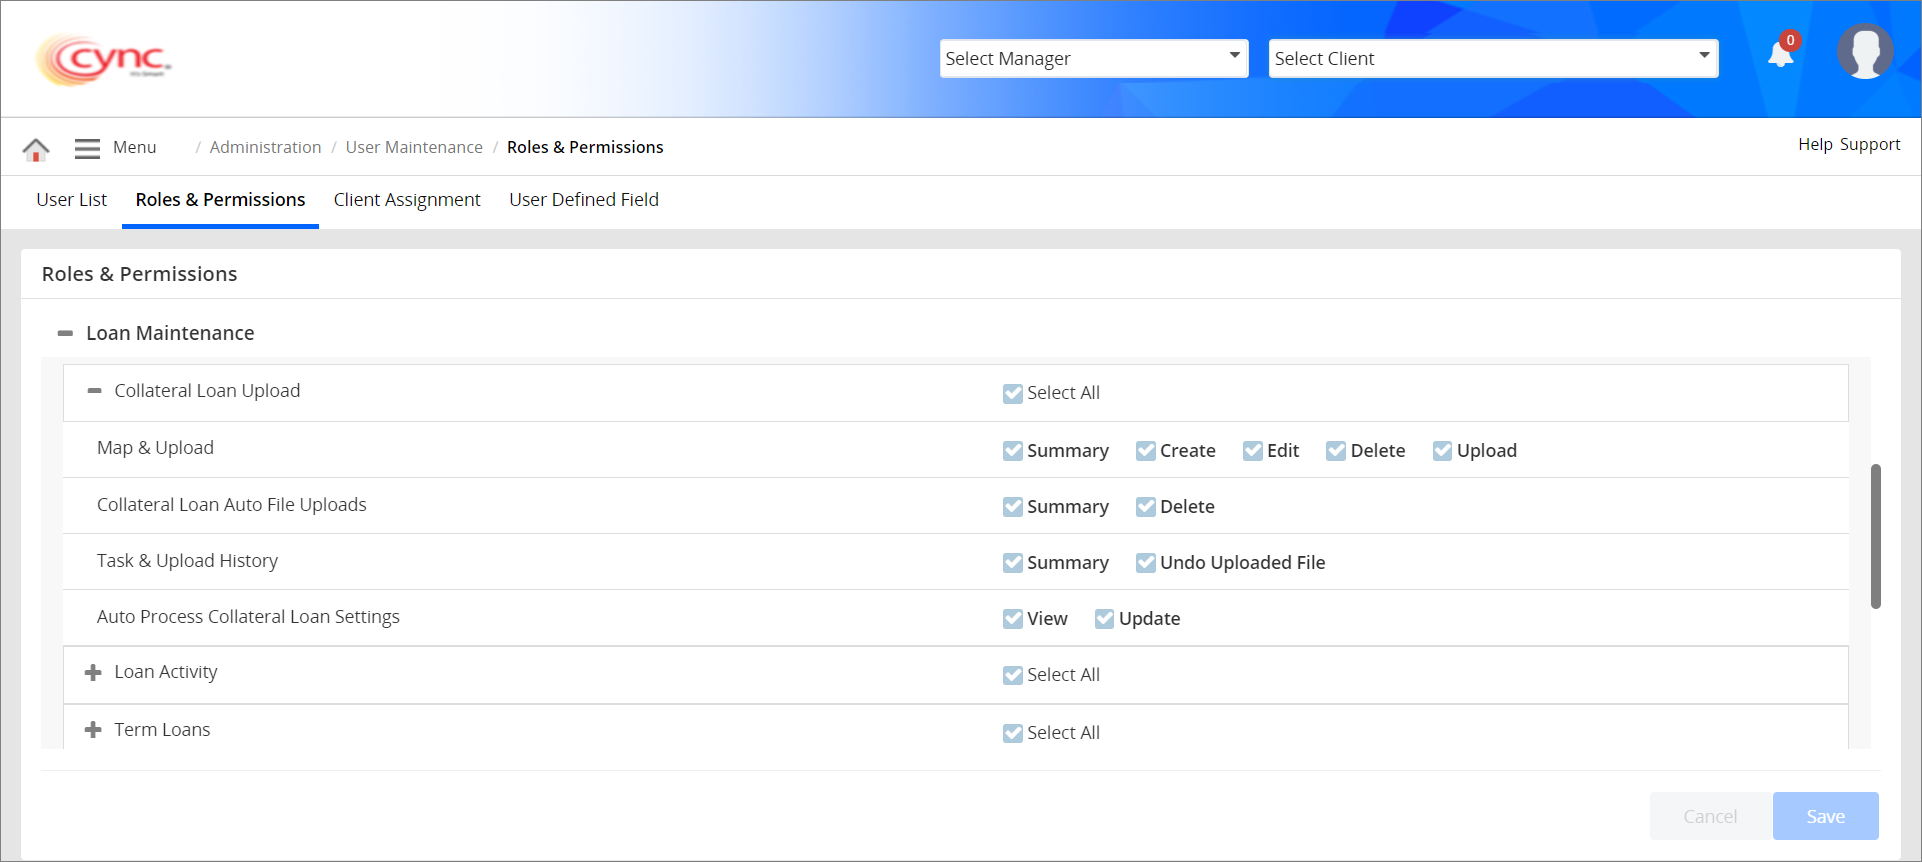
After undoing the file, the respective file gets deleted from the Upload History page as well as Collateral Loans page. The system allows you to perform undoing the mapping file based on the settings done under Roles and PermissionsRoles and Permissions page.
You can also reprocess the file upload by clicking the ![]() button. A pop-up message “Selected file Re-process triggered successfully” appears.
button. A pop-up message “Selected file Re-process triggered successfully” appears.
Refer to the screenshot:
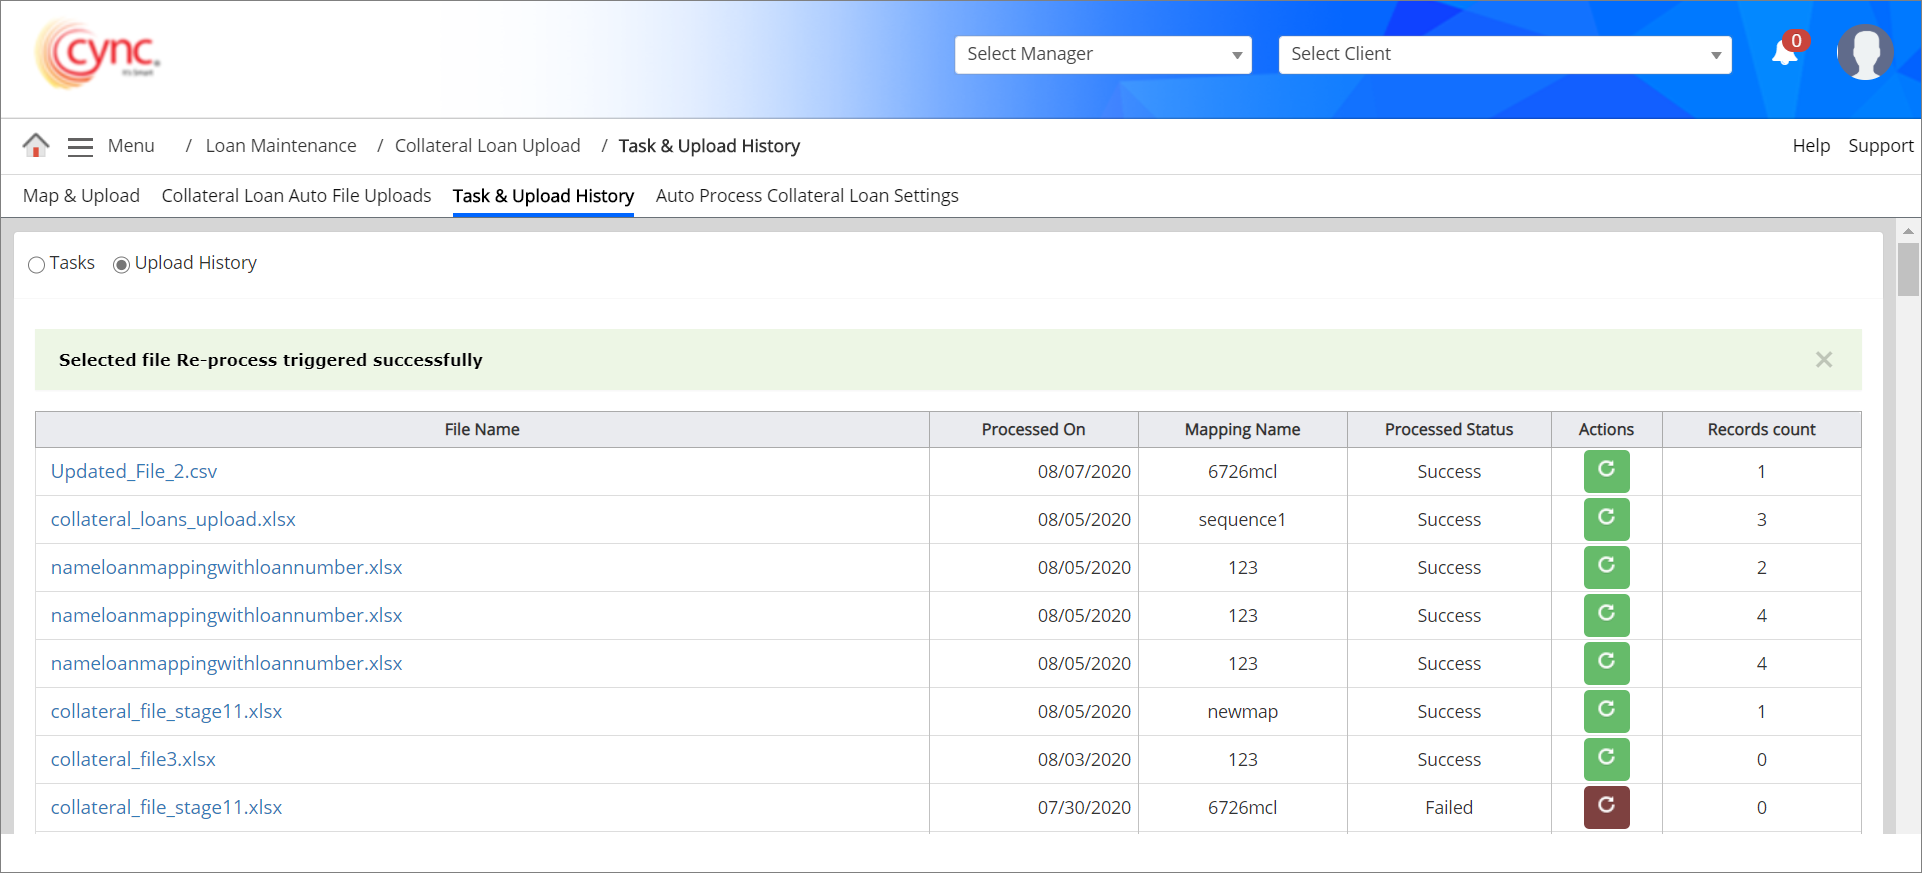
If user reprocesses the same file multiple times in Upload History section, the system will generate the exception task only once without generating it multiple times. Hence, the user will also not be notified via email multiple times.