Menu / Loan Servicing / Loan Activity / Loan Set Up
Loan Set up
The Loan Set Up page allows you to create multiple collateral loan (MCL) accounts for an ABL client.
Users can create new loan accounts, edit the existing loan account details, delete the existing loan accounts, and define interest rates along with the rate adjustments.
Users can also set up individual interest rates and charge codes & rates on each Loan ID. You may add all related transactions to the specific BBC.
By default, the loan account is created under the Loan Set Up page once the ABL client/borrower is created.
The default loan account would be considered an ABL Loan.
All loan transactions (BBC and Non-BBC loans) including interest and other charges will be tracked under the Collateral Loans page as one single Loan Account ID for the default loan account to get the outstanding Balance as a single amount against the borrower.
Any loan account created using the Create New option would be considered a Non-ABL Loan for the same ABL client.
Navigation: Menu → Loan Servicing → Loan Activity → Loan Set up
|
Table of Contents |
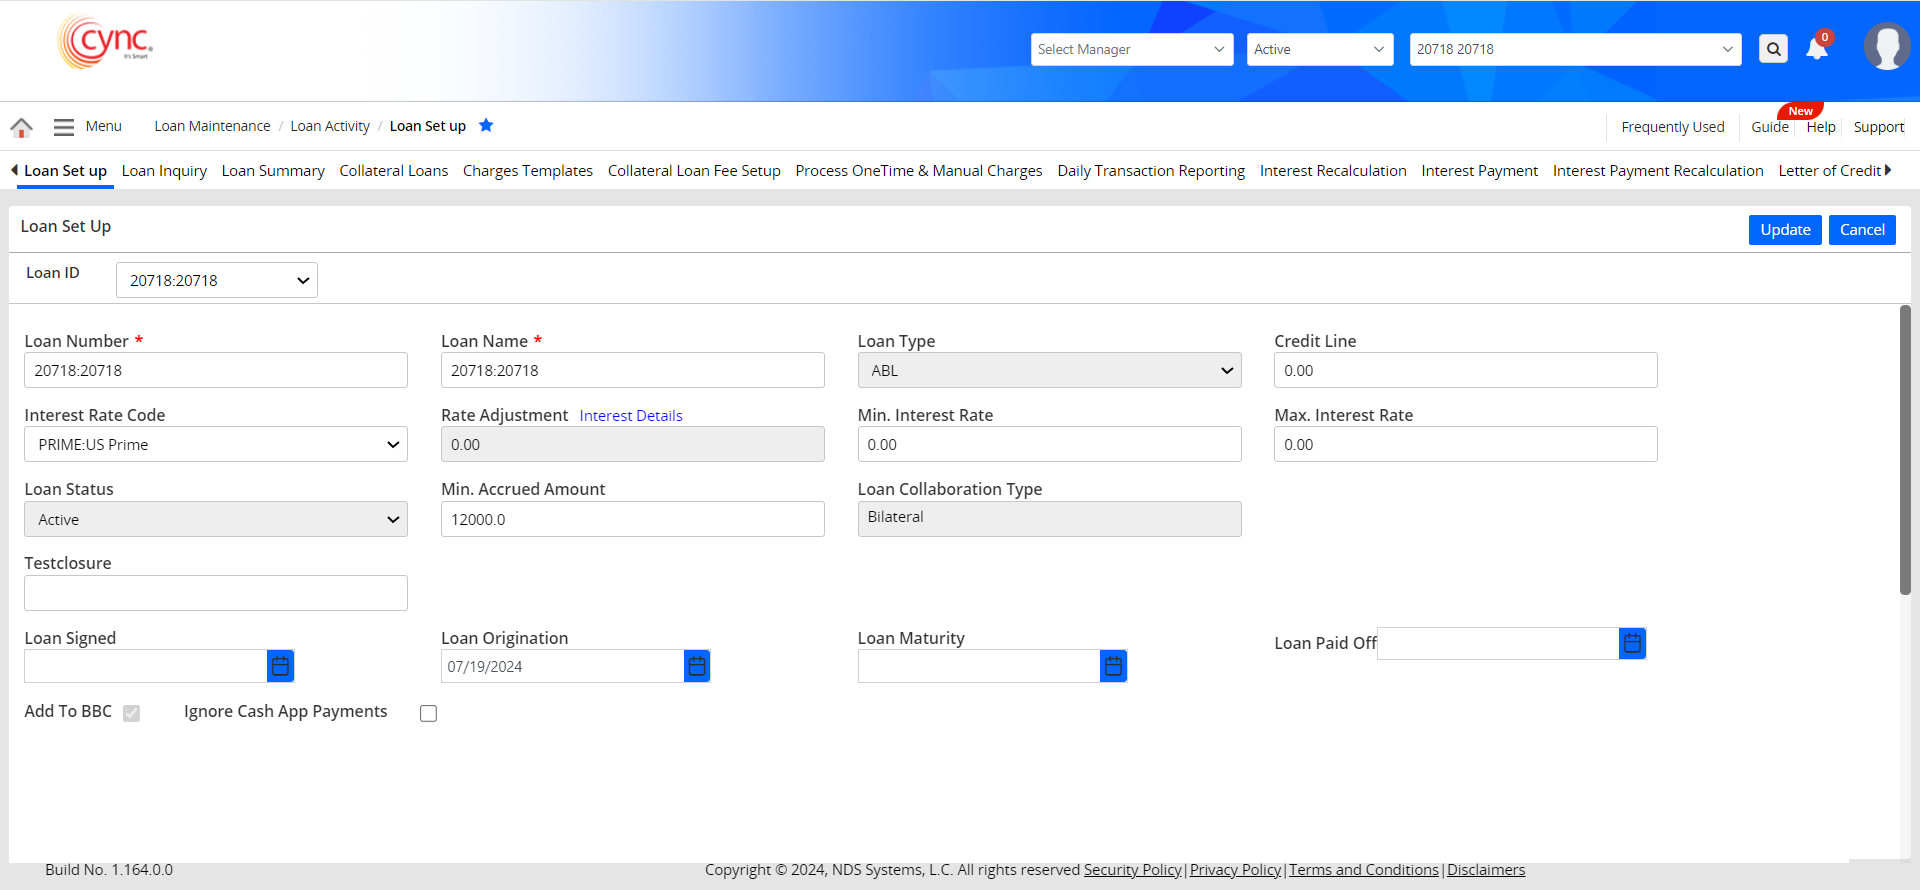
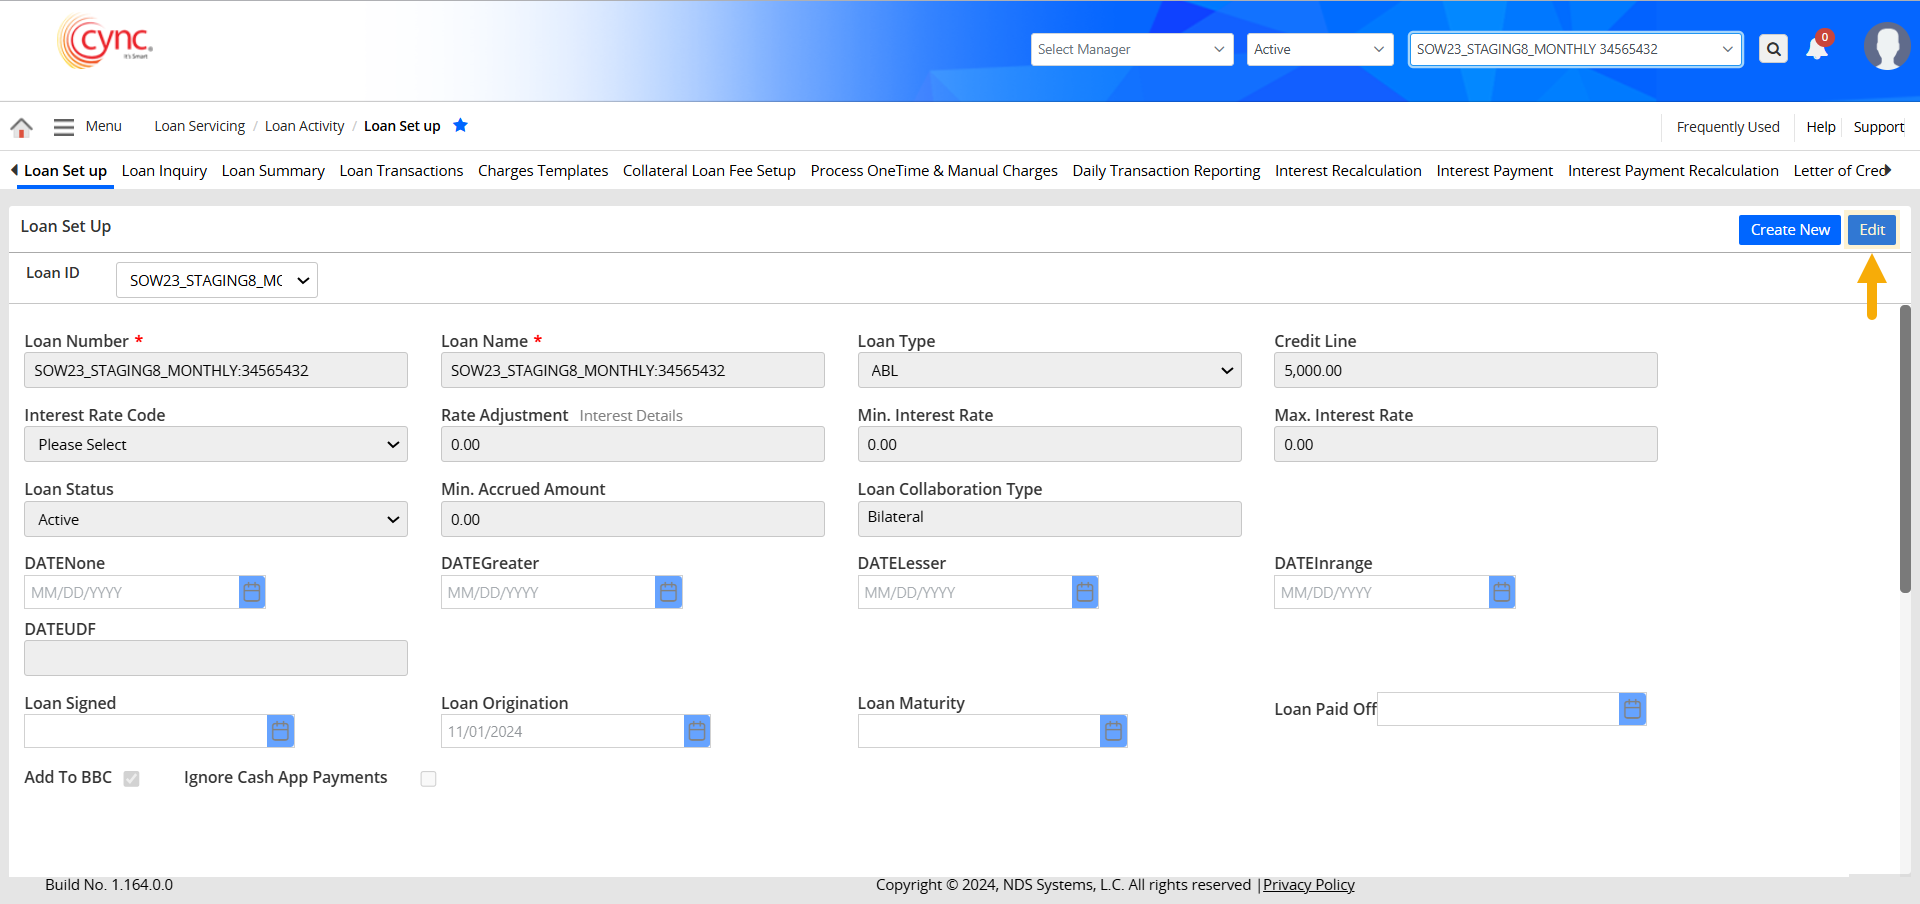
Refer to the screenshot:
Once the client is created, you can navigate to the Loan Set Up page to configure the ABL Loan or to make a non-ABL Loan.
Here is how you can configure the ABL Loan.
1. The Loan ID field automatically displays a unique alphanumeric identifier generated from the Client Name and Client Number. Since there is only one ABL loan per client, this field is pre-filled based on the information provided during client creation.
2. The Loan Number and the Loan Name fields by default take up the Loan ID value. You can still make changes to the Loan Number and Loan Name as required.
3. Loan Type is by default is ABL, as there are no other loans created during the client creation process.
4. Define the Credit Line amount.
5. Select the Interest Rate code from the dropdown. The Interest Rate codes are set up here.
6. Click the Interest Details link to get the Rate Adjustment prompt via which you can add interest rates.
7. Define the Minimum and the Maximum Interest rates for the loan.
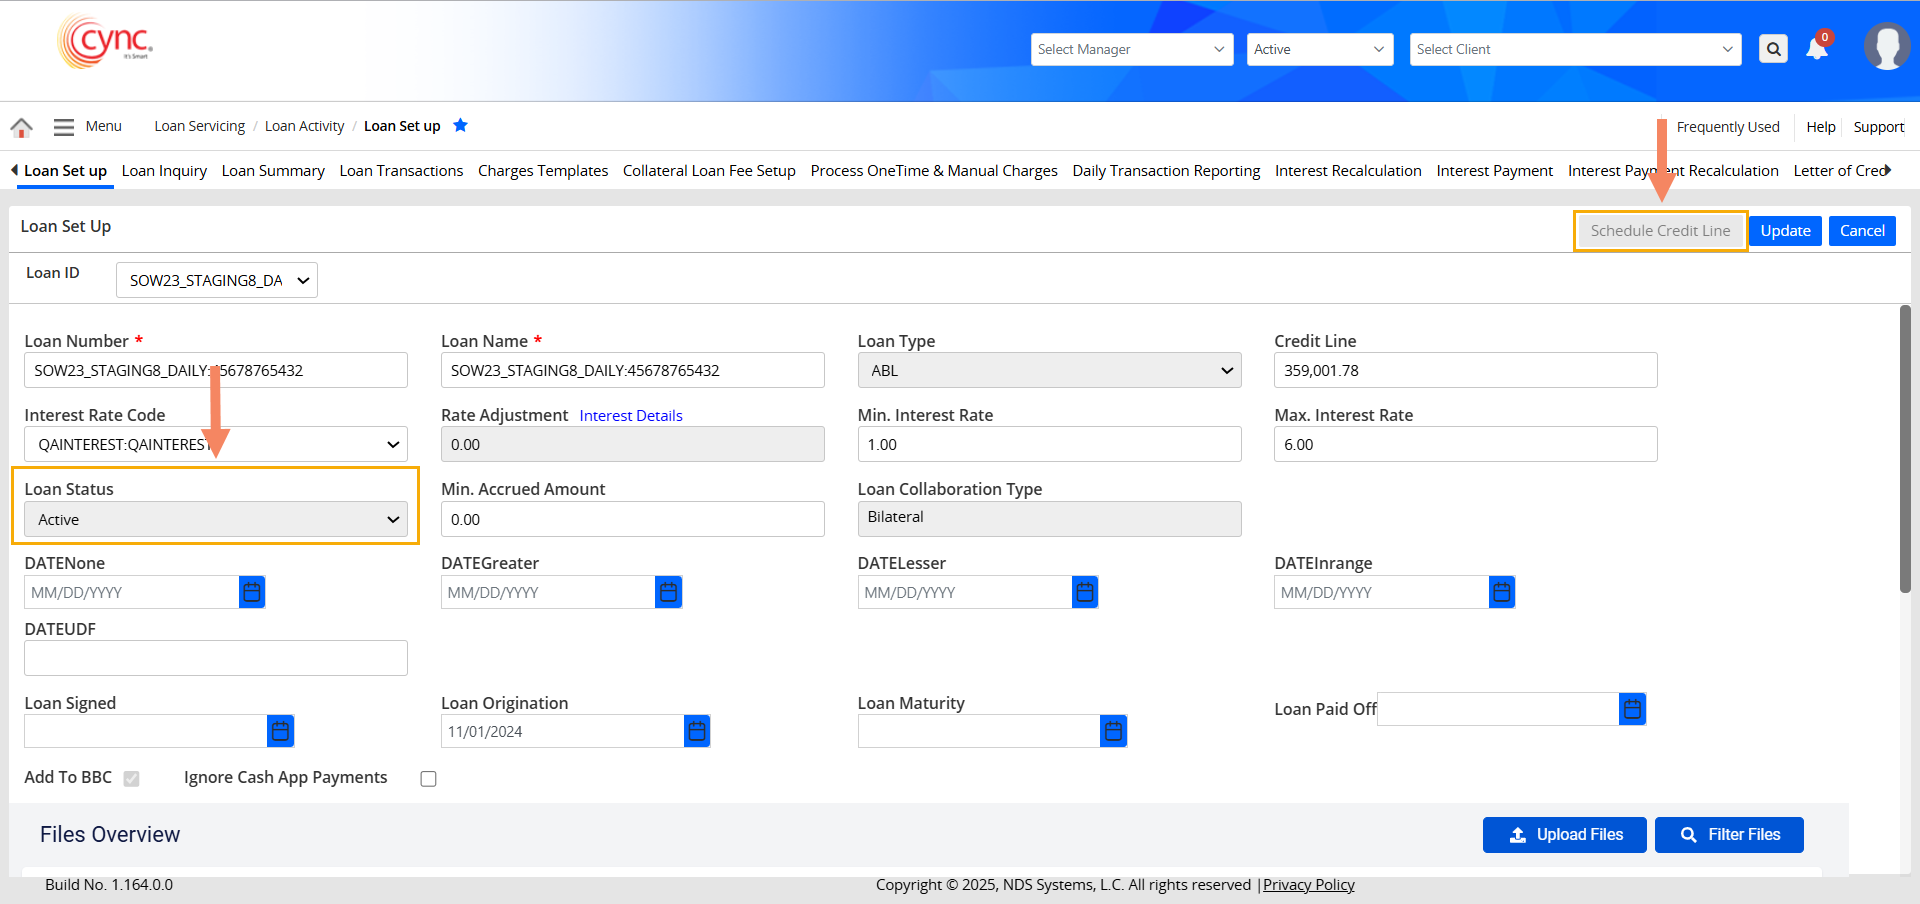
8. The Loan Status field is auto-updated based on the current status of the loan. For new ABL loans, the value is "Active" by default.
9. Define the Min. Accrued Amount.
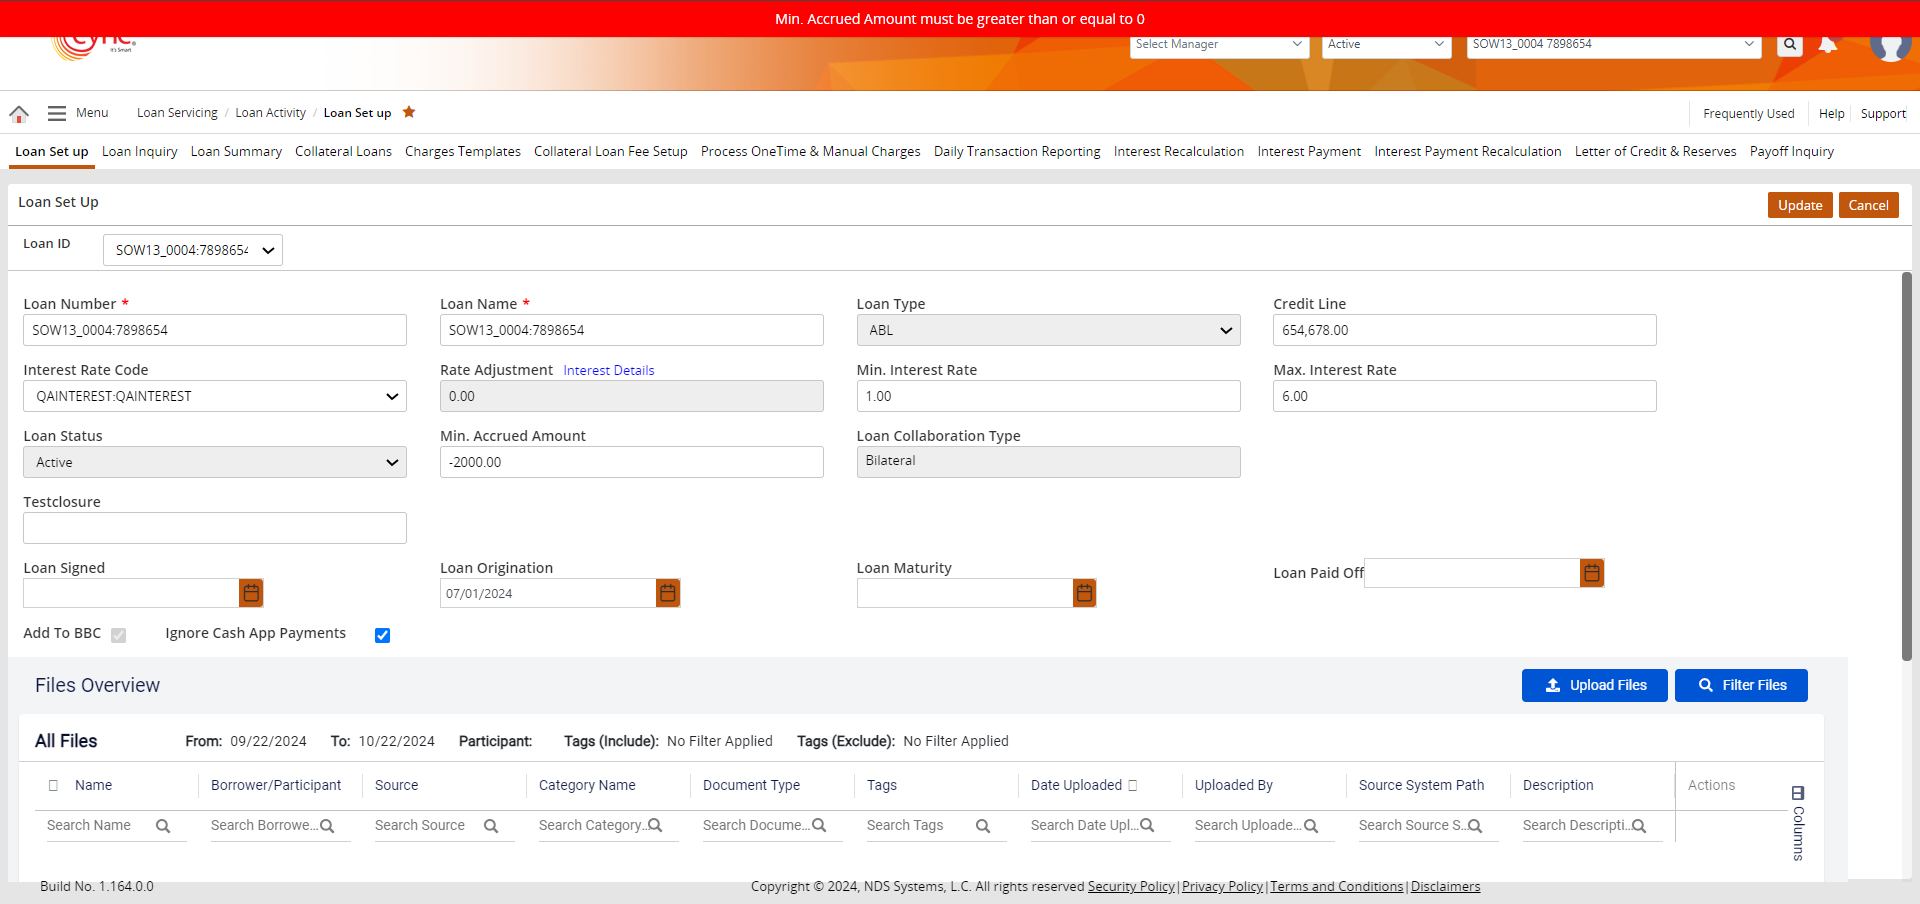
Refer to the screenshot:
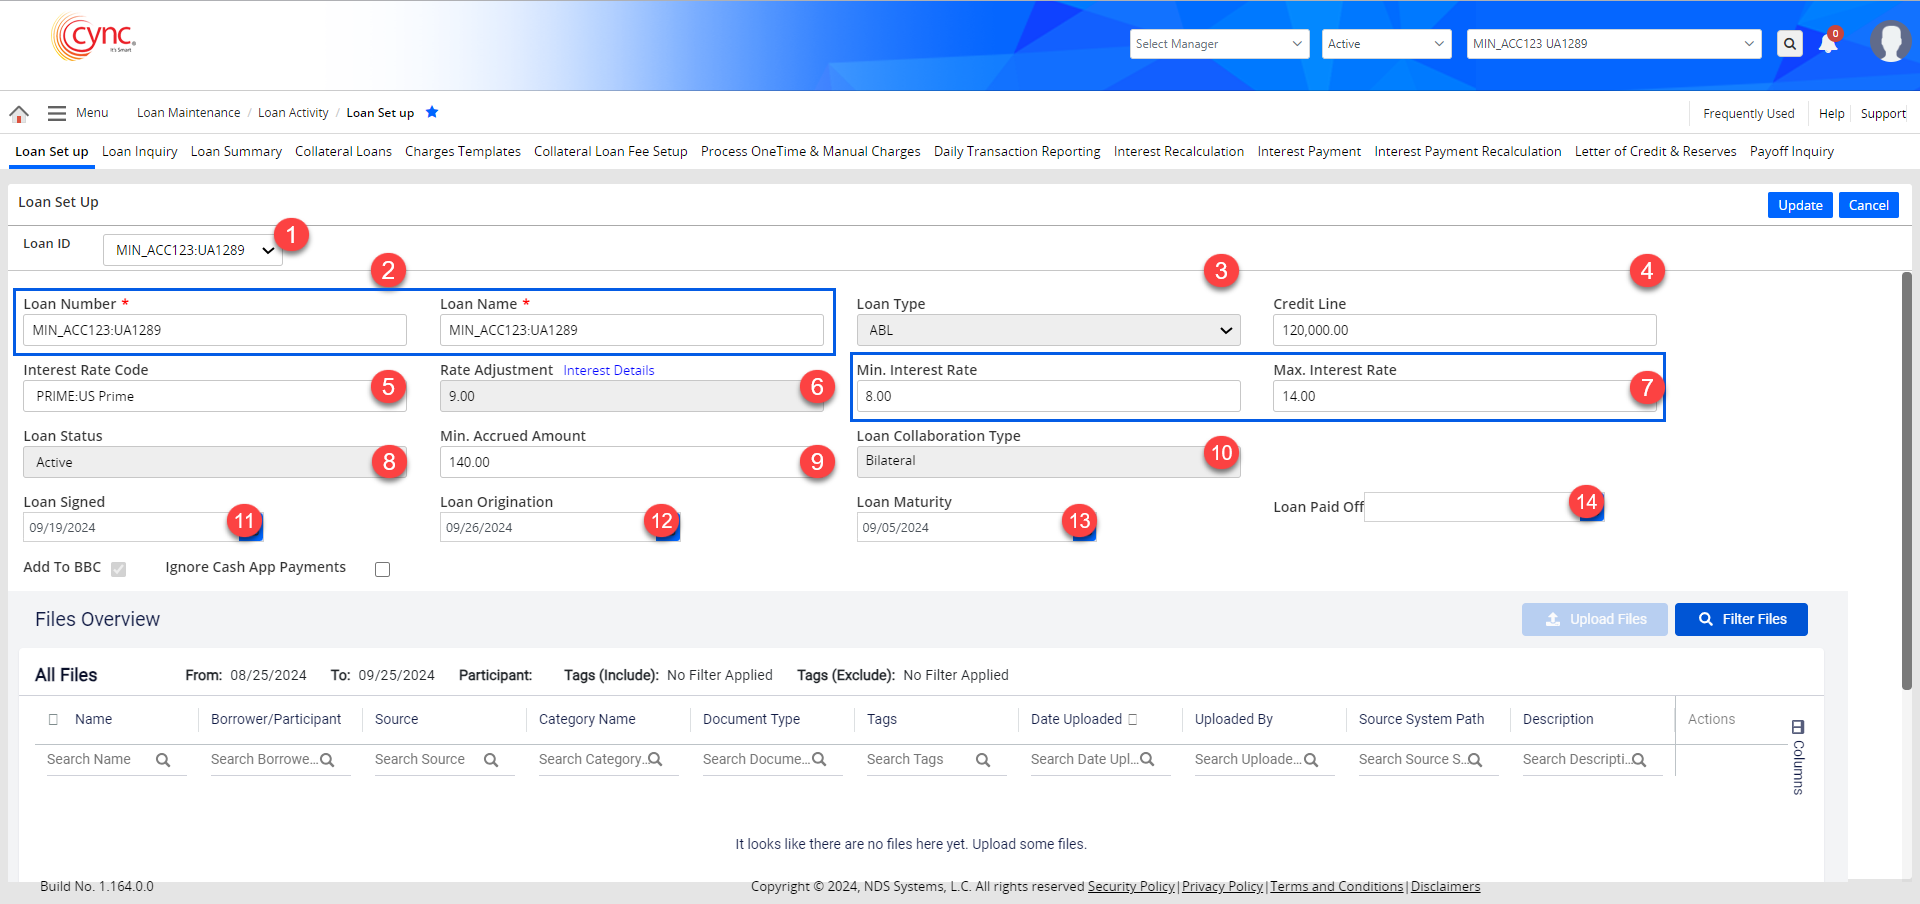
 The Min. Accrued Amount can't be negative. A negative value will issue a validation error to make the Min. Accrued Amount value greater than or equal to zero.
Refer to the screenshot:
10. The Loan Collaboration Type currently defaults to Bilateral for all the ABL Loans.
11. Select the loan agreement date in the Loan Signed field.
12. Select the loan-funded date in the Loan Origination field.
13. Select the due date for the loan repayment on the Loan Maturity field.
14. The Loan Paid Off field will be auto-populated once the loan amount is fully paid off and the closing balance becomes zero.
15. You can also add custom fields using the UDFs (User Defined Fields).
16. The Add To BBC field for all the ABL Loans is checked by default. This allows the field values to be considered while calculating the BBC.
17. The Ignore Cash App Payments is unchecked by default.
If the loan origination date of the ABL Loan is greater than the MCL Loan, the repayments made via the Cash APP will be posted under the MCL Loans.
If the Ignore Cash App Payments field is Unchecked:
All the repayments done By: Invoice, Bulk, and Loan, will be posted under the ABL Loan.
If the Ignore Cash App Payments field is Checked and the loan origination date of the ABL Loan is the same as the MCL Loan
The repayments done By Invoice will be posted under the ABL Loan.
The repayments done By Bulk will be posted under the MCL Loan.
The repayments done By Loan will be posted under the MCL Loan.
18. Click the ![]() button to finish configuring the ABL Loan.
button to finish configuring the ABL Loan.
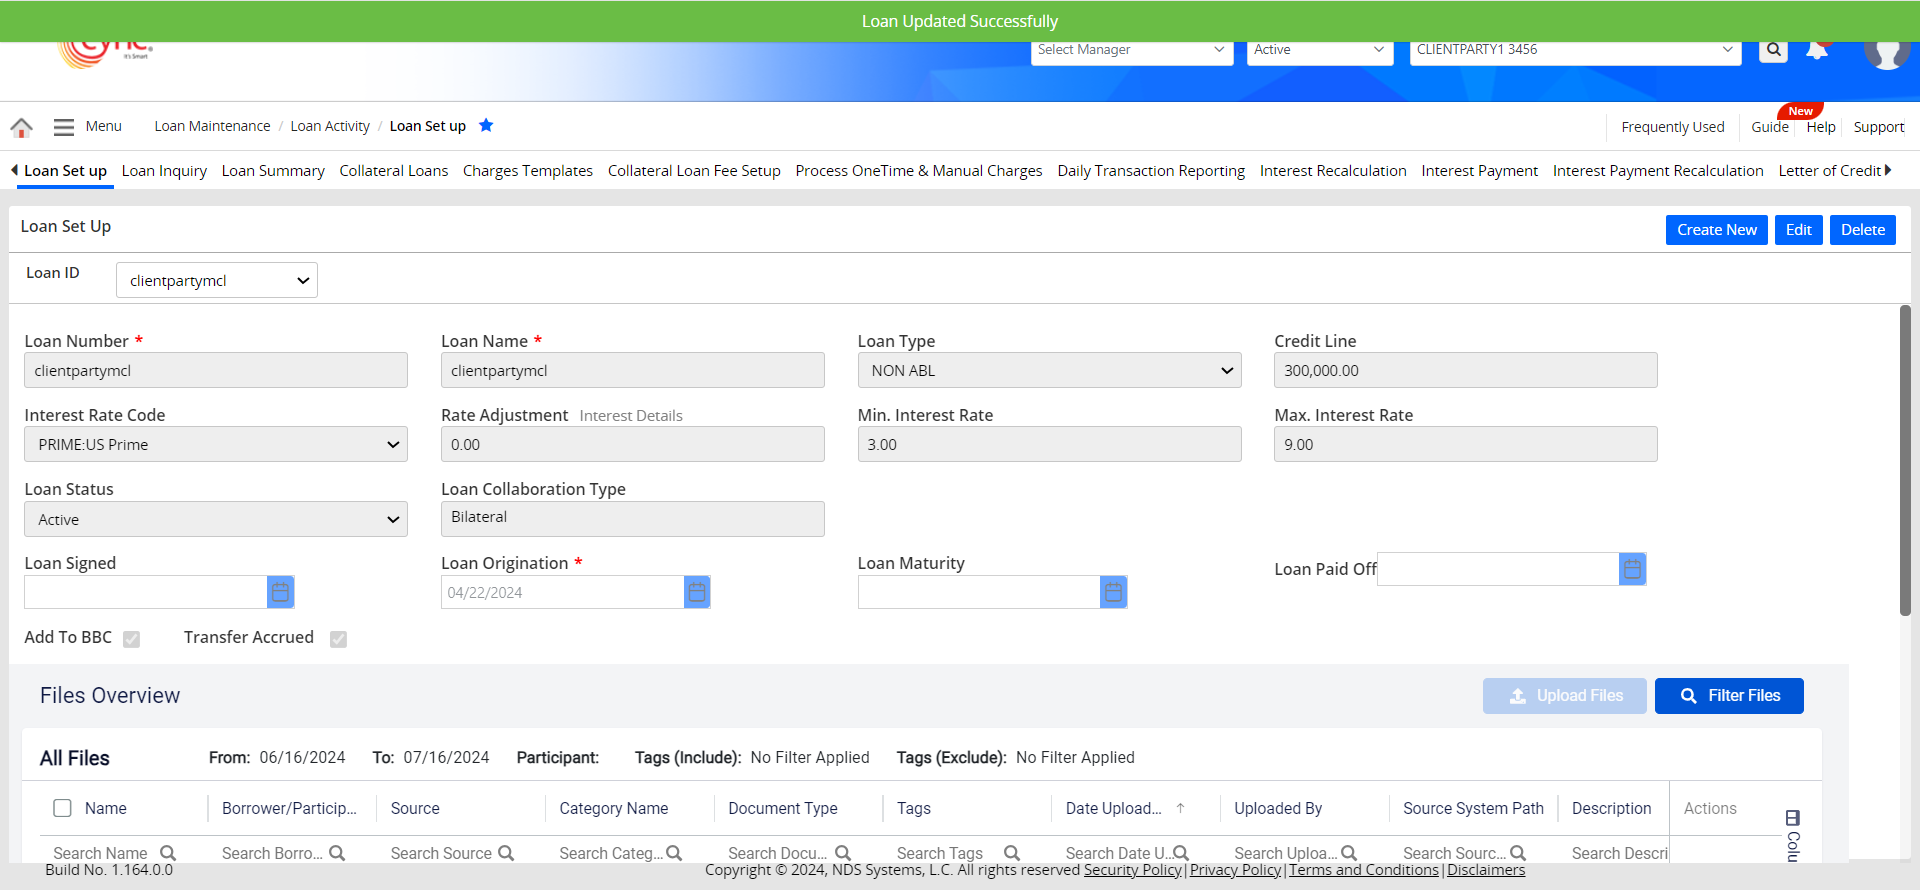
19. A success message confirms that the loan has been updated.
Refer to the screenshot:
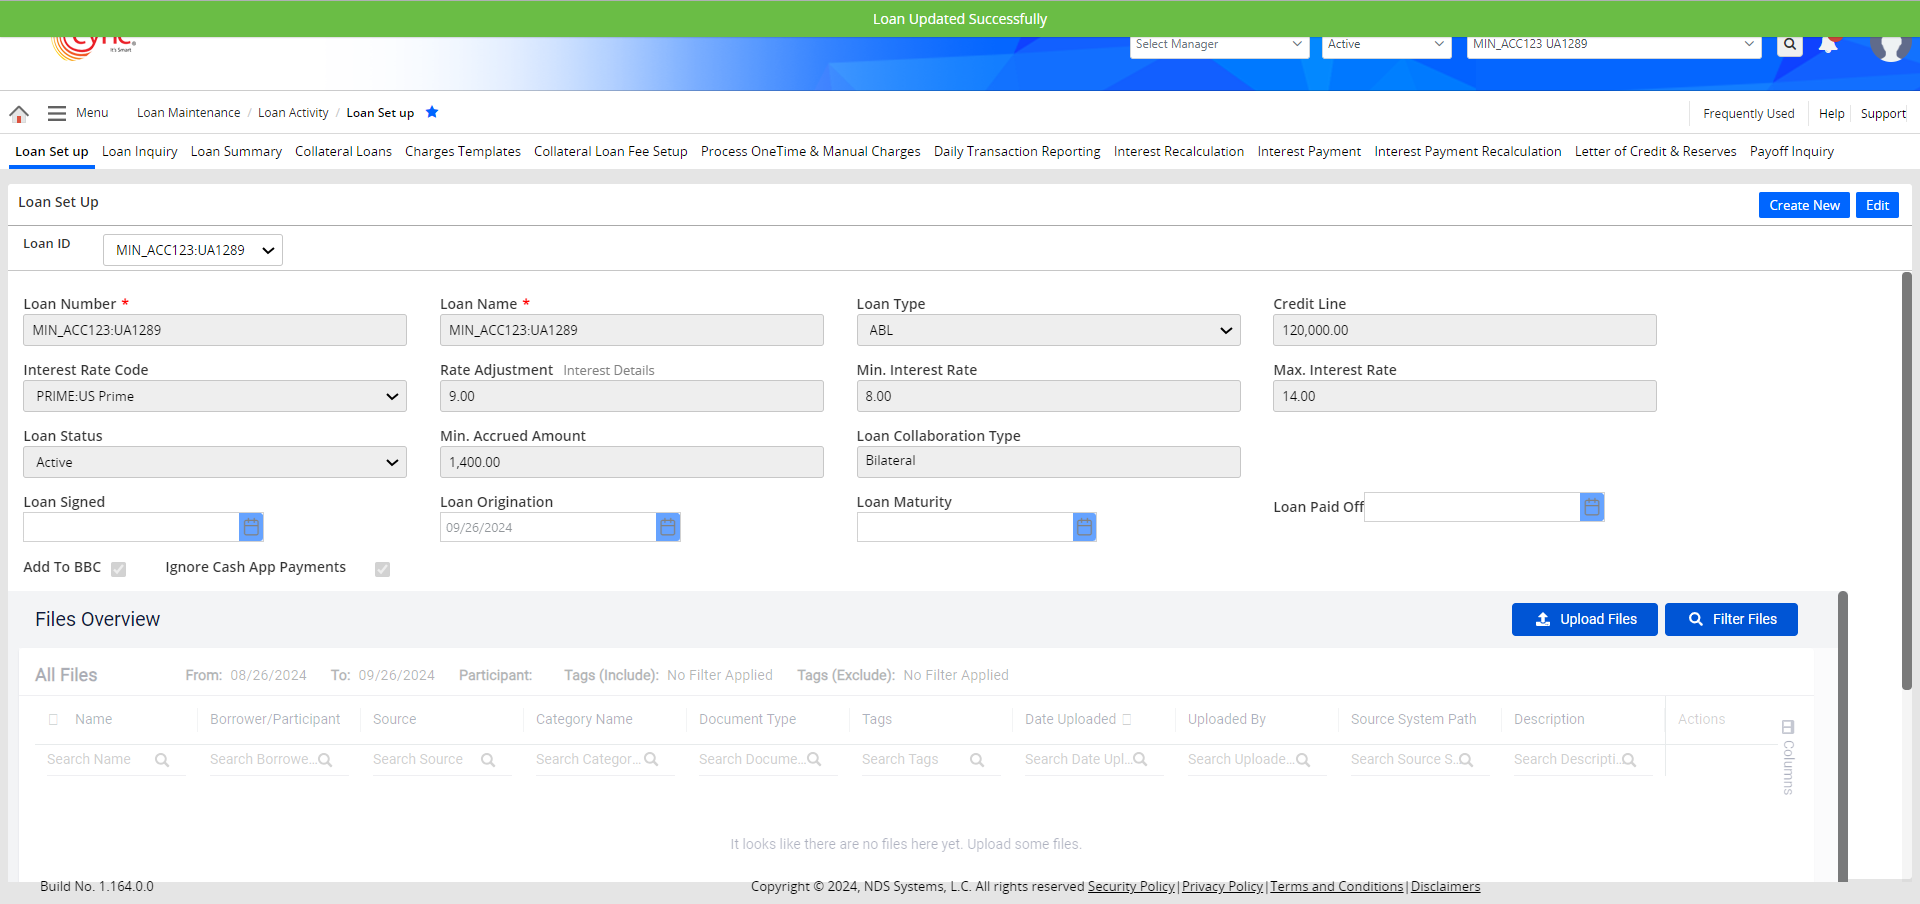
For MCL loans (non-ABL Loans), the Credit Line, Loan Status, Loan Maturity, and Loan Paid Off date fields are updated and for ABL loans, the Credit Line, Loan Status, and Loan Maturity fields are updated.
The ABL loan is always in Active status only. You cannot make the loan status inactive. In the Loan Set up page, for a loan ID, the credit line is considered for calculation only if the loan status is active with Add To BBC Flag "ON" and having Loan Origination Date <= Current BBC date.
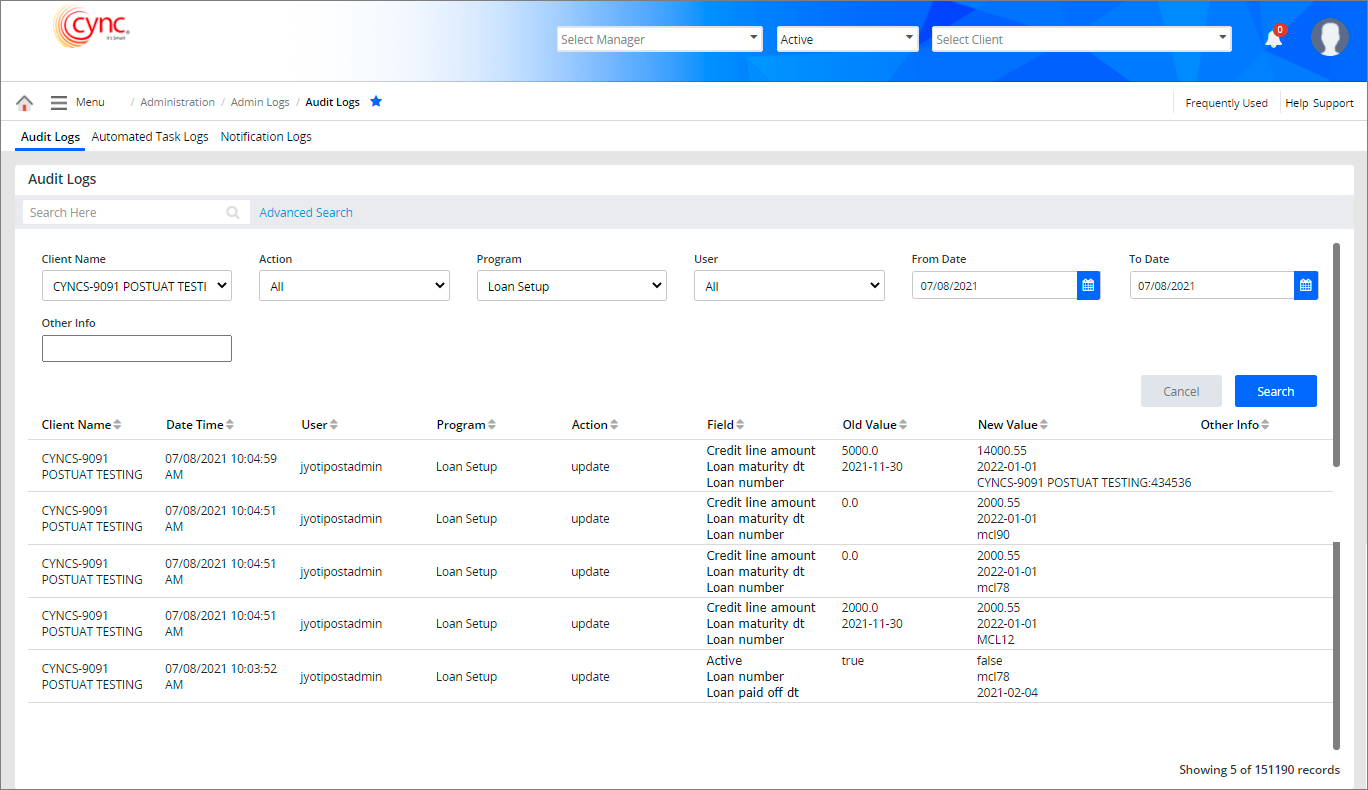
In the Audit Logs page, in the case of an ABL loan, the Credit Line, Loan Status, Loan Maturity, and Loan Paid Off date are recorded with an Update action, displaying old and new values under the Loan Set Up program.
Refer to the screenshot:
Fields and Descriptions
|
Fields |
Descriptions |
| Loan ID |
Allows the user to type the Loan ID of the client/borrower. |
| Loan Number |
Allows the user to type the Loan number of the client/borrower. |
| Loan Name | Allows the user to type the name of the client/borrower. |
| Loan Type |
Allows the user to select the type of the Loan from drop-down list. Can be ABL or MCL |
| Credit Line |
Allows the user to enter the maximum amount of credit limit for the client/borrower.
|
| Interest Rate Code | Allows the user to select the interest rate code from the drop-down list. |
| Rate Adjustment |
Specifies the special interest rate defined for a particular loan. Allows users to apply a different interest rate from a given date. Users can do so by clicking the Interest Details link. |
| Min. Interest Rate |
Allows the user to enter the minimum interest rate.
|
| Max. Interest Rate |
Allows the user to enter the maximum interest rate.
|
| Loan Status |
Displays the loan status of the client as Active or Inactive.
|
|
Min. Accrued Amount |
Allows users to set a Min. Accrued Amount that represents the threshold for the sum of interest and fees for all applicable loans, for the period. If the combined interest and fees for the loans (ABL+MCLwith Transfer Accrued flag "On") fall below this threshold, the system calculates the shortfall and posts it as "Minimum Accrued L" to the ABL loan. The Min. Accrued Amount calculation is performed only if the defined Min. Accrued Amount is greater than zero. This posting occurs either at the beginning or the end of the period, depending on the system settings. If the total interest and fees exceed or as the same as the set threshold, no additional posting is made.
|
|
Loan Collaboration Type |
Displays the type of Loan collaboration in place for the selected Loan. Can be Participation / Syndication / Bilateral. |
| UDF Field |
Allows the user to enter the UDF field value or select the value from drop-down menu based on the settings done under the User Defined Fields page.
|
| Loan Signed | Allows the user to select the date signed for the loan agreement. |
| Loan Origination | Allows the user to select the date on which the loan is funded. |
| Loan Maturity |
Allows the user to select the due date for the loan amount to be paid. |
| Loan Paid Off |
Displays the loan paid off date. This field is automatically filled out by Cync.
|
| Loan Documents | Allows the user to upload the documents related to this specific loan. |
| Add To BBC |
Select the checkbox if the loan details need to be added in the current BBC.
|
| Transfer Accrued |
Select the checkbox to transfer the Accrued Interest and Accrued Fees from MCL loans to ABL loans. This flag is only available for the MCL / non-ABL loans
|
| Ignore Cash App Payments | Select the checkbox if the payment needs to be ignored for an ABL default Loan and needs to be only posted to a Non-ABL loan. |
If the Add To BBC flag is ON, then the system displays the sum of all principle balances to the loan in the Net BBC availability field under the BBC Availability page, Unapproved BBC page and BBC’s to be approved page (before approving the BBC).
If the Loan Status is INACTIVE, then the system will not add the inactive loans in the BBC Availability page even if the Add To BBC flag is ON. The system will not allow the user to edit the loan details in the Collateral Loans page for Inactive loans.
If the Add To BBC flag is ON, then the system displays the sum of all principal balances to the loan in the Current Balance column under the Client Summary page.
If the Add To BBC flag is OFF, then the loan details will not be added to the current BBC.
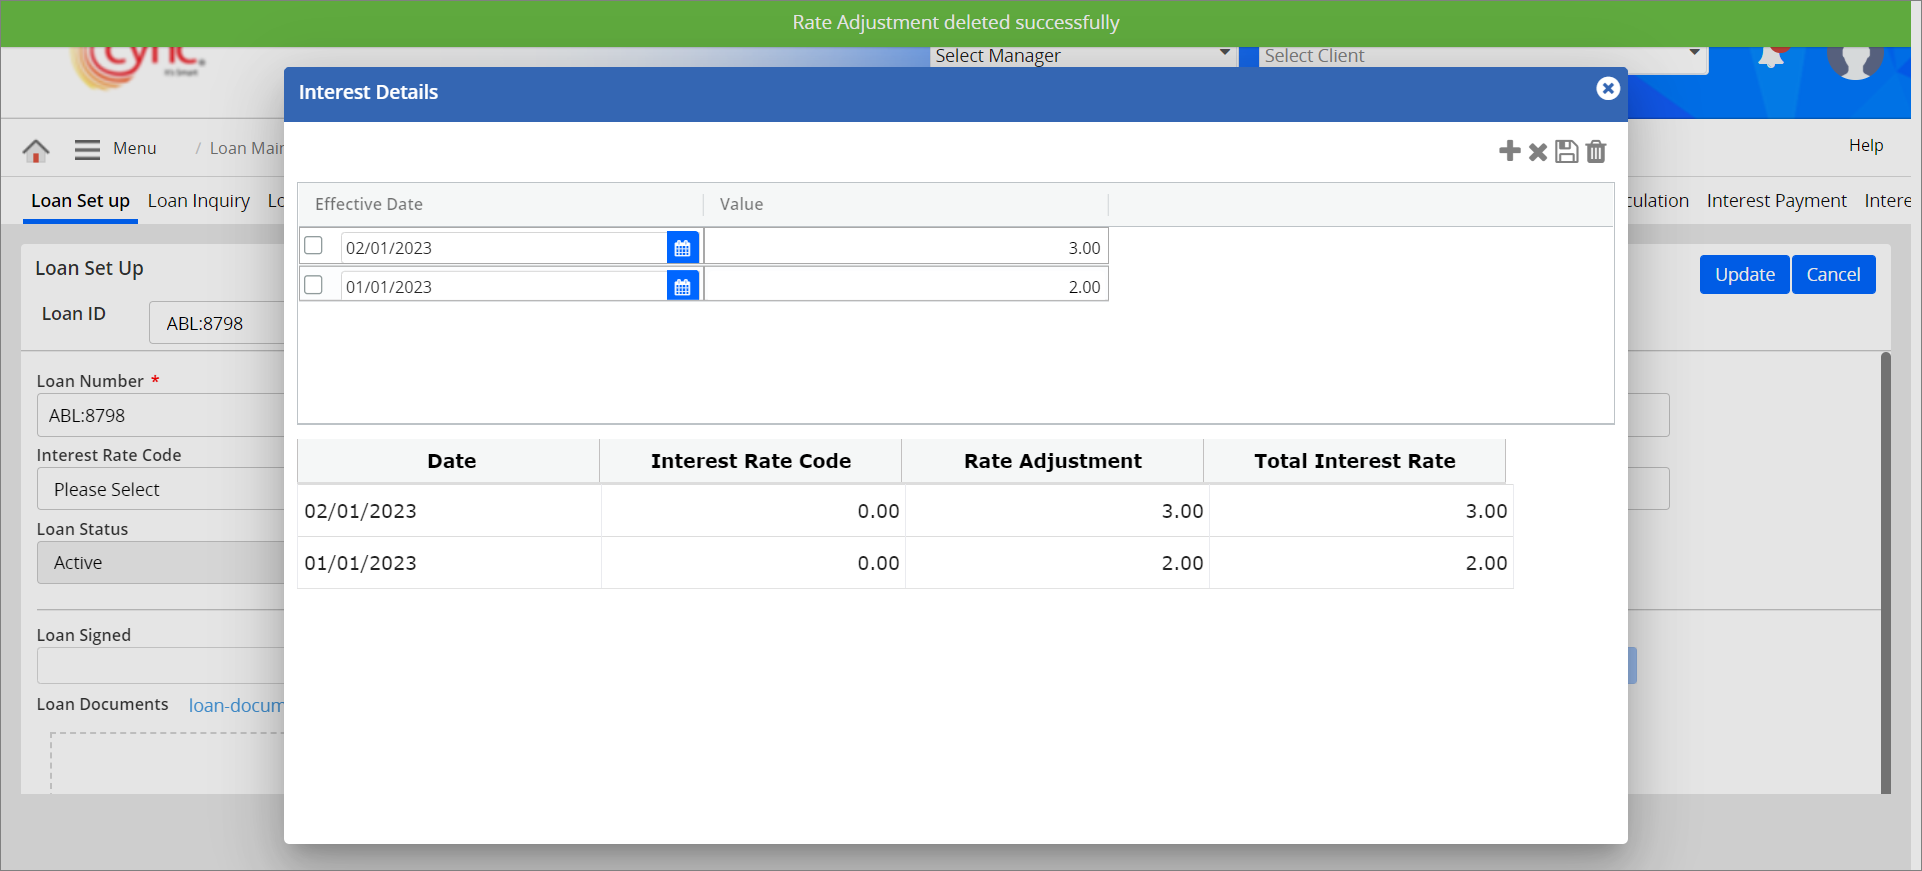
The Interest Details link allows the user to add and delete the positive rate adjustment value on the Loan Set Up page. You may also add the negative rate adjustment value in the Loan Set Up page only if the Interest Code Rate value is greater than the rate adjustment value. The created rate adjustment value will also be reflected in the Interest Details link under the Basic Parameters page.
Refer to the screenshot:
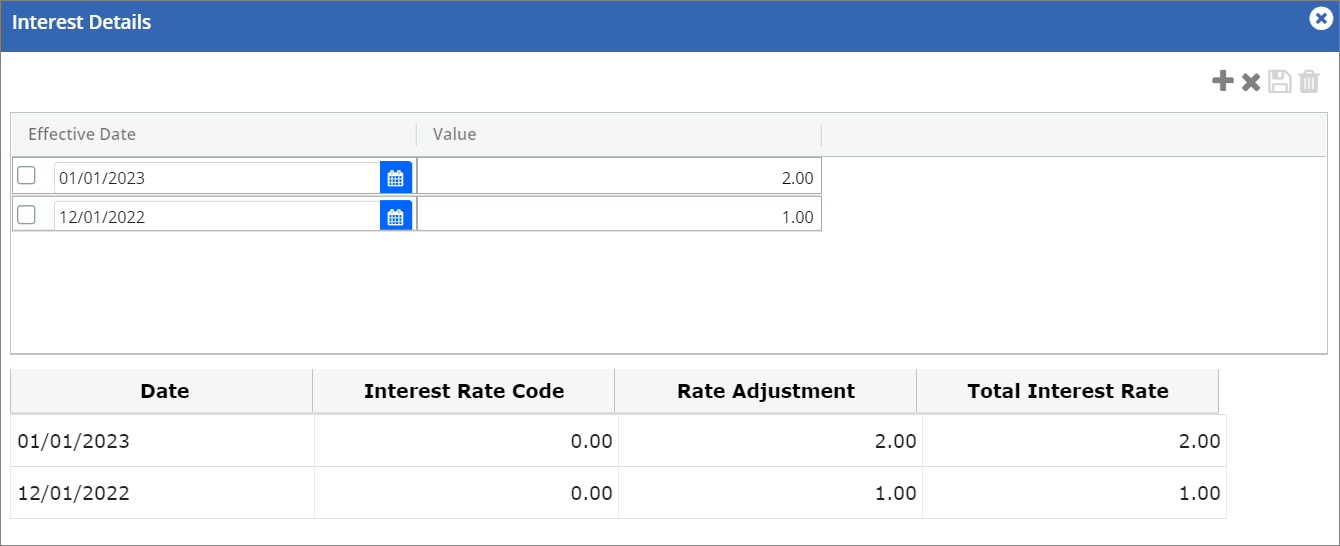
Fields and Descriptions:
|
Fields |
Descriptions |
|
Date |
Displays the start date of the rate adjustment value. |
|
Interest Rate Code |
Displays the Interest rate code value. |
|
Rate Adjustment |
Displays the rate adjustment value. |
|
Total Interest Rate |
Displays the total sum value of the Interest Rate Code and Rate Adjustment. |
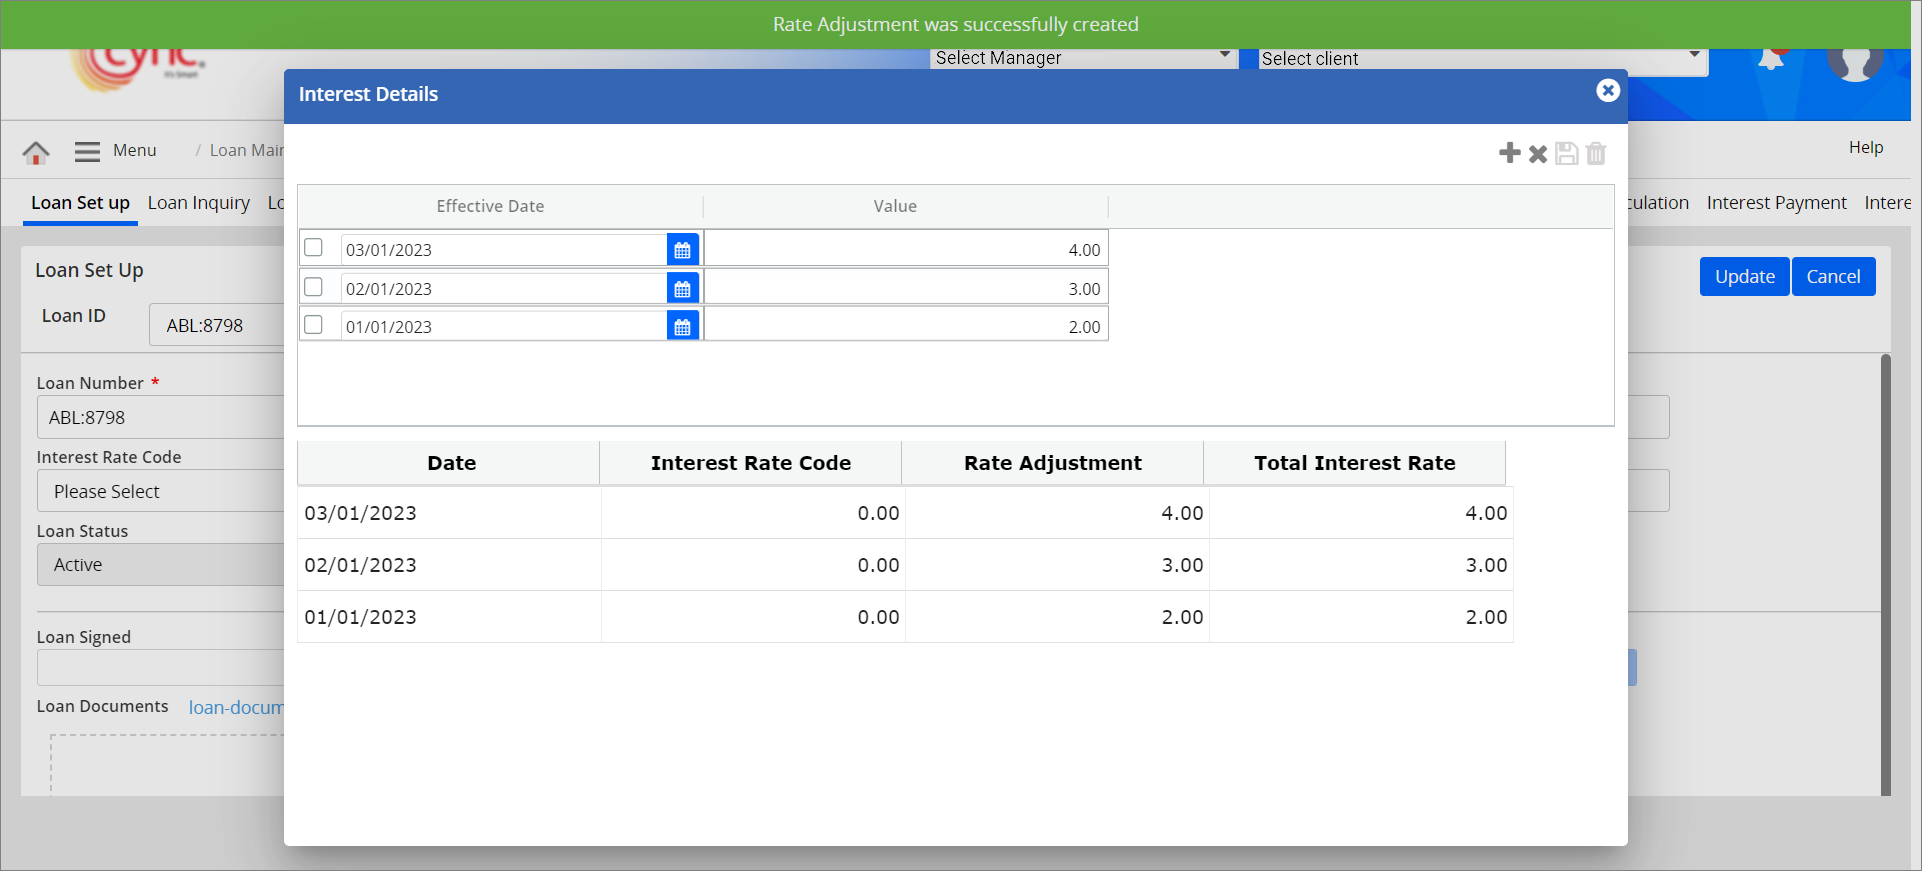
To add the Interest details, perform these steps:
1. Click the  icon to add new interest details.
2. In the Effective Date column, select the start date for the interest rate adjustment.
The Effective Date should be greater than the last approved BBC and should be greater than the end of the previous month.
3. In the Value column, enter the rate adjustment value.
You may click the  button if you want to reset the fields before saving the interest rate adjustment values.
4. Click the  button. The Interest rate adjustment value is successfully created and a success message “Rate Adjustment was successfully created" appears.
Refer to the screenshot:
Negative values should not be allowed to add as adjustment amount for the previous periods if the interest is set as Accrued To Loan/accrued to statement.
When user enters the negative Rate Adjustment value on specific date on which total Interest rate become negative, the system shows an error notification.
Refer to the screenshot:

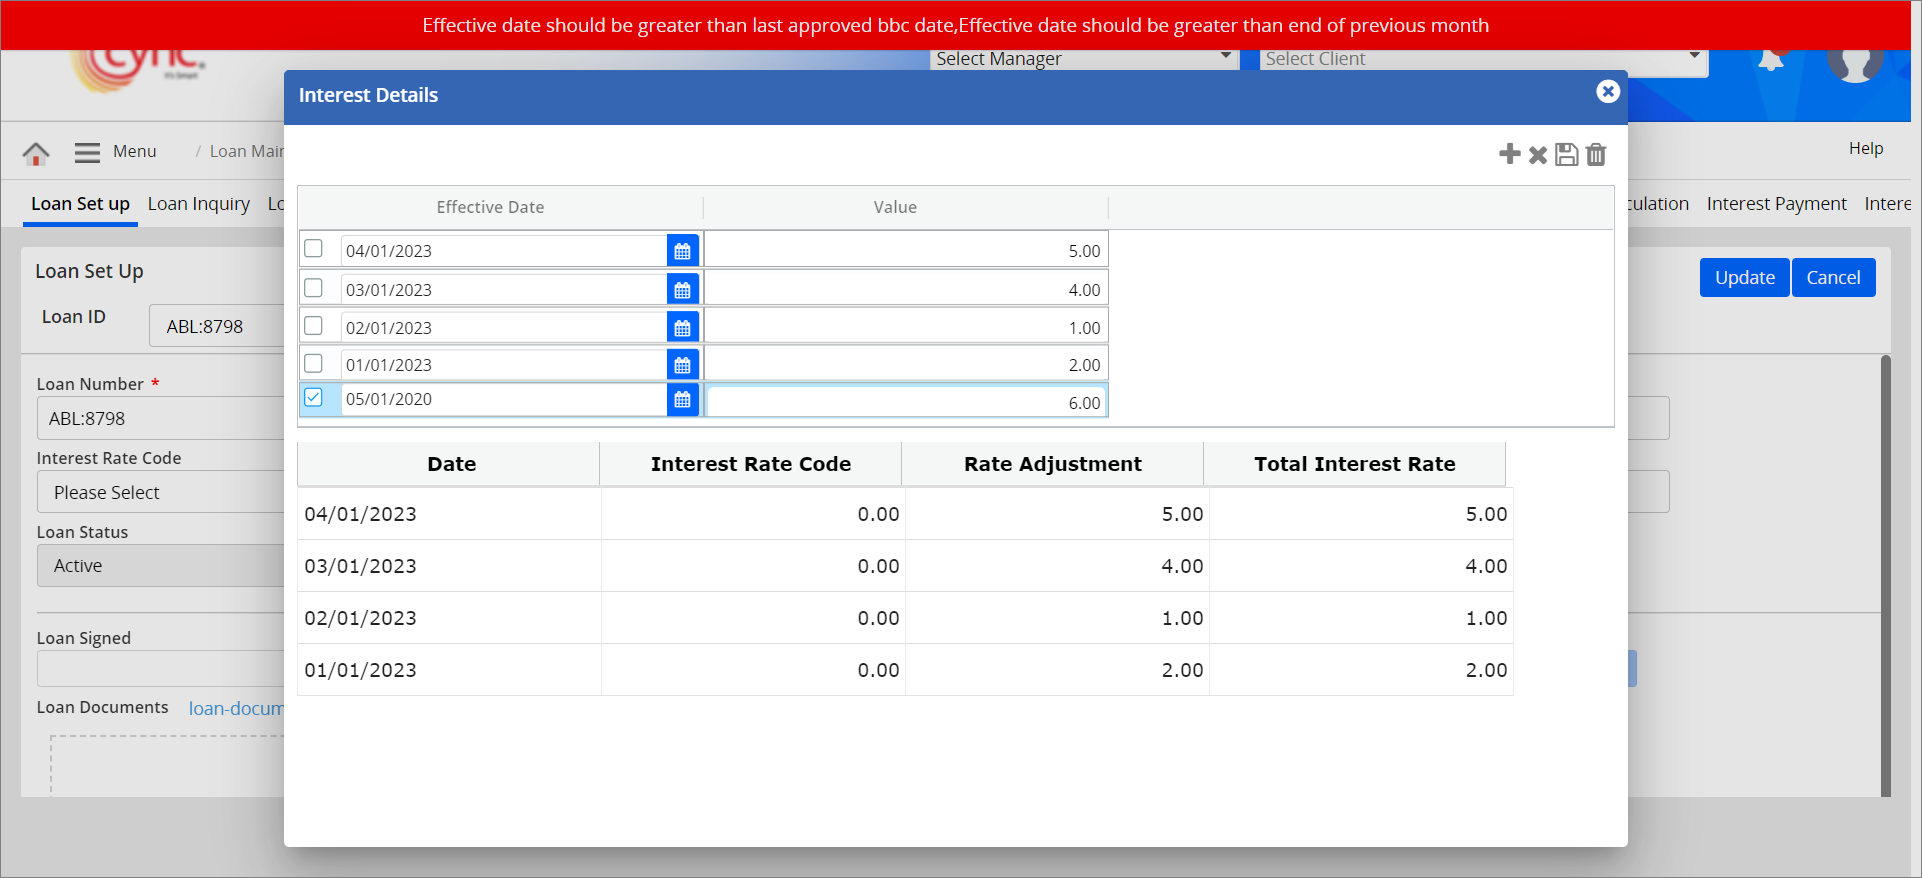
If the Effective Date is selected lesser than the last approved BBC and/or lesser than the end of previous month, then the system shows an error notification.
Refer to the screenshot:
To delete interest details, perform these steps:
1. In the Effective Date column, select the interest rate adjustment value that you wish to delete.
2. Click the ![]() button. A delete pop-up window appears.
button. A delete pop-up window appears.
Refer to the screenshot:
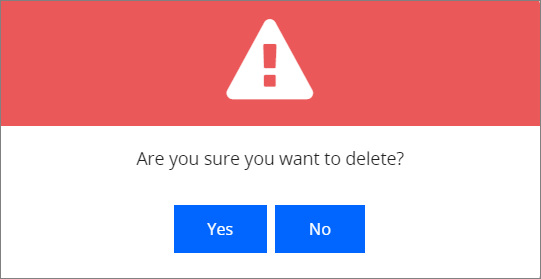
3. Click the  button to cancel the rate adjustment deletion process.(or)
4. Click the  button. The interest rate adjustment value is successfully deleted and a success message “Rate Adjustment deleted successfully" appears.
Refer to the screenshot:
You can create, edit and delete the loan account based on the permissions provided under the Roles and Permissions page.
This option allows you to create non-ABL loans.
To create new Non-ABL Loans, perform these steps:
1. Click the ![]() button. The Create New page appears.
button. The Create New page appears.
Refer to the screenshot:
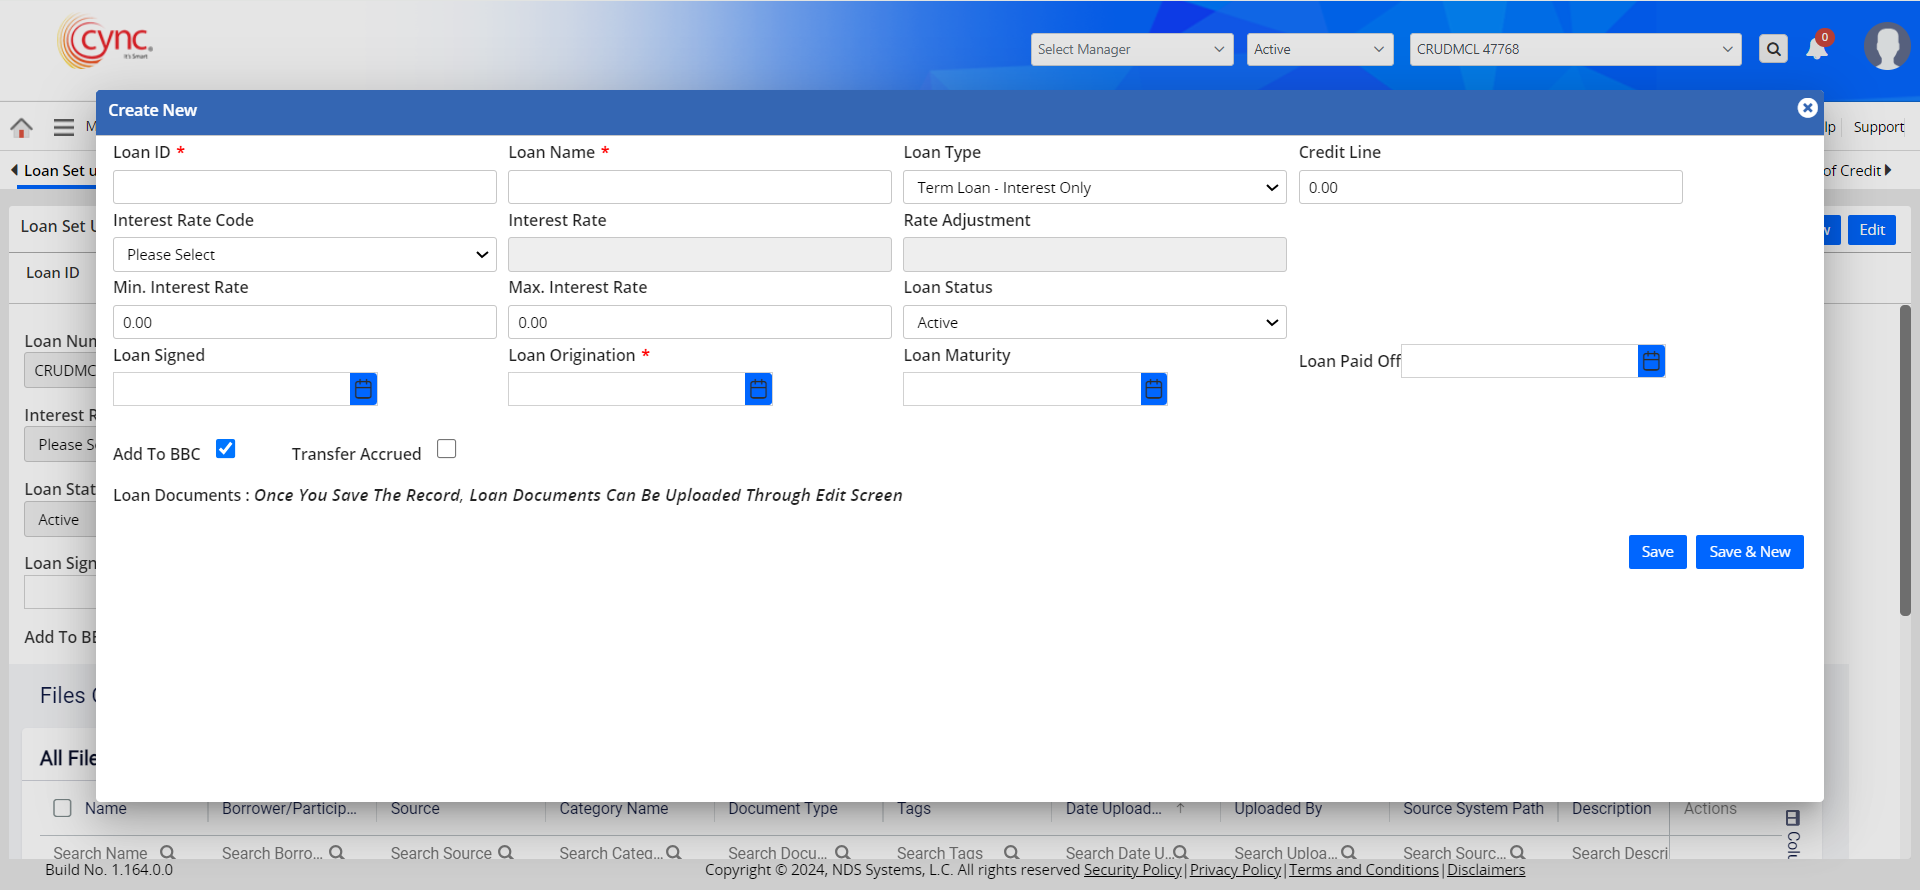
2. Populate all the required fields with appropriate information.
3. The Add To BBC field is checked by default. This allows the field values will be linked to the Current BBC (BBC Availability).
You can also uncheck the Add To BBC field. In this case, the loan values will not be linked to the Current BBC (BBC Availability).
4. The Transfer Accrued field is unchecked by default, that allows the interests and fees to be posted under the same MCL Loan.
If the Transfer Accrued field is checked, this allows the interests and fees to be posted under the ABL Loan with the Accrued Interest L or the Accrued Fees L posting type.
5. Click the  button to save and create a new loan simultaneously. (or)
6. Click the ![]() button. The new non-ABL loan account is created and the message "Loan Created successfully" appears.
button. The new non-ABL loan account is created and the message "Loan Created successfully" appears.
Refer to the screenshot:

Upon creating the new loan, the system logs the loan creation details in the Audit Logs page.
Users can enable or disable the Add To BBC flag while creating a new MCL Loan/Non-ABL Loan.
Users can enable or disable the Transfer Accrued flag while creating a new MCL Loan/Non-ABL Loan.
Enabling the Transfer Accrued field will transfer the MCL loan's Accrued Interest and Accrued Fees to the corresponding ABL loan, in cases where both fees and interest charge codes are set to Accrued To Loan.
Also, both Accrued Fees L and Accrued Interest L will be posted under the ABL Loan.
If the Transfer Accrued flag is OFF, then there won't be any transfers of Accrued Interest and Accrued Fees from MCL Loans to ABL Loans.
If the Credit Line, Expiry Date, and Risk Rating Code are mapped and the file is uploaded successfully without mapping the Loan ID under the Map & Uploads page, then the Loan Maturity Date and the Credit Line get updated according to the ABL Loan under Loan Set Up page.
If there are multiple entries with different Expiry Dates of the same client in the uploaded file under Map & Uploads page, then the system fetches and displays the greatest date as Loan Maturity date for ABL Loan under Loan Set Up page. If there are multiple entries with different Credit Line amounts of the same client in the uploaded file under Map & Uploads page, then the system fetches and displays the higher value as Credit Line for ABL Loan under Loan Set Up page.
If Credit Line, Expiry Date, Risk Rating Code are mapped, the Loan ID is also mapped and file is uploaded successfully under Map & Uploads page, then the Credit Line and Expiry Date of each Loan ID gets updated automatically under Loan Set Up page for each Loan.
If the Credit Line, Expiry Date, Risk Rating Code are mapped, the Loan ID is also mapped and the file is uploaded successfully under Map & Uploads page, then the Credit Line value will be Sum of Credit Line of all the Loan IDs (when Add To BBC Flag is ON) and the Expiration Date will be the greatest date among the Loan Maturity dates of all the Loan IDs (Can be taken from the Loan Set Up page of each Loan ID) under Basic Client Detail page.
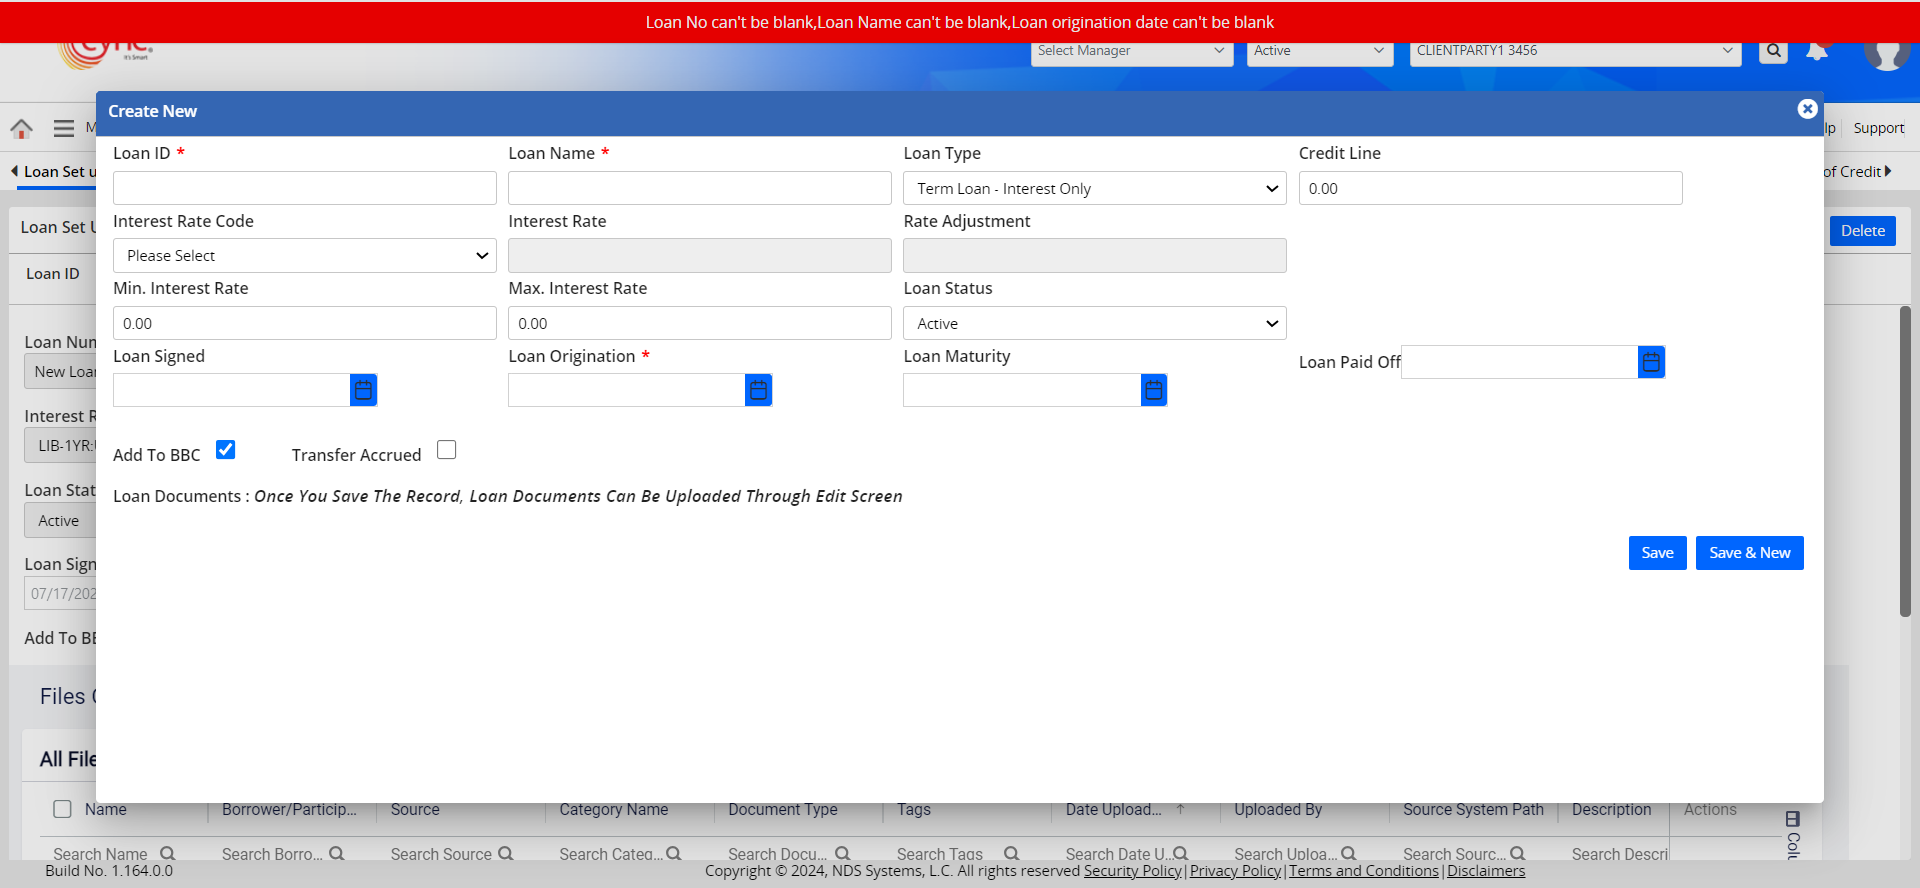
Fields marked with * are mandatory fields. If the mandatory fields are not filled out while creating/editing the MCL loan, then the system shows an error notification.
Refer to the screenshot:
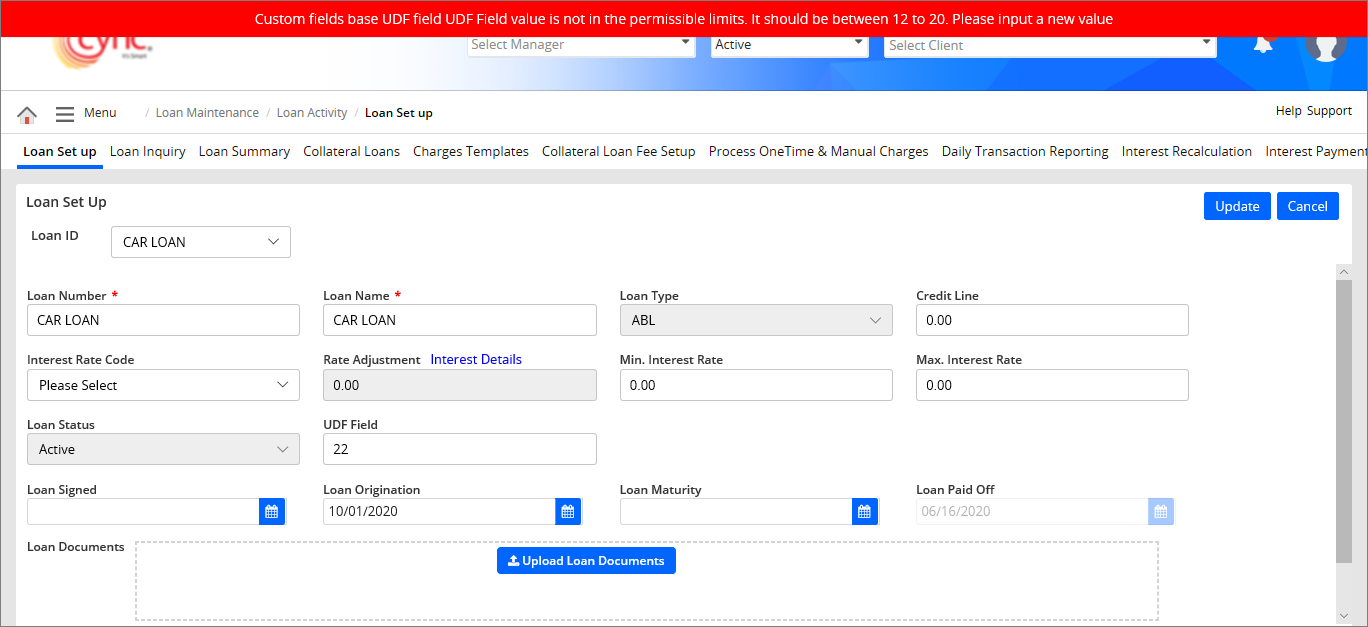
When the user inputs values in the UDF field while creating MCL loans or user updates the values in UDF field while editing ABL/MCL loans in the Loan Set up page, the system logs those entries in the Audit Logs page.
If the user enters the UDF Field value which is either lesser than the value defined in the Min Value field or greater than the value defined in the Max Value field (especially when the Validation Type is set as Range) under User Defined Field page, then the system shows an error notification.
Refer to the screenshot:
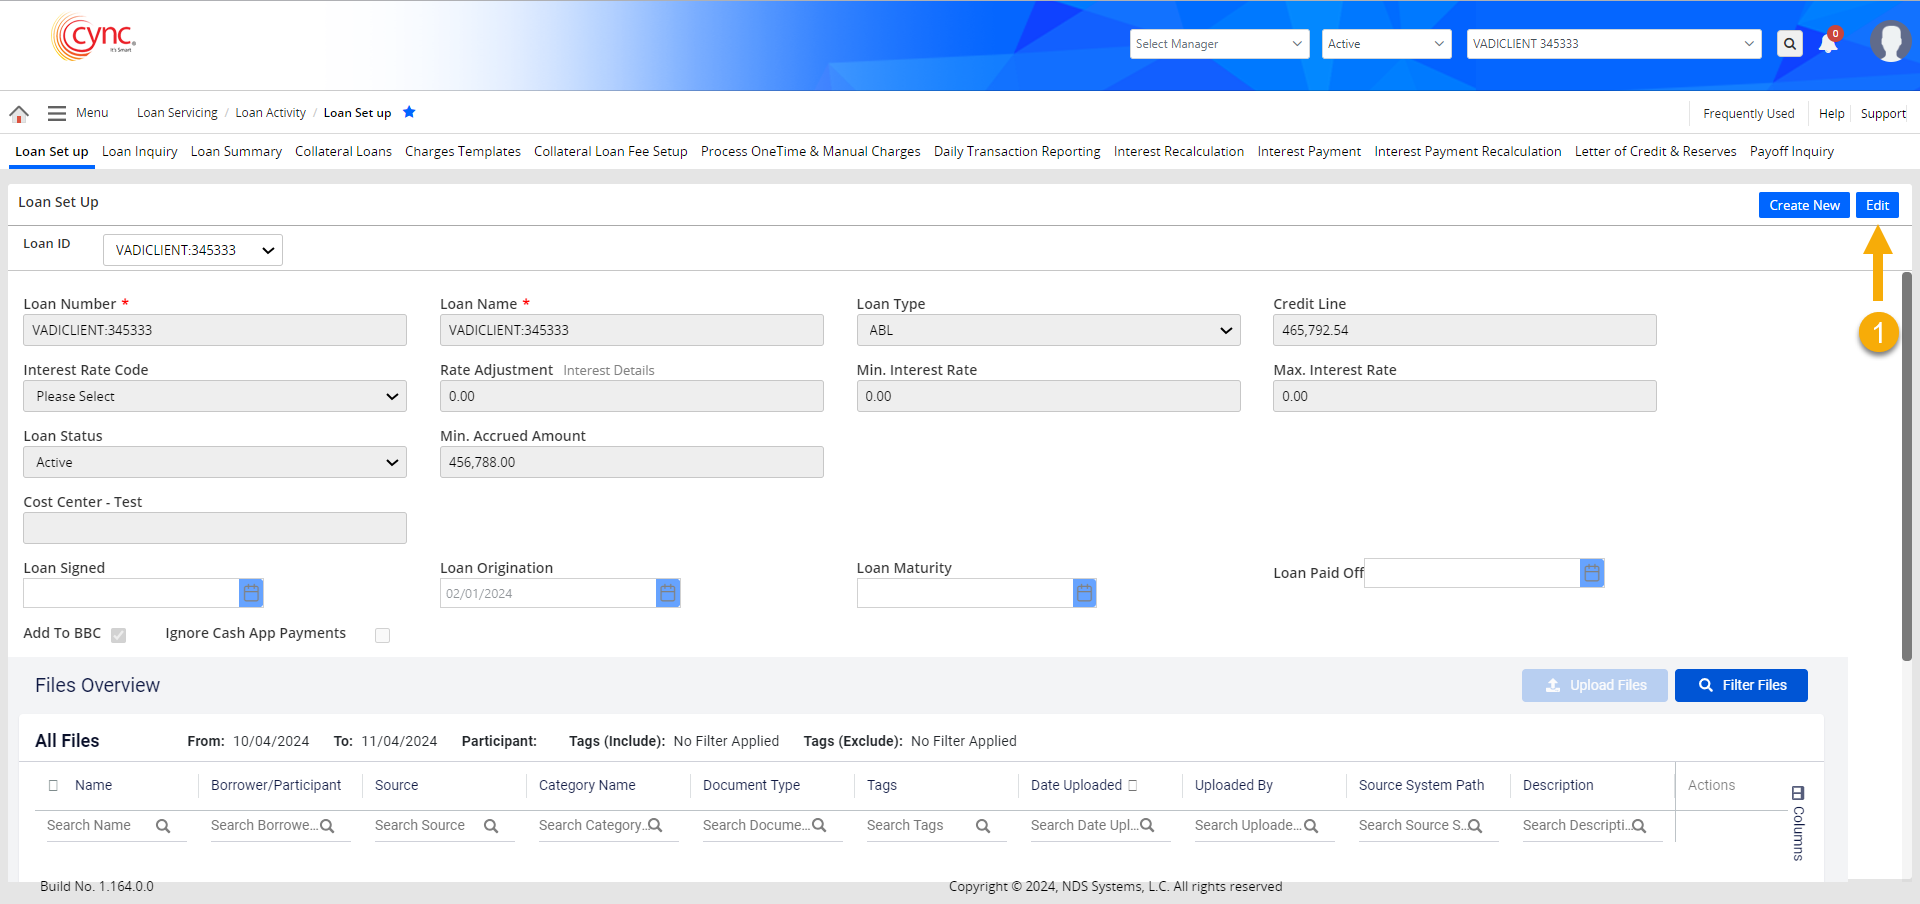
You can edit both ABL and Non-ABL Loans.
To edit the existing loan details, perform these steps:
1. Click the ![]() button to edit the ABL loan.
button to edit the ABL loan.
For Non-ABL Loans, select the non-ABL loan from Loan ID drop-down menu and click the ![]() button.
button.
2. Edit the fields that you want to edit.
3. Click the ![]() button if you want to cancel all changes done. A pop-up window appears.
button if you want to cancel all changes done. A pop-up window appears.
Refer to the screenshotRefer to the screenshot
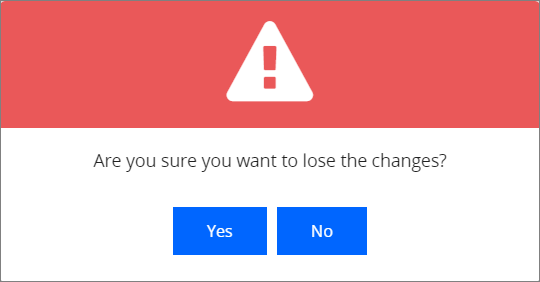
a. Click
button if you want to continue
the editing process. (or)
b.
Click button
if you want to cancel the editing process.
4. Click the ![]() button. The loan details are updated and the message "Loan Updated Successfully" appears.
button. The loan details are updated and the message "Loan Updated Successfully" appears.
Refer to the screenshot:
Upon editing the existing loan, the system logs the loan editing details on the Audit Log page.
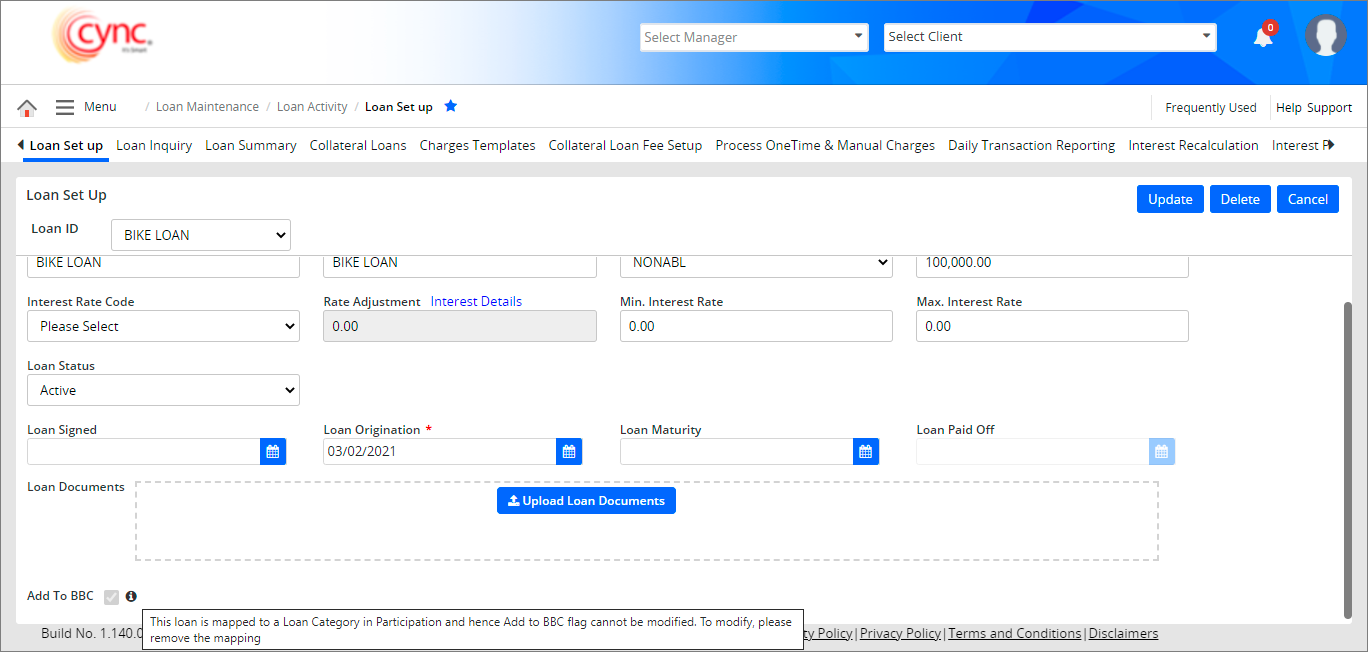
In Loan Set Up edit mode, the Add To BBC flag will be in the Read-Only state if the MCL loans are already mapped to either Collateral Loan/BBC or Collateral Loan/Non-BBC loan category through Map Loans under the Participation Loan Details page. Hence, the user cannot enable or disable the Add To BBC flag even in Loan Set Up edit mode.
Users can perform enable or disable action on the Add To BBC flag for MCL loans in any of the following cases:
If any MCL loans are mapped to either Collateral Loan/BBC or Collateral Loan/Non-BBC category through Map Loans under the Participation Loan Details page, an information ![]() icon will be displayed right to the Add To BBC flag in Loan Set Up edit mode.
icon will be displayed right to the Add To BBC flag in Loan Set Up edit mode.
On hovering the mouse pointer over the ![]() icon, the system displays the message as “This loan is mapped to a Loan Category in Participation and hence Add To BBC flag cannot be modified. To modify, please remove the mapping”.
icon, the system displays the message as “This loan is mapped to a Loan Category in Participation and hence Add To BBC flag cannot be modified. To modify, please remove the mapping”.
Refer to the screenshot:
By default, the Add To BBC flag will be in non-editable mode for the default ABL loan. Hence, the information ![]() icon will not be available for default ABL Loan even in edit mode.
icon will not be available for default ABL Loan even in edit mode.
You can delete only non-ABL loan accounts. You cannot delete the default ABL loan account.
You can view the ![]() button to delete the Non-ABL loans based on the settings done under Roles and Permissions page.
button to delete the Non-ABL loans based on the settings done under Roles and Permissions page.
To delete the Non-ABL loan, perform these steps:
1. In Loan ID field, select the non-ABL loan from the drop-down list.
2. Click the ![]() button. A pop-up message “Are you want to delete the loan?” appears. Refer to the screenshotRefer to the screenshot
button. A pop-up message “Are you want to delete the loan?” appears. Refer to the screenshotRefer to the screenshot
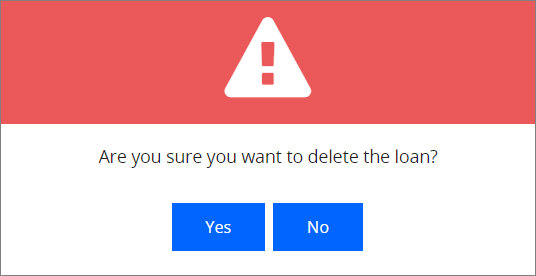
3. Click the button if you want to cancel the loan account deletion process. (or)
4. Click the button to delete the loan account. The non-ABL loan account is deleted successfully and BBC recalculation is triggered automatically. A success message “Loan deleted successfully and triggered BBC recalculation” appears.
Refer to the screenshot:
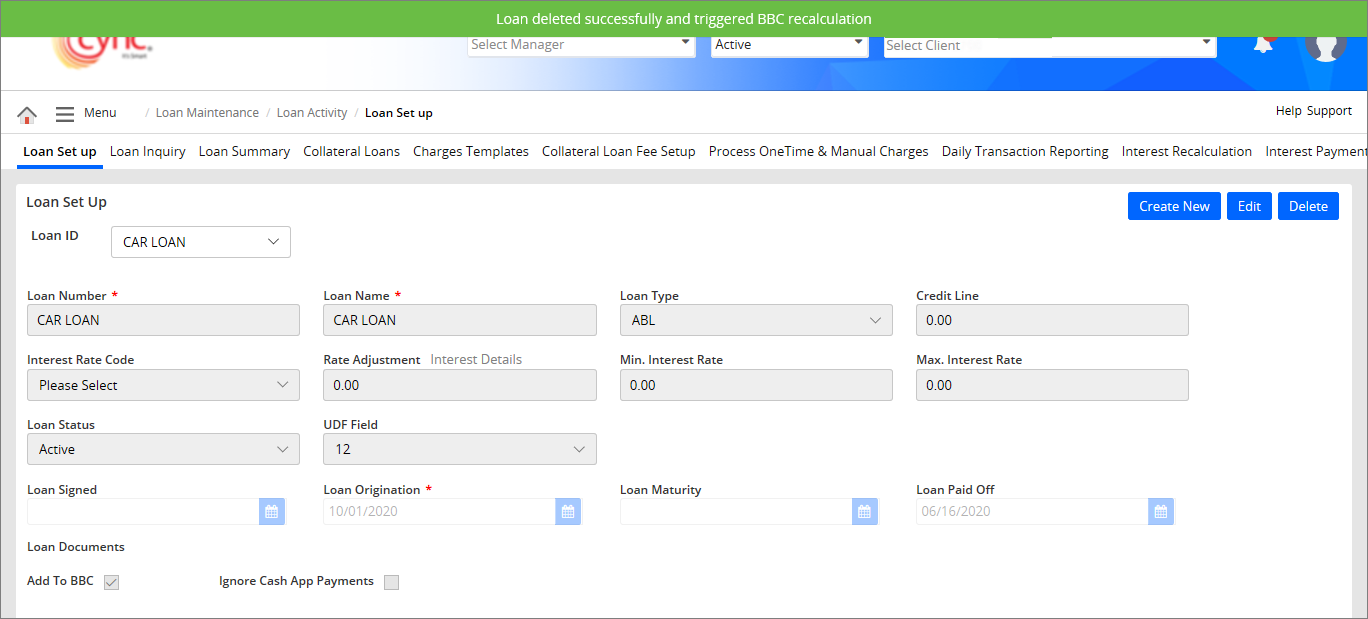
Upon deleting the non-ABL loans, the system deletes the respective loan ID in the Loan Set Up page, Loan Summary page, Collateral Loans page, Charges Templates page, Process One Time & Manual Charges page, Interest Payment page and BBC Availability page. The system logs the loan deletion details in the Audit Log page.
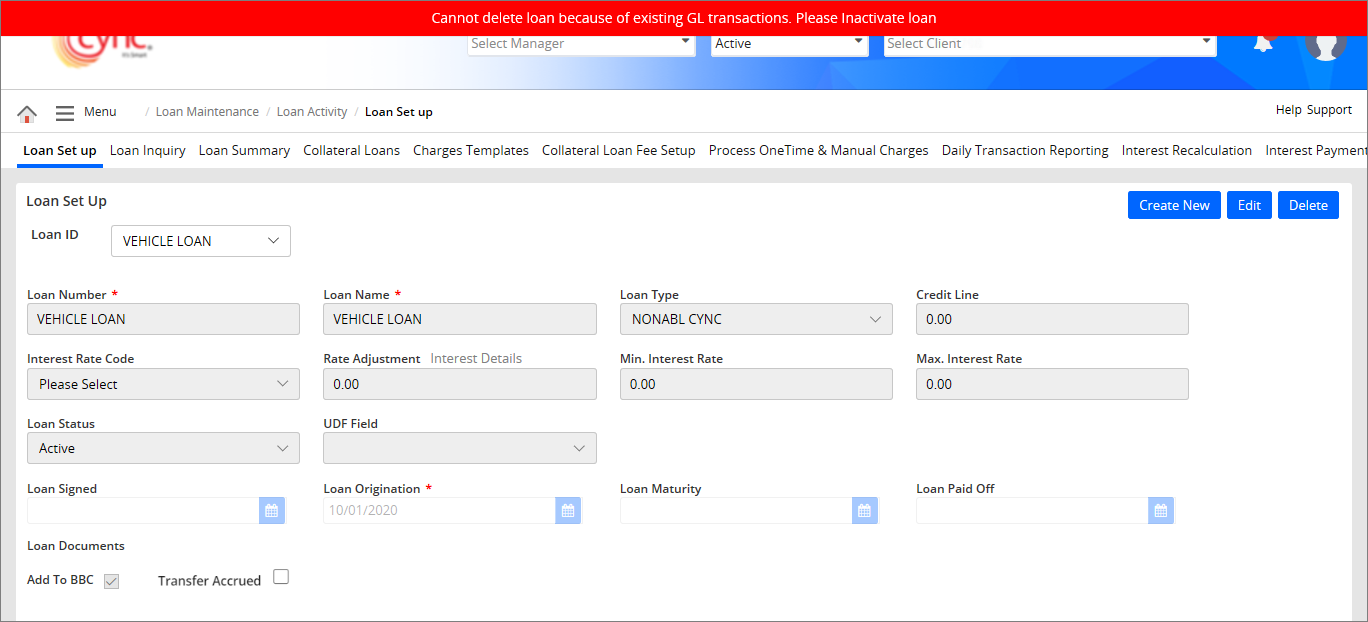
The system shows an error notification when you delete the loan account in the following conditions.
Refer to the screenshot:
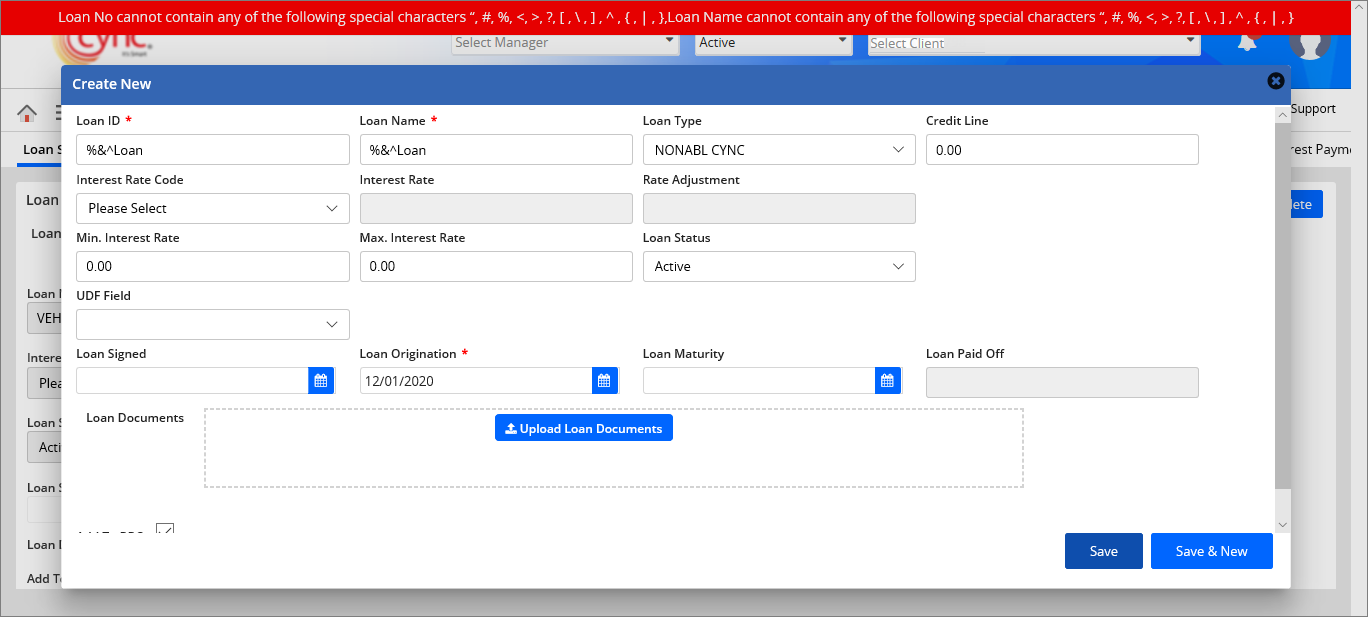
If the user enters special characters in the Loan No and Loan Name field, then the system shows an error notification.
Refer to the screenshot:
To upload the Loan Documents, perform these steps:
1. In Loan Documents field, Click the ![]() button.
button.
2. Select the file that you want to upload.
3. Click the button to upload, save and create new loan simultaneously. (or)
4. Click the  button. The loan documents are updated successfully and a message “Loan Updated Successfully” appears.
Refer to the screenshot:
You can click the ![]() button and click
button and click  icon in Loan Documents fields to delete the uploaded loan documents. The uploaded loan document is deleted and a success message "File Deleted Successfully" appears.
You may view the uploaded documents under Document Management page.
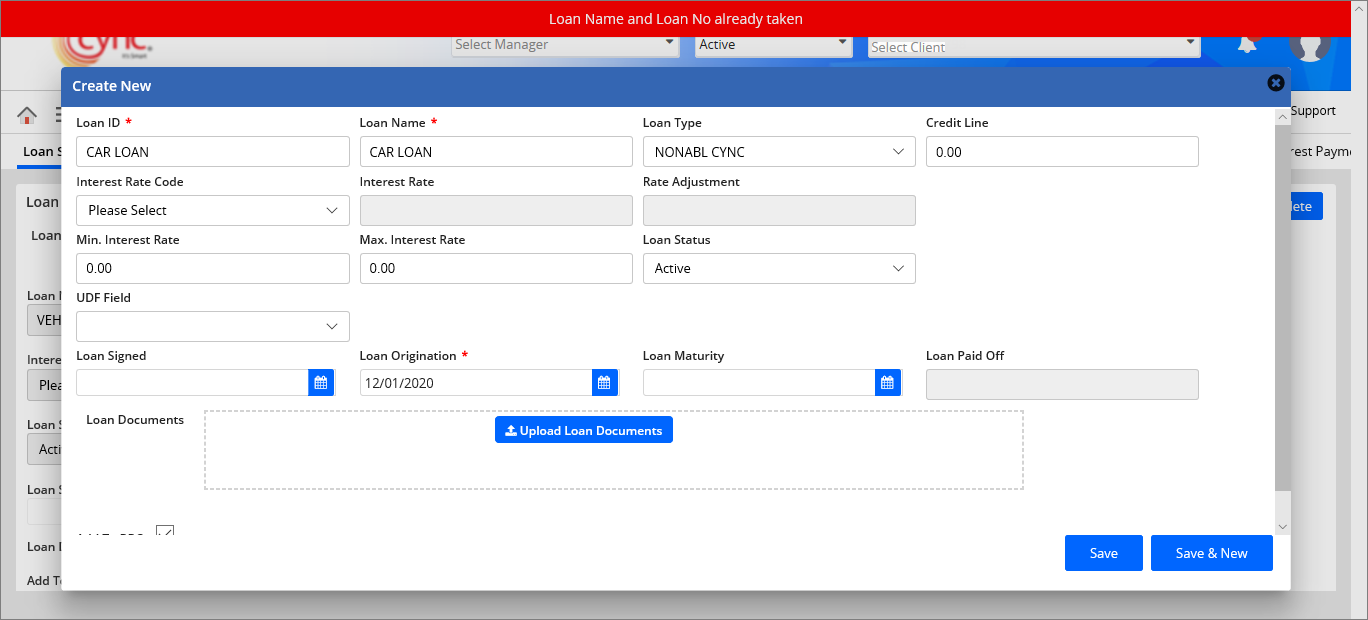
You may use the same loan names for different clients while creating the multiple loan accounts. If you use the same loan names for the same client while creating the multiple loan accounts, then system shows an error notification.
Refer to the screenshot:
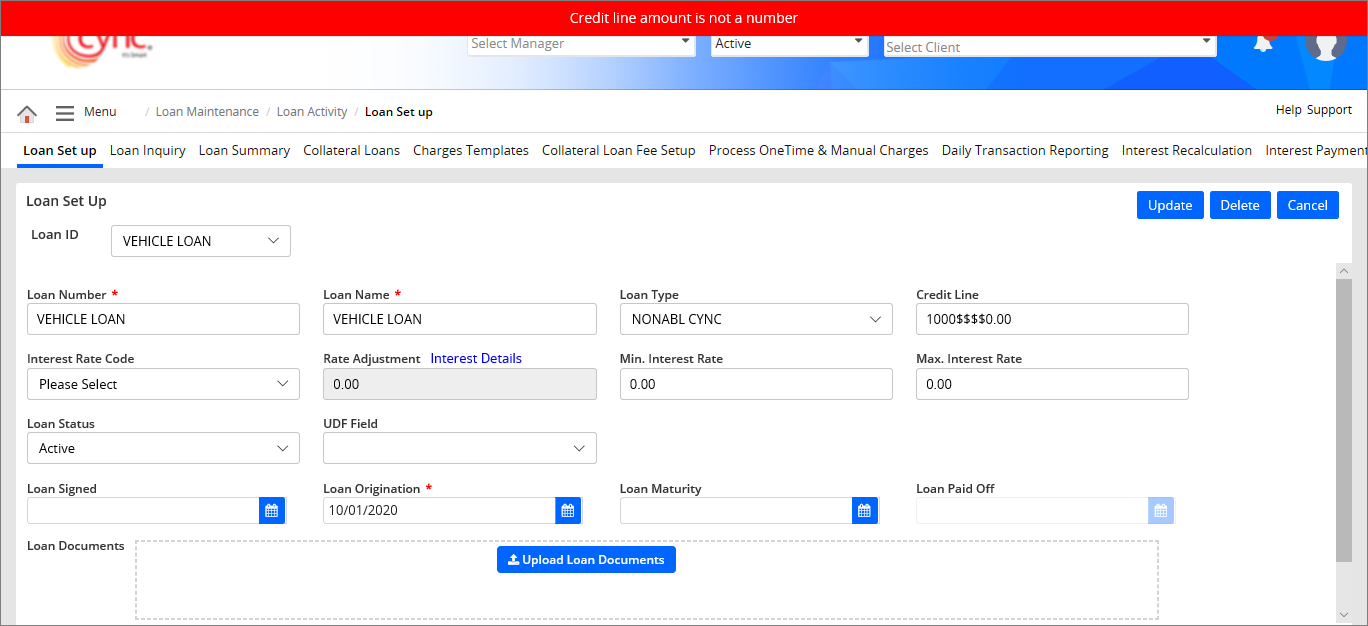
If a user enters any special characters in the Credit Line field, then the system shows an error notification.
Refer to the screenshot:
The Loan Set Up page has a scheduler feature, where users can set a schedule for the credit line, allowing the credit line value to update automatically by the cron job on the scheduled date.
Users can also be able to update/stop the existing schedules.
The scheduler is available to configure for both the ABL and MCL loans.
You can summon the credit line scheduler from the Loan Set Up page via the edit mode.
Refer to the screenshot:
You can follow the below steps to schedule a credit line for a loan.
1. On the Loan Set Up page, click the  button.
Refer to the screenshot:
2. The previous action will put the Loan Set Up page on edit mode.
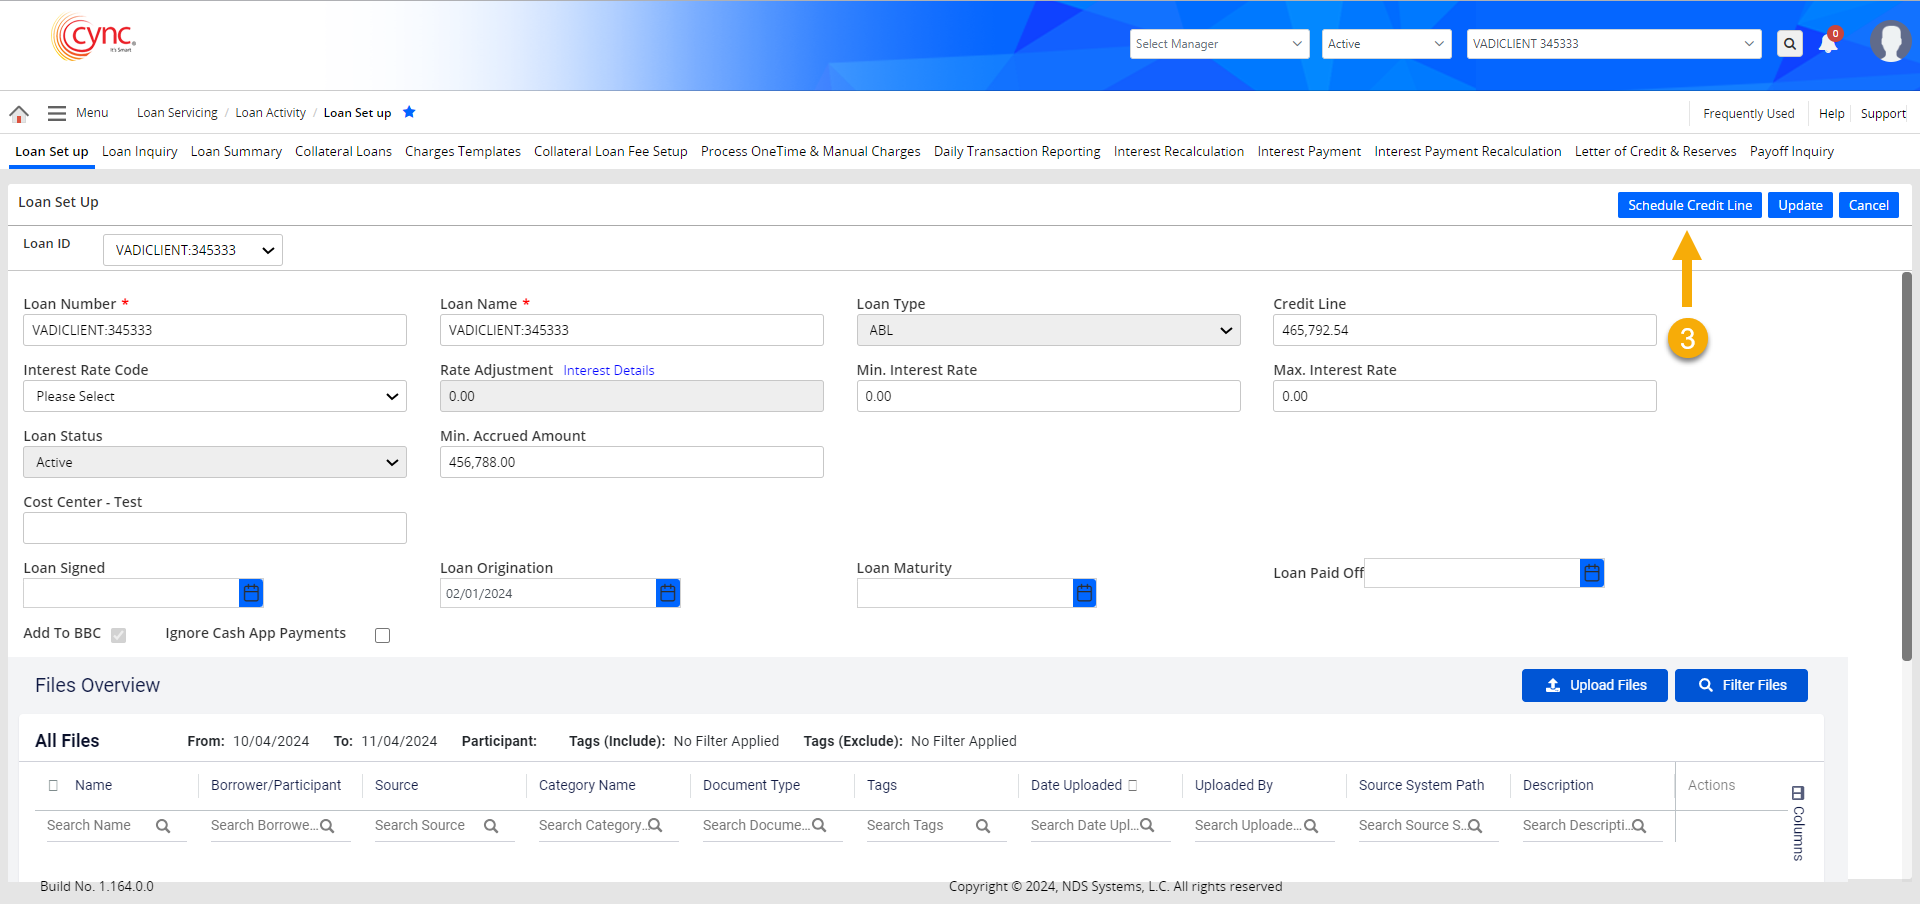
3. Now, click the  button to summon the credit line scheduler.
Refer to the screenshot:
4. You can schedule the recurrence pattern (The frequency of updating the credit line value) in the following 2 ways:
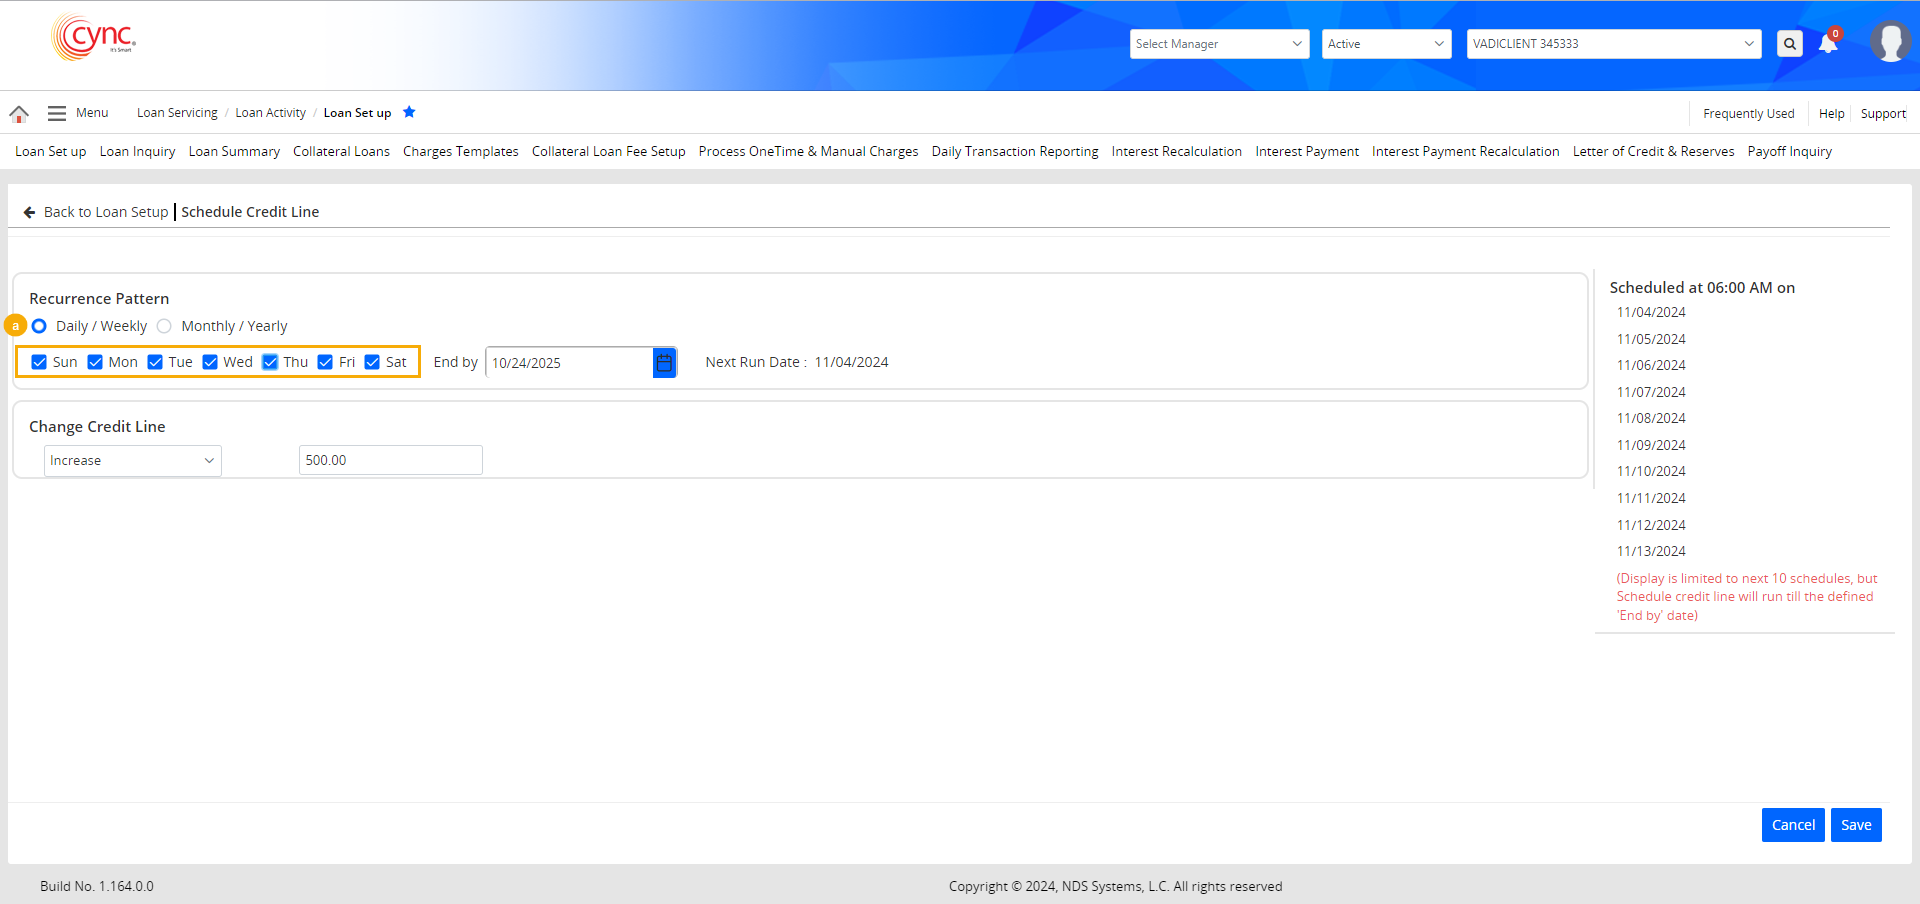
a. Daily / Weekly:
i. Select the recurrence pattern as Daily / Weekly, and select all the days of the week to update the credit line daily. The Daily / Weekly option starts on Sunday and ends on Saturday.
 Monday and Tuesday are selected by default.
Refer to the screenshot:
Here, the credit line gets updated every day of the week until the specified End By date.
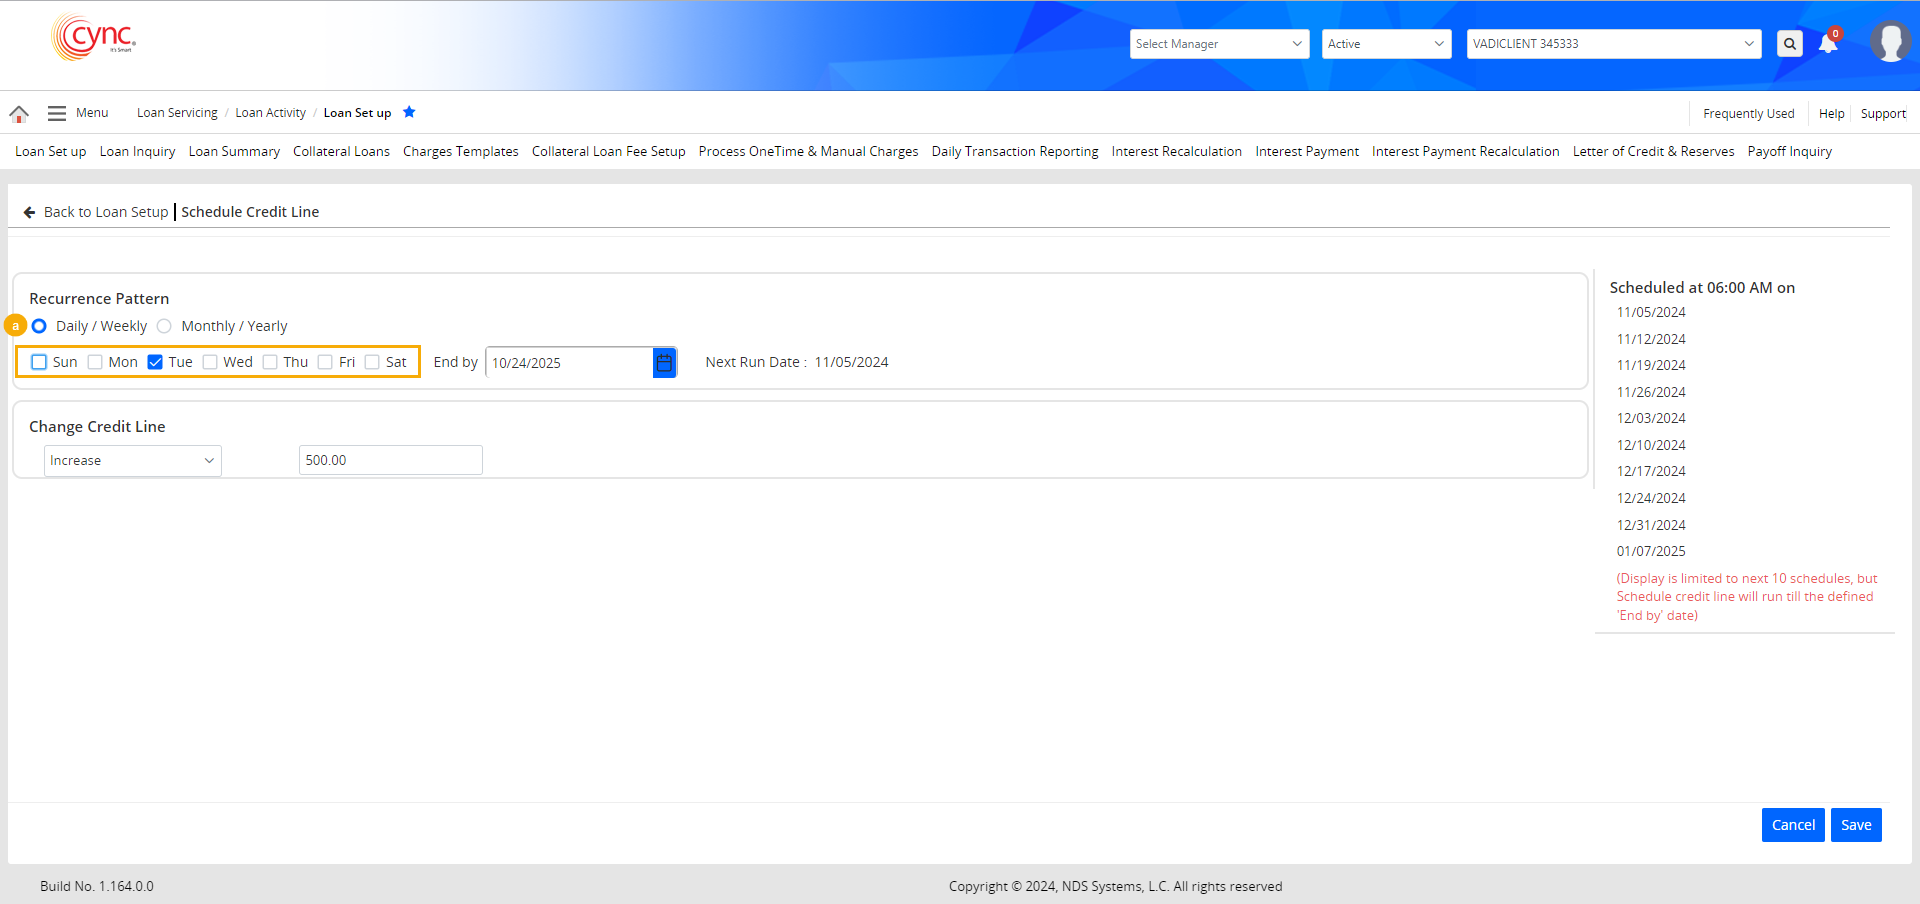
ii. Select the recurrence pattern as Daily / Weekly, and select a specific day of the week to update the credit line on that day each week.
Refer to the screenshot:
Here, the credit line gets updated every Tuesday of the week until the specified End By date.
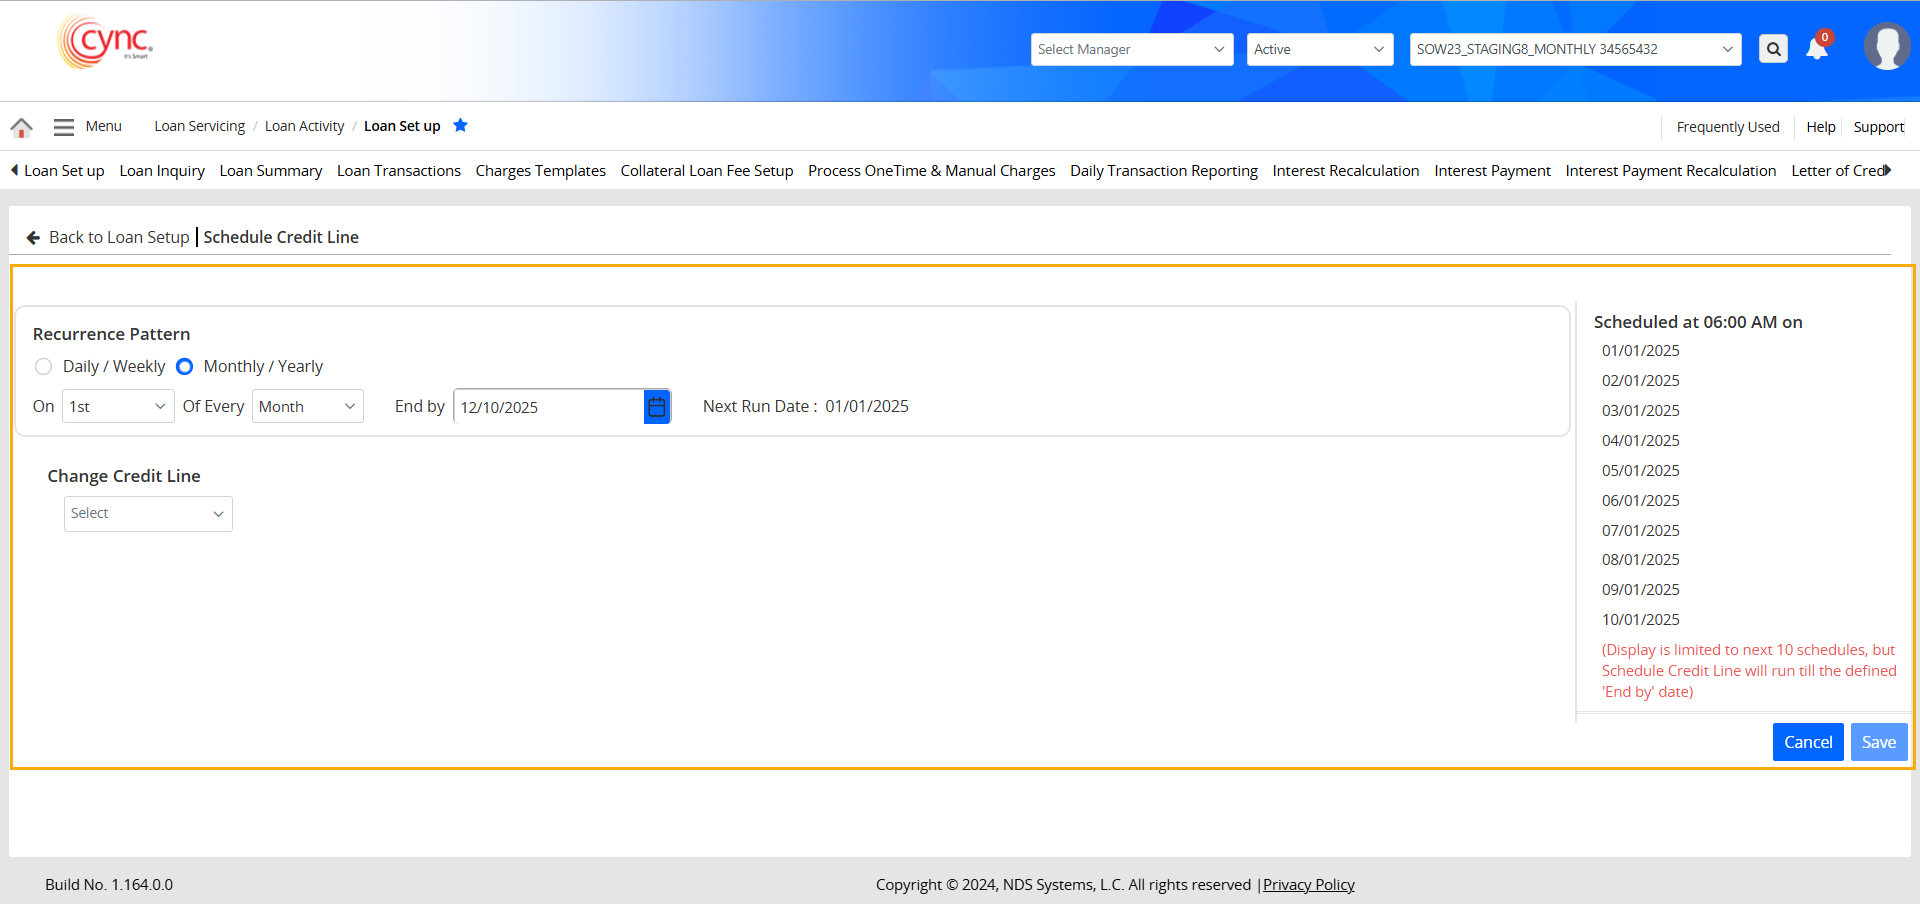
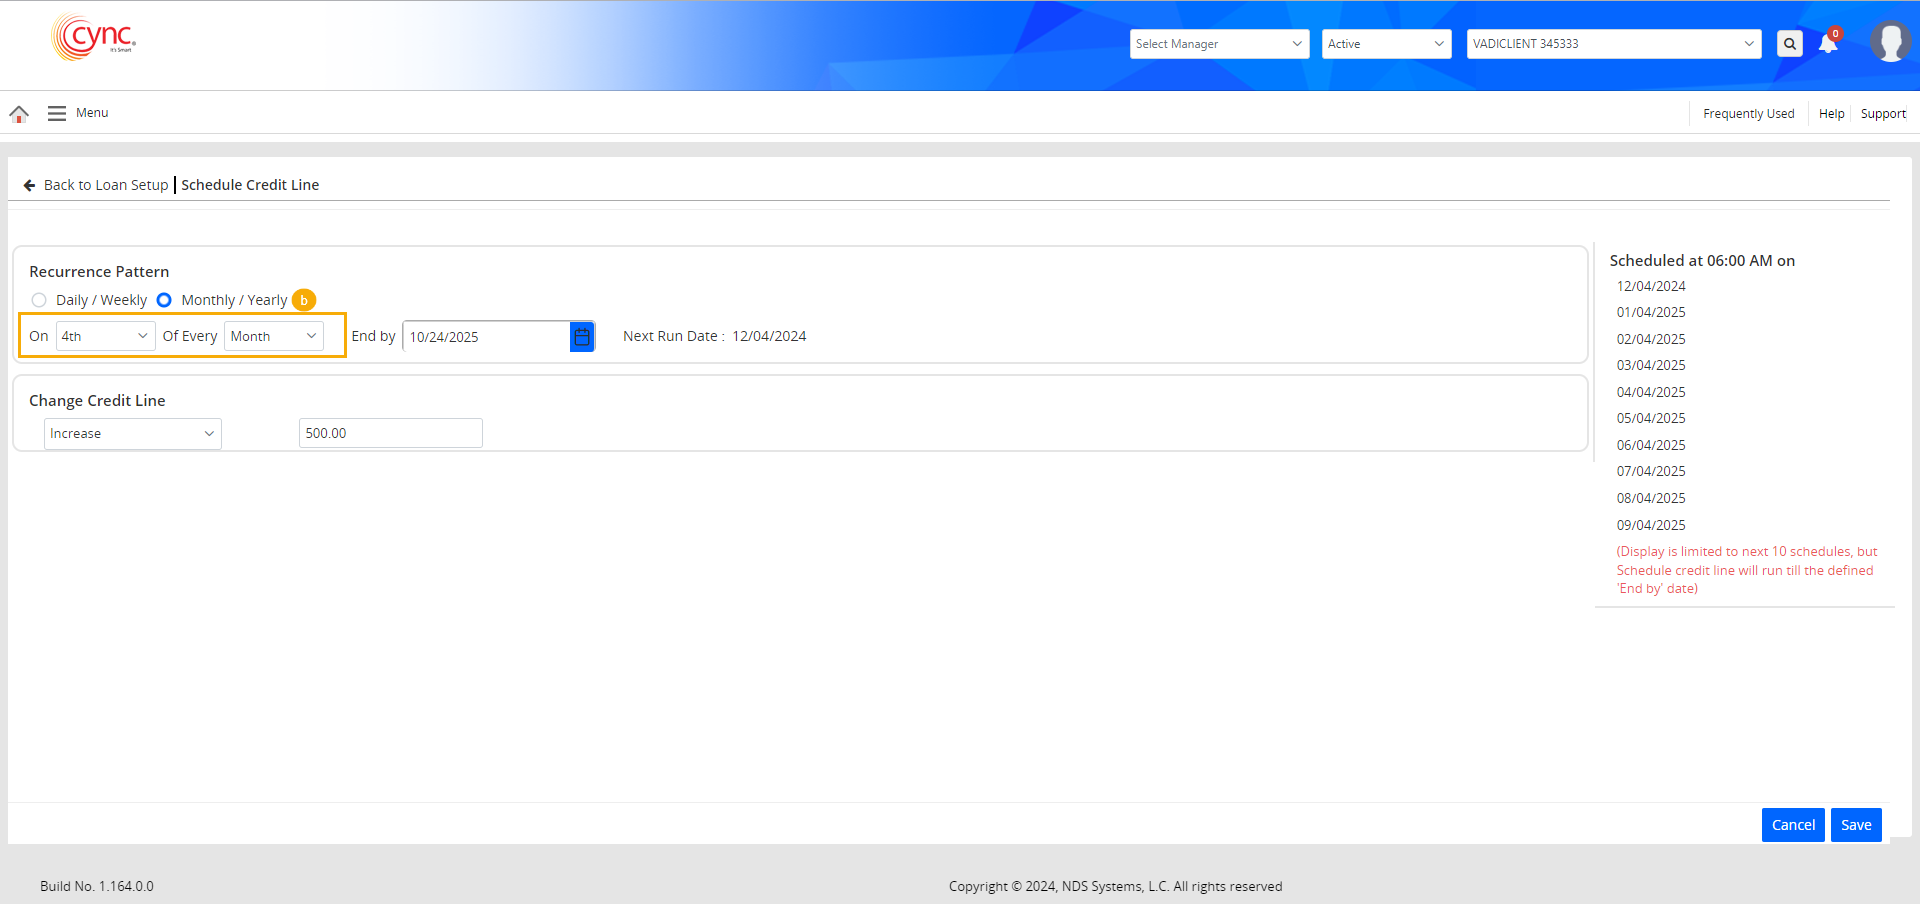
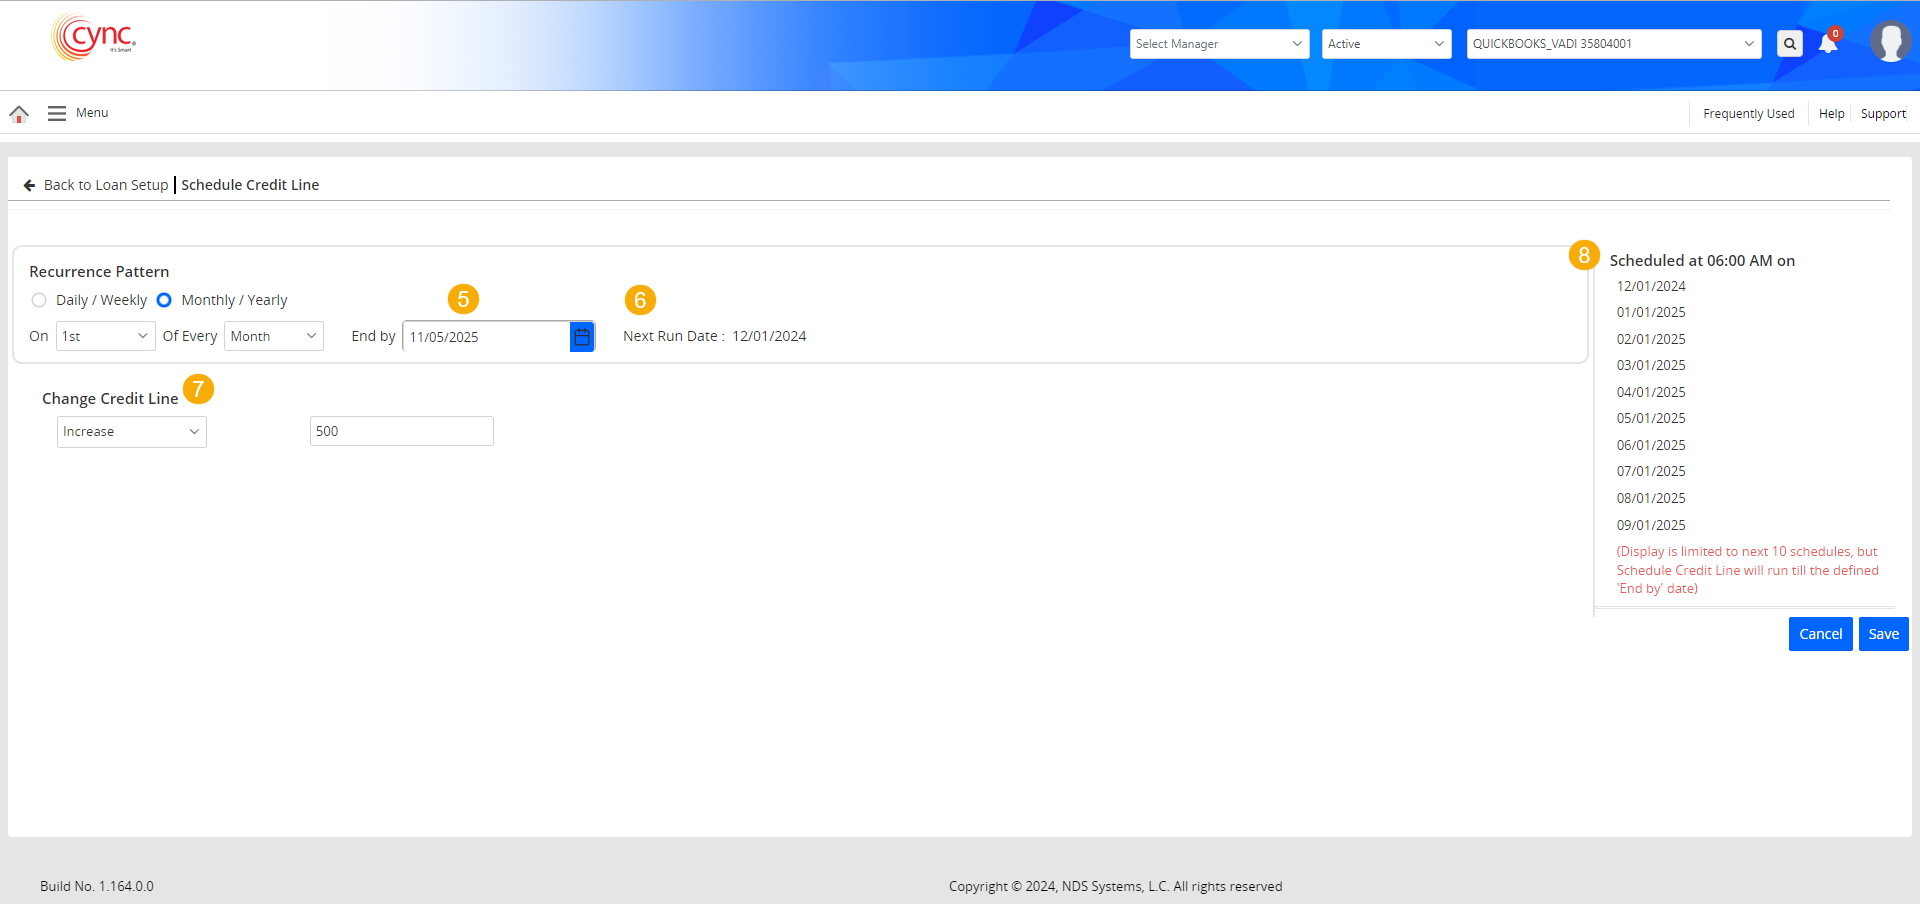
b. Monthly / Yearly: The Monthly / Yearly recurrence pattern is selected by default.
i. Select the recurrence pattern as Monthly / Yearly, and select Month to run the schedule every month on the selected date. The Monthly / Yearly option starts from 1st of the month till the last day of the month.
1st of Every Month is selected, by default,.
Refer to the screenshot:
Here, the credit line gets updated every month on the selected date until the specified End By date.
ii. Select the recurrence pattern as Monthly / Yearly, and select the name of a month to run the schedule once a year on the selected date.
Refer to the screenshot:
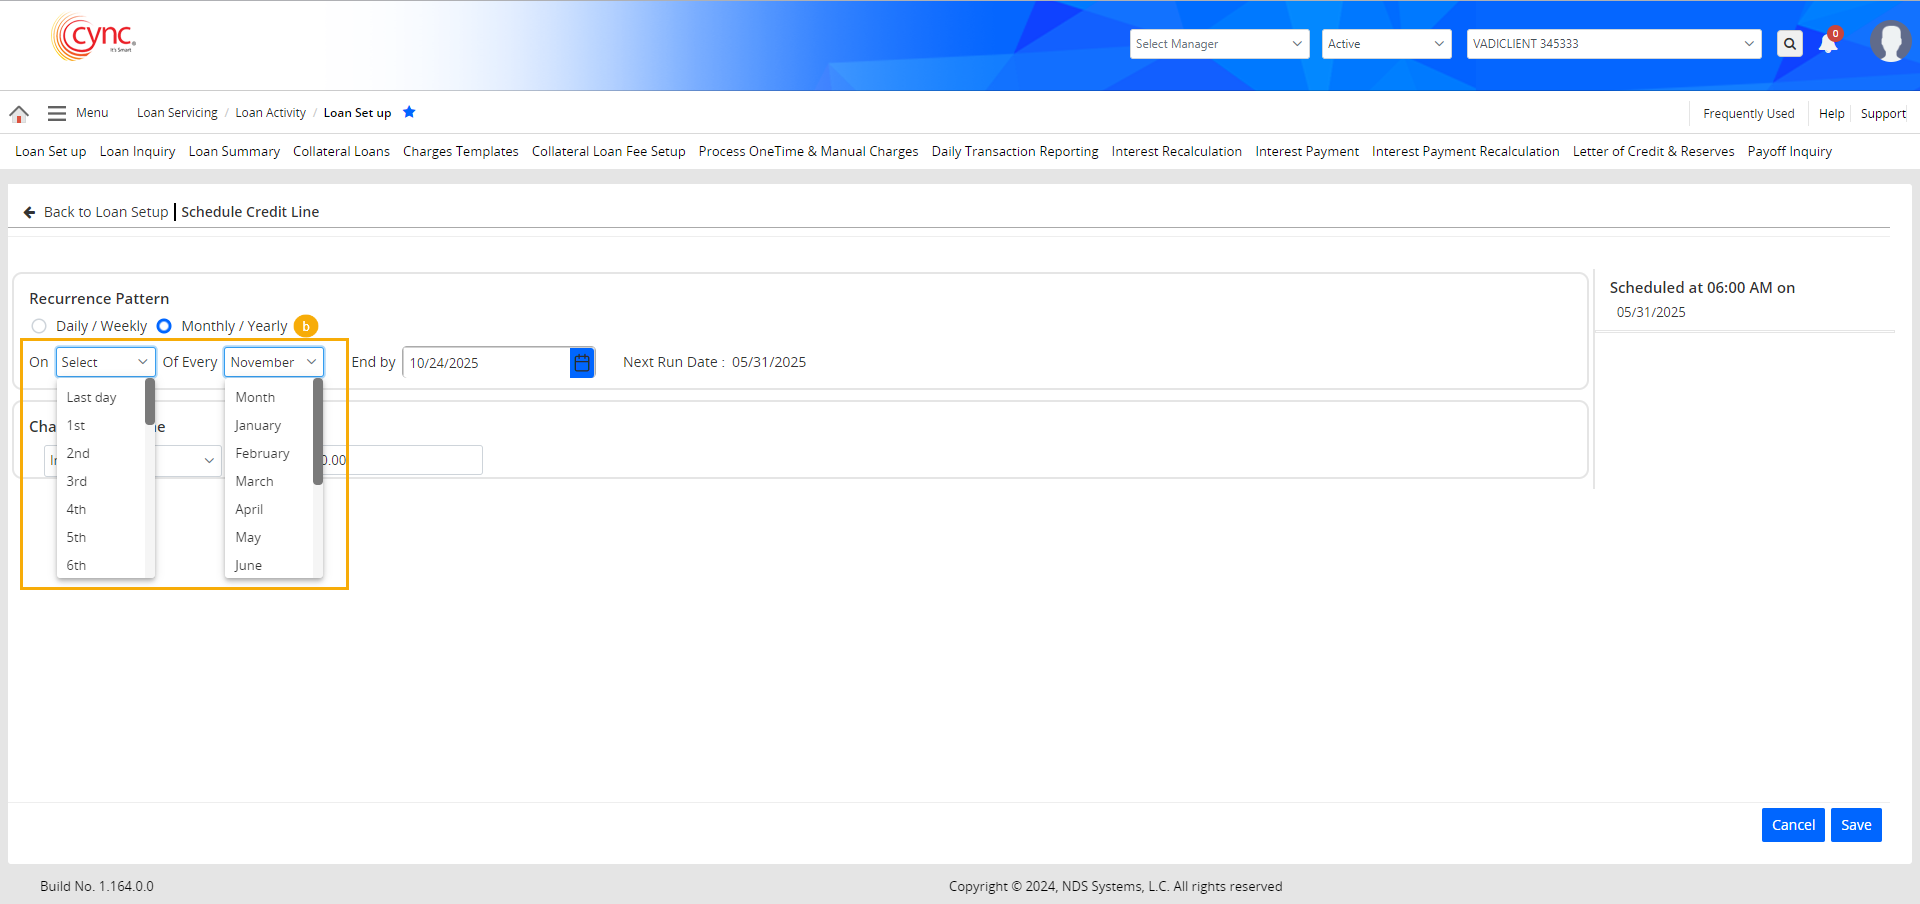
Selecting the "Last Day" will update the credit line on the last day of the selected month or on the last day of every month.
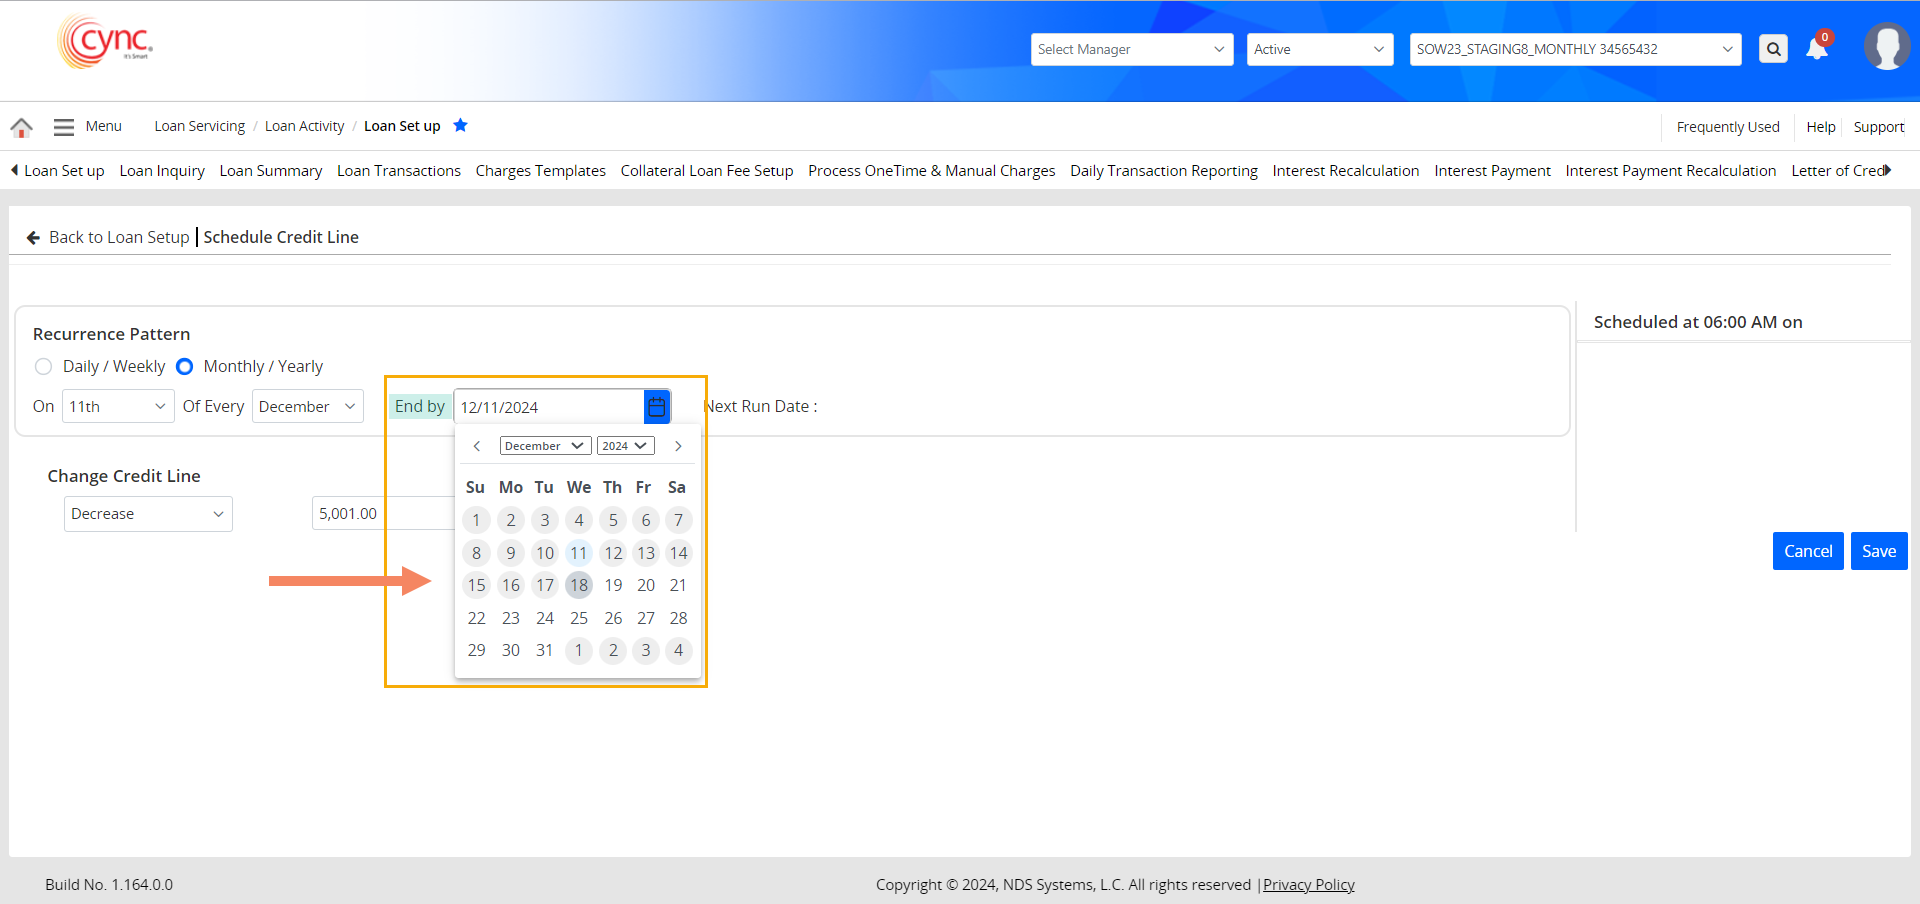
5. The End By field lets users specify a date until which the system updates the credit line according to the defined recurrence pattern. After this date, the pattern will no longer run.
The End By date must be greater than equal to the current date.
End By dates that are earlier than the current date are grayed out and cannot be selected.
Refer to the screenshot:
6. The Next Run Date displays the scheduled date for the next credit limit update according to the defined recurrence pattern.
7. The Change Credit Line field helps increase or decrease the credit line value. Users can define a value by which the credit line increases or decreases on the scheduled date.
For Example:
If the Credit Line is set to increase or decrease by $500 on the scheduled date of 10 Dec, 2024, the total Credit Line gets increased or decreased by $500, on 10 Dec, 2024, once the corn job runs.
The Change Credit Line field accepts only numbers greater than 0. Entering a value less than 0 triggers a validation failure.
Refer to the screenshot:

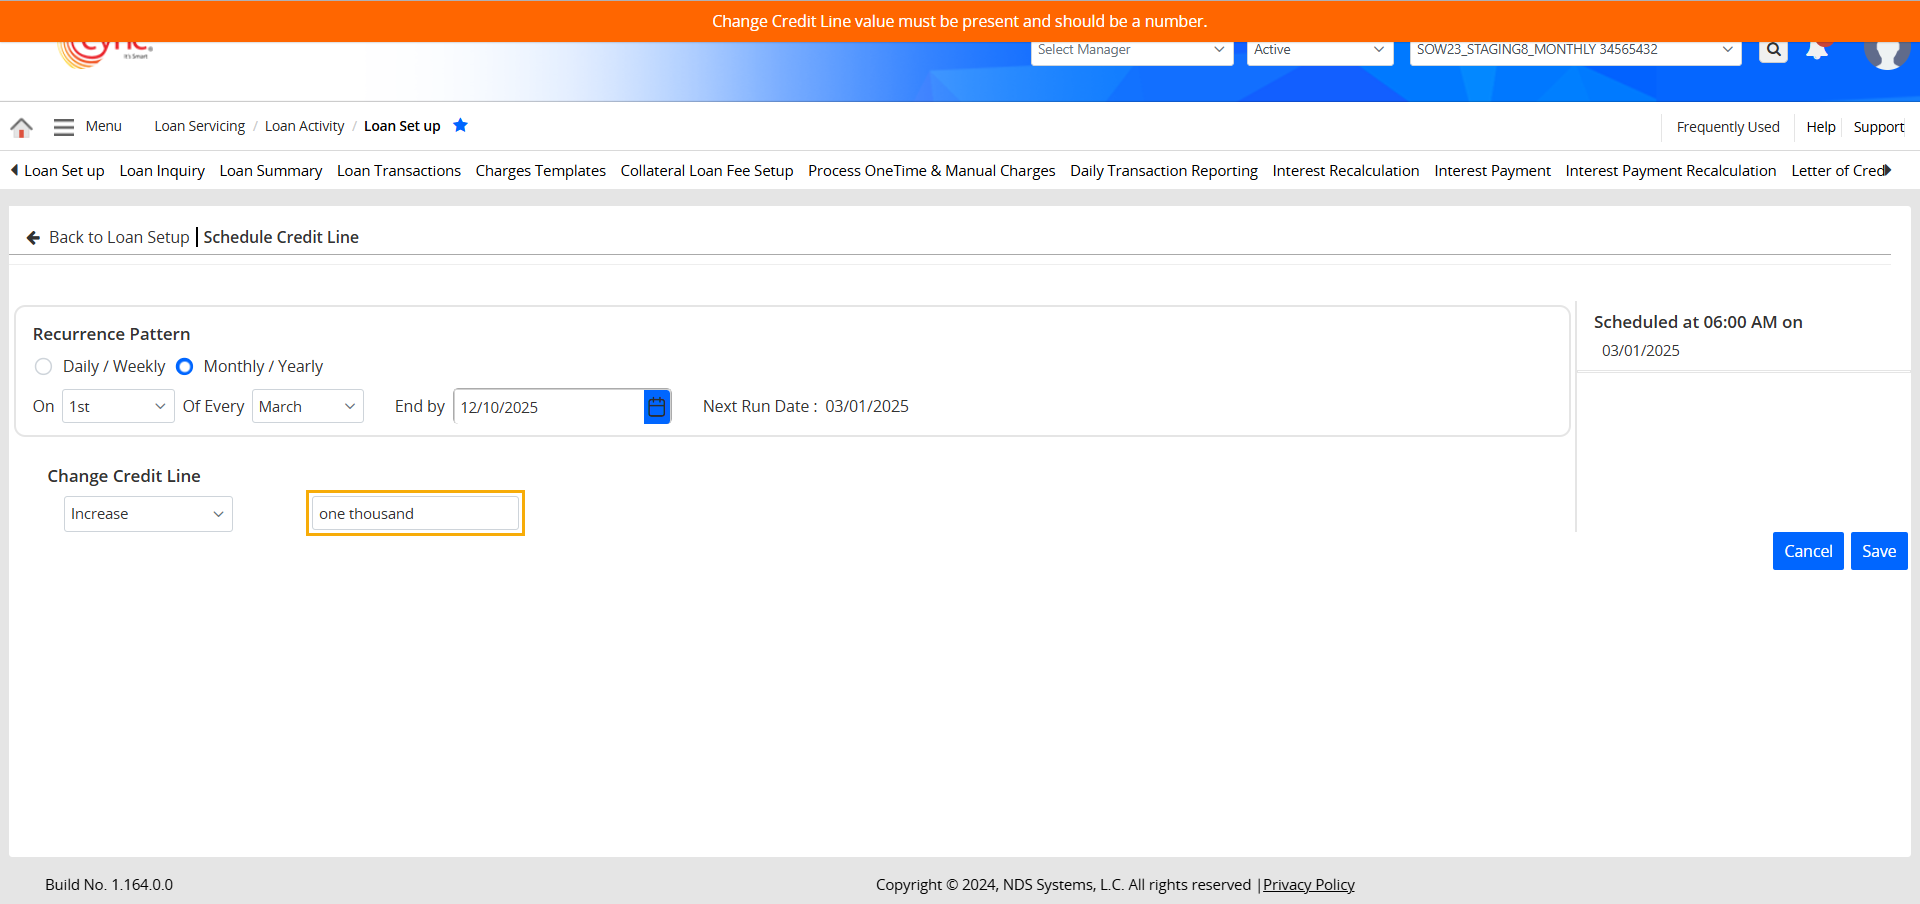
The Change Credit Line field rejects alphabetical inputs, causing a validation failure for any such entries.
Refer to the screenshot:
8. The Schedule Timeline section displays a list of the next 10 schedules, based on the configured Schedule Run Time and Recurrence.
The Schedule Timeline section only displays up to 10 scheduled dates.
If there are more than 10 scheduled dates, a message will be displayed stating "Display is limited to next 10 schedules, but Schedule Credit Line will run till the defined 'End by' date", as shown in the below image.
Refer to the screenshot:
9. Click the ![]() button to save the schedule. The create/update schedules will be logged on the Audit Log page, under the Schedule Credit Line program.
button to save the schedule. The create/update schedules will be logged on the Audit Log page, under the Schedule Credit Line program.
10. You may cancel the schedule by either clicking the ![]() button or clicking on the Back to Loan Set Up page button.
button or clicking on the Back to Loan Set Up page button.
On the confirmation prompt click the ![]() button to abort the cancel action Or click the
button to abort the cancel action Or click the ![]() button to proceed with the cancel action.
button to proceed with the cancel action.
Refer to the screenshot:

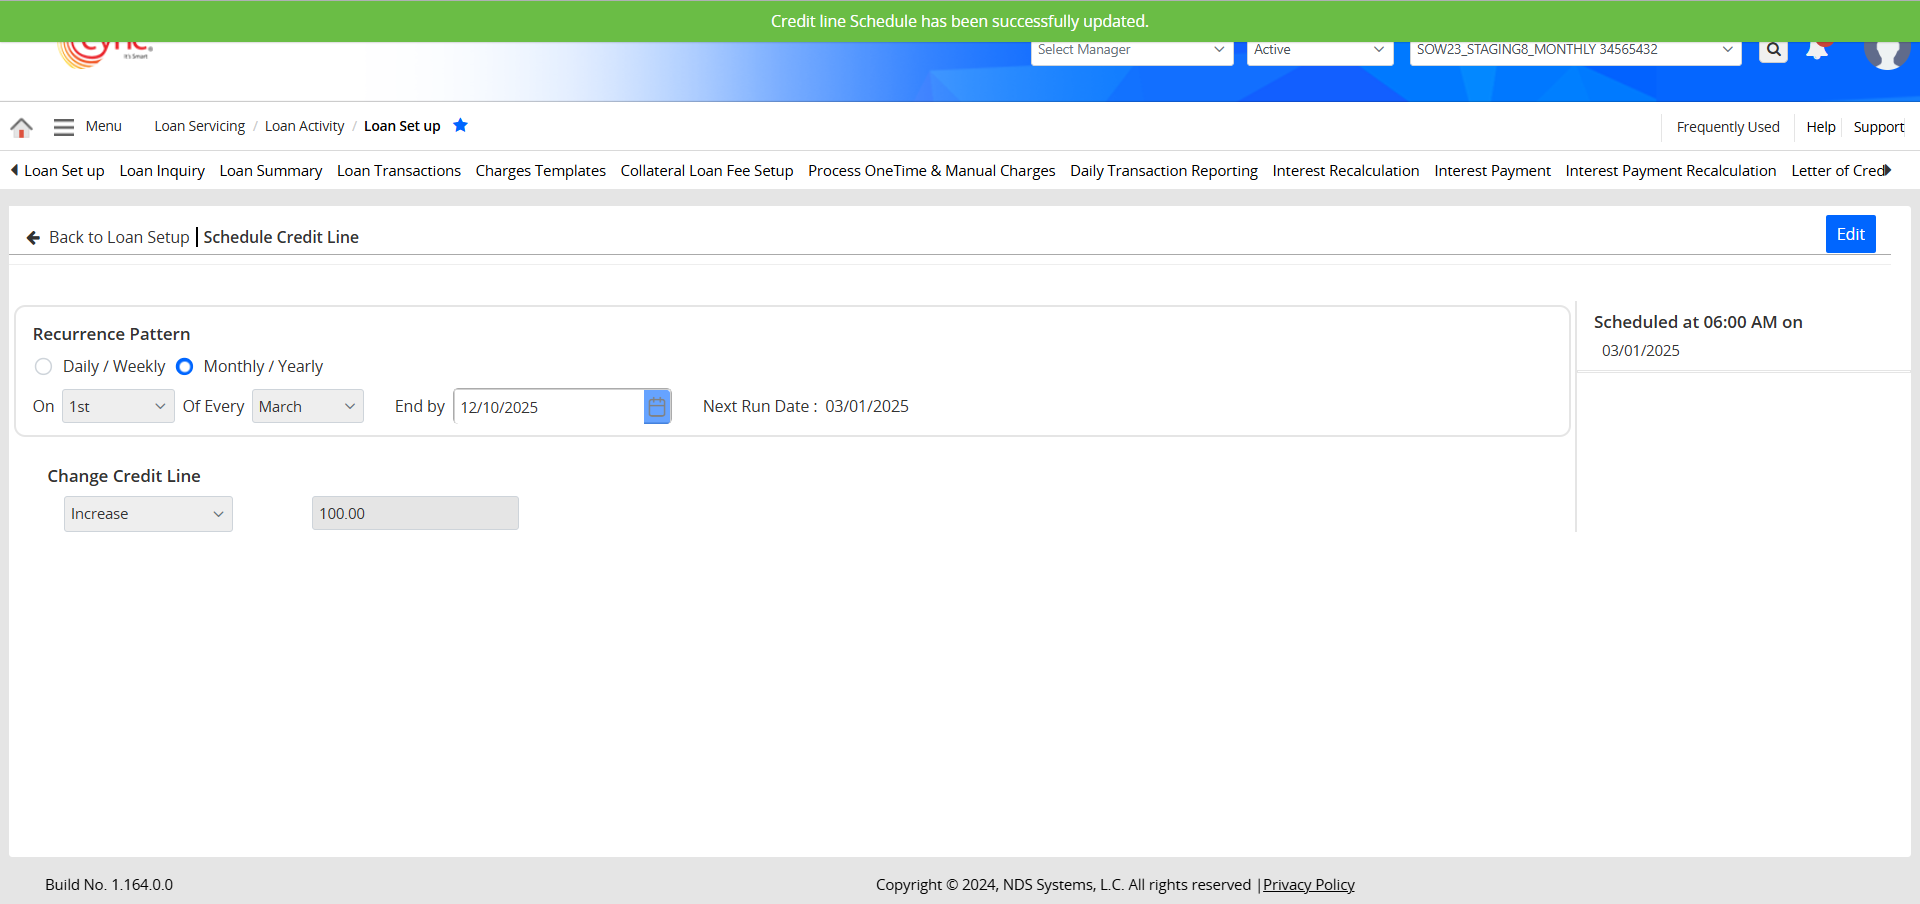
11. The system provides a success message once a schedule is set for the first time.
Refer to the screenshot:

12. The system provides a success prompt after every successful update made to an existing schedule.
Refer to the screenshot:
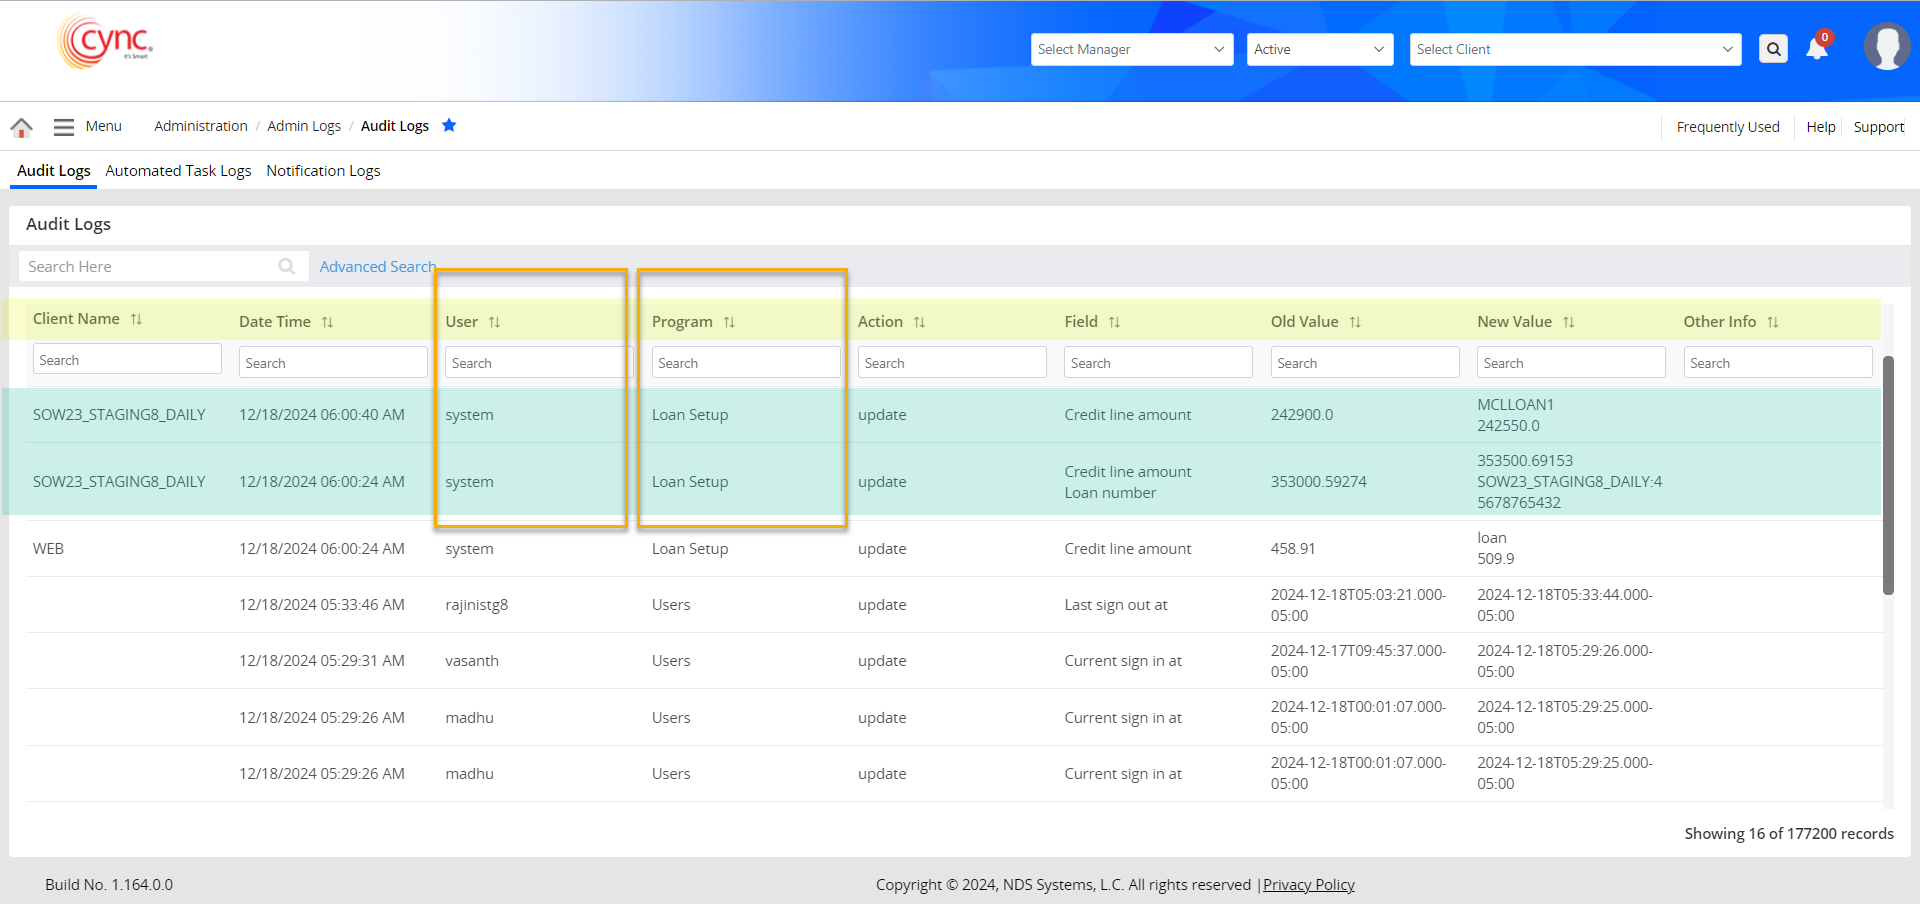
13. When a credit line schedule is executed, the updated credit line value is recorded on the Audit Log page under the Loan Setup program, with "System" listed as the user, applicable for both ABL and MCL loans.
Refer to the screenshot:
14. The credit line value is also updated on the pages and fields below.
For approved BBC, the Credit Line value will not be updated in the history pages.
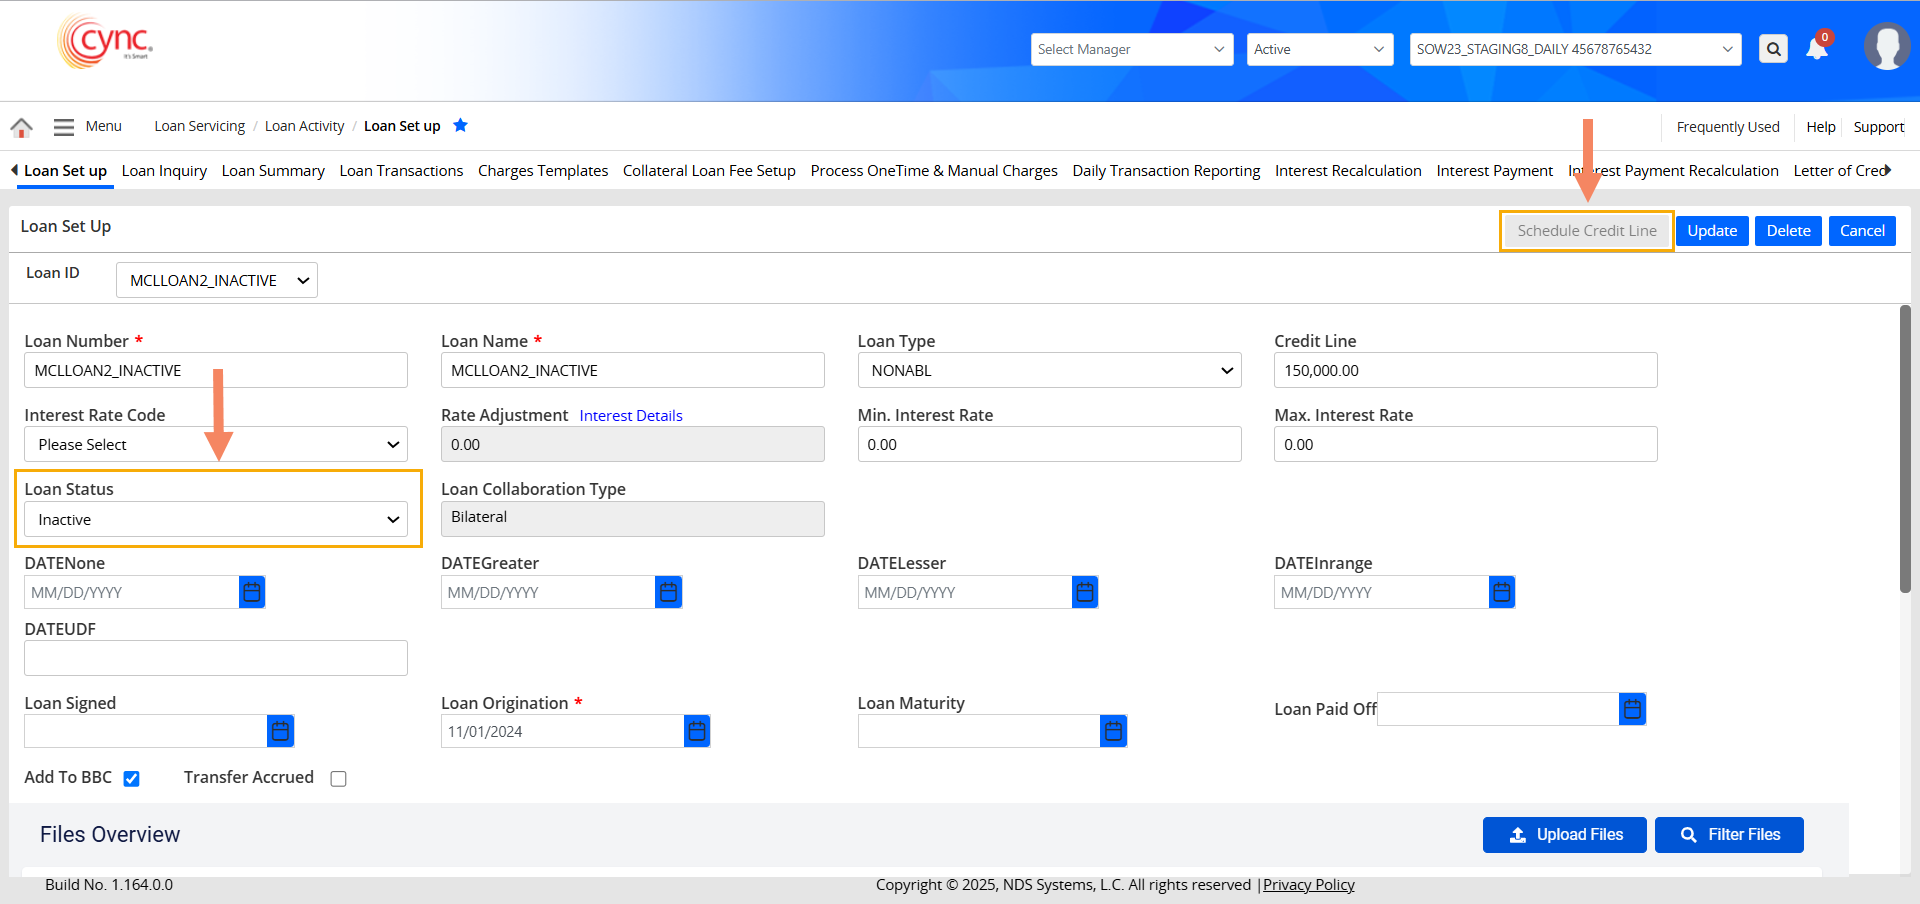
If the Loan Status is Inactive on the Loan Set up page, users are not allowed to schedule a credit line. The ![]() button will be disabled for the MCL Loan in this case.
button will be disabled for the MCL Loan in this case.
Refer to the screenshot:
If the Client is Inactive on the Basic Client Detail page, users are not allowed to schedule a credit line.
Refer to the screenshot:
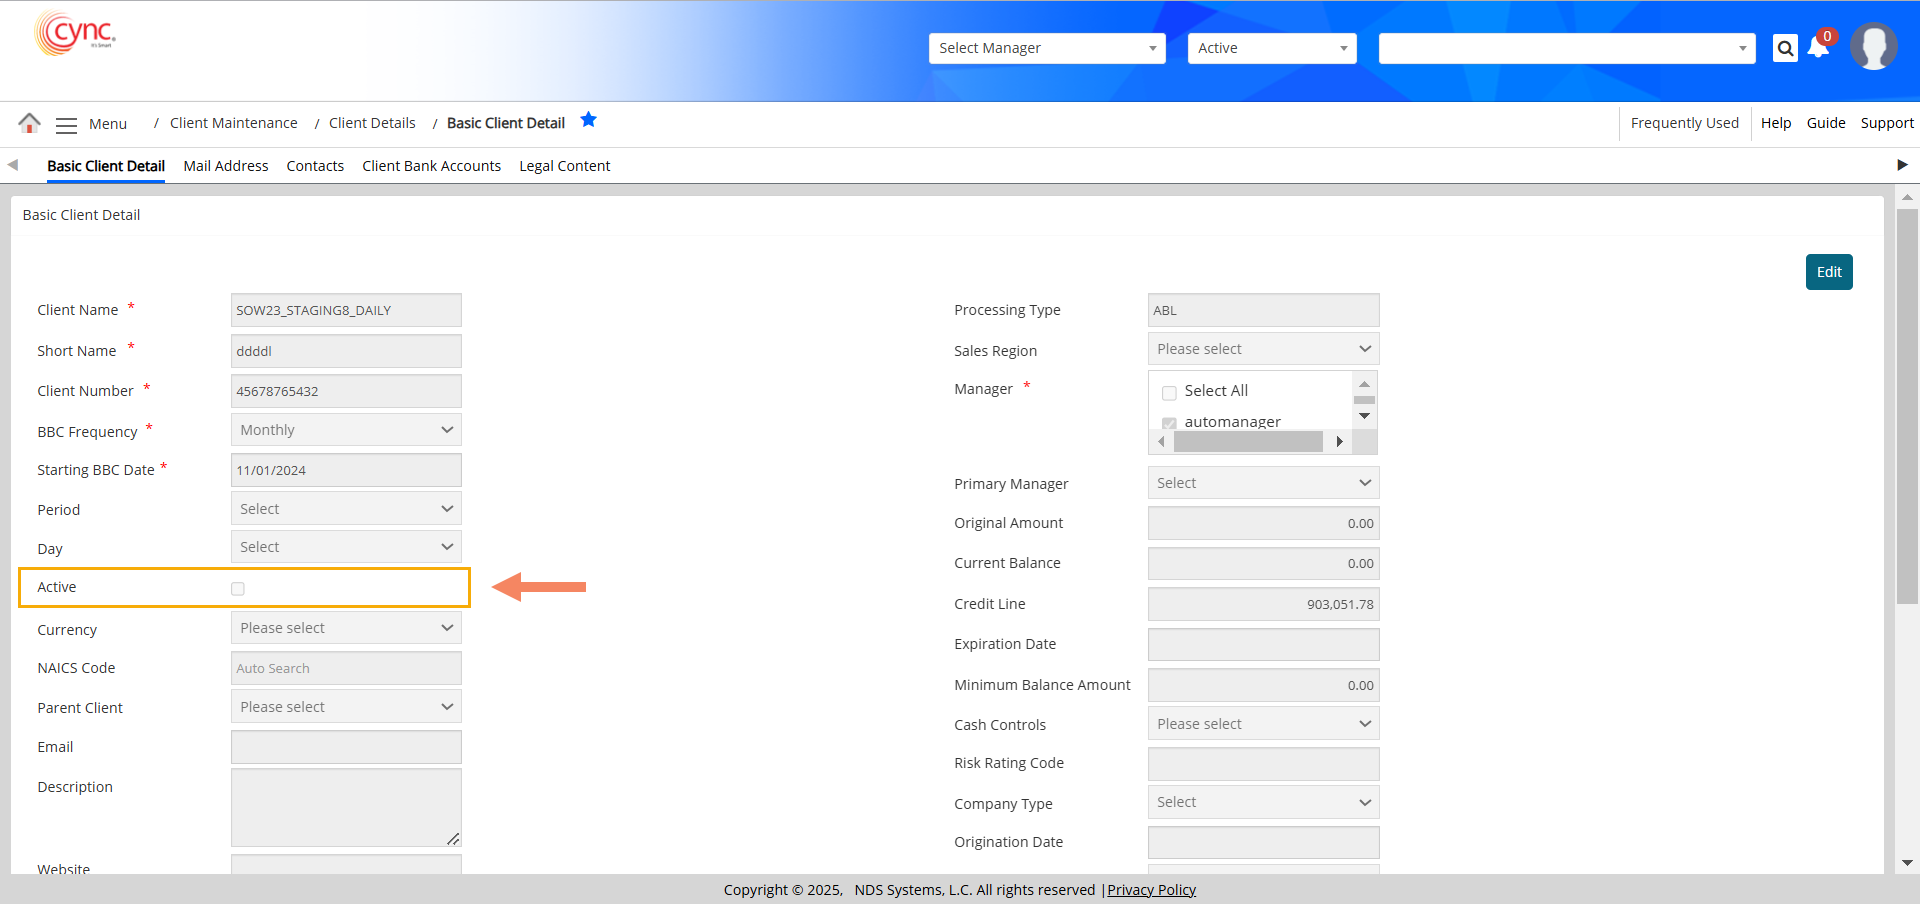
The ![]() button will be disabled for both MCL and ABL Loans in this case.
button will be disabled for both MCL and ABL Loans in this case.
Refer to the screenshot:
If the Scheduled Credit Limit is more than the Actual Credit Limit, the resulting value must be 0(Zero). The Credit Line value can't be negative.
Fields and Descriptions:
|
Fields |
Descriptions |
|
Recurrence Pattern |
Dock to set up schedules. Schedules can be set up to run daily, weekly, monthly, or yearly. |
|
Change Credit Line |
The Value field adjusts the credit line by increasing or decreasing it based on the input value. |
|
Schedule Timeline |
Displays the next 10 scheduled runs. |